Become A Sponsor
|
Why Ads
Making & Using a Fire-by-Friction Set
Partially adapted from the Firecrafter Candidate's Manual
and a guide by Ernest Thompson Seton.
Do you think that you can build a fire using a fire by friction set made by yourself? If you answered YES to the
this question, you are already 50% done with the building of your fire by friction. It is a fun challenge to any scout and the following tips should make it easier for you, especially if you believe you can build a fire by friction set.
This fire-by-friction set was last used in 1971.
(The bow is not displayed)
When last used it was capable of creating an ember in 40 seconds.
Click on image to see a larger picture.
Finding the Right Wood
Your first step is to find the best wood for your spindle and your fireboard.
Generally, you should make these two parts of your set from the same type of
wood (if for some reason this is not possible, make sure that the spindle is a
harder wood than the fireboard). Good choices for your spindle and
fireboard are:
- Red Elm (Slippery Elm)
- Cedar - one of the best choices
- Basswood
- Walnut
- Blue Beech
- Cottonwood
- Yucca - one of the best choices
- Cypress
- Tamarack
For your thunderhead you'll want to use a pine or hemlock knot. The
trick is to get a piece of wood from the fir family that has a lot of resin that
will help lubricate the thunderhead.
Drying your Wood
For this to work, your wood must be bone dry. If your wood is not dry,
you will need to dry it out. On a hot summer day, you can put the spindle
and fireboard on the dashboard of a car and let the sun dry it out. If the
weather is not cooperating, you can wrap your floorboard and spindle in aluminum
foil and place it on a charcoal fire for s short time to dry. Be careful
though - if you leave it too long, it will burn.
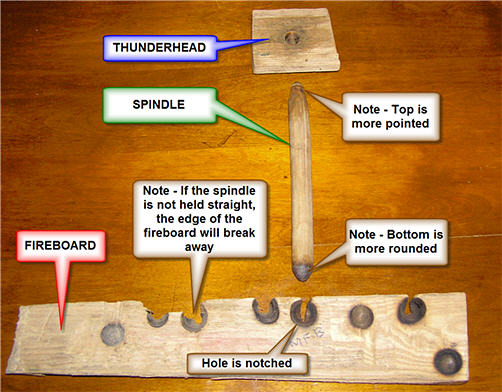
The Spindle
The spindle should be straight wood and preferably from the center of the
log. A good height for your spindle is to 12 to 15 inches with a diameter of
3/4 of an inch. With a sharp hand axe, shave the
corners down, so as to make your spindle eight sided. Leave the edges sharp, so
that they will bite into the thong or rope of your bow. Sharpen both ends, with the top end
being a little more pointed than the bottom end.
The Fireboard
Next, split a piece of wood about 3/4 of inch thick for the fireboard. Your
fireboard must have a flat surface so it does not rock when placed on the
ground. The length of your fireboard should be 18 to 24 inches long. The holes in your
fireboard should be 3/4 of an inch from the edge. Make sure the hole is far
enough from the edge to prevent breaking. To start the holes in your fireboard,
use the sharp corner of a hand axe or a lock blade knife.
The Thunderhead
Your thunderhead should be made of a hard wood that has been taken from a
log or branch. It should fit in the hand well and should be comfortable to the
user. Start the hole in your thunderhead the same way you did in your
fireboard.
The Bow
The last part of your set is the bow. The bow should be about the length of
your arm, or perhaps a little longer. It will work best if it is slightly
flexible and has a slight curve. Unless your bow has a fork at the end(s), you
will need to put notches or holes in your bow to keep the thong or rope from
slipping. So, make sure your bow is thick enough. Do not forget to leave room
for a handle. The thong or rope, which is used to turn the spindle on the
fireboard, should be made of good quality rawhide or rope. Cherry sap may be
used on the thong or rope to give the spindle a non-slipping surface.
Tinder
A bird nest without feathers or mud is the best tinder. Dry grapevine,
sassafras, and the inner bark or cottonwood or aspen can be used, but should be
shredded and made into a nest. Many people like dry grass which is easy to find,
but make sure it is very, very dry! Dry grass also smokes a great deal. Seton
suggested using a wad of fine, soft, very dry, dead grass mixed with shredded
cedar bark, birch bark, or even cedar wood scraped into a soft mass. If
you can find a meadow mouse's nest, it will also work nicely. Make sure your
nest has a place to put your spark.
Lubricants
Before you start, collect some jewelweed, sassafras leaves, or sap that you
can put between the top of the spindle and the thunderhead. If you
lubricate the top of your spindle well it will turn without as much friction at
the top and create more friction at the bottom.
Preparation
Before you start, decide which end of the spindle will be the top.
Mark the top of you spindle with the edge of a piece of charcoal or a pencil so
that you know which end is the top. This is very important, because you never
want the top of the spindle to touch the fireboard. The top end will be
lubricated and if the lubricant gets on the fireboard, it will also lubricate
the bottom of your spindle and prevent you from being able to start a spark.
It is also a good idea not to touch the bottom end, because the oil from your
hands will lubricate it.
Now it is time to burn the holes in your thunderhead and fireboard. Many
methods can be used, but the most effective way has proven to be the type where
the left foot is placed on the fireboard, the thunderhead is held under the knee
of the left leg, and the bow is pumped with the right arm. If you are
left-handed, you hold the fireboard with the right foot, the thunderhead is in
the right hand, and you pump the bow with your left arm.
After you have burned the hole(s) into the fireboard, use a hand saw or a
bow saw, and cut a narrow notch into the fireboard, so that the point of the V
is at the center of the hole. The notch should go farther underneath the hole
than it does on top so that the spark does not get caught. Use a knife to shave
the rough edges, but remember not to make the notch too big. The edges of the
notch need to be as smooth as possible so that the powder and spark will drop
down below the fireboard.
Going for the SparkNow you are ready to get a spark. Put some jewelweed, sassafras leaves, or
other natural lubricant inside the thunderhead. Tighten your bow before you
start to pump, and tighten it again when necessary. Pump the bow in the manner
described earlier. Take long, even strokes. Pressure is very important, so
force as much weight as possible on to the thunderhead. Keep a good rhythm. A
popular method is the 20-20-20. First take 20 long strokes to establish a good
rhythm. Then, increase the speed for 20 strokes while adding a little pressure
and maintaining long strokes. Finally, put on as much pressure as possible
while going as fast as possible. If you can do this for another at least
another 20 strokes, you probably will have a spark. Make sure you have
something underneath your fireboard to catch your "goofers" dust and
your spark. Aluminum foil works well for this. Keep all your goofers dust in a
35mm film canister or something similar, as you will use it to build up your
spark. Do not stop when smoke starts appearing. Add pressure and a little bit
more speed. Even if you think you have a spark, keep pumping. When you feel
like stopping, don't. If, after you stop pumping, smoke appears, you have a
spark.
What to Do with the Spark
Once a spark is obtained, fan it with a knife blade. Catch your breath, and
get your nest ready. You should not be in a hurry. After the spark has been
built up with the goofers dust you have saved up, cut it in half and place it
into the middle of your nest with your knife blade. Enclose the spark with the
nest, but do not smother it. Hold up the nest as if you were praying to
something in the sky, and whisper to that beautiful spark. If you blow too
hard, you will blow it out. As the spark gets larger and more abundant, blow a
little harder. Soon the tinder will burst into flames, but do not drop the
nest. Instead, place it down into the fire lay that you have built. If the
first half of your spark does not light the tinder, use the other half that
remains from when you cut the spark, and place it in the birds' nest again.
Build up your fire. Do not get excited and use
your set for firewood!
|