Become A Sponsor
|
Why Ads

February Cub Scout Roundtable Issue
|
Volume 14, Issue 7
March 2008 Theme |
Theme:
Litter to Glitter
Webelos:
Engineer & Athlete
Tiger Cub Activities
|
|
PACK & DEN ACTIVITIES
Advancement Ideas:
Carol E. Little, CS RT Commissioner
American Elm District, Black Swamp Council
Tigers -
Ach 1F , Elect. 20, 33, 47
Wolf-
Ach 2B, 2E, 2F, 7, 8A, 11, Elect. 12A, 12C, 17D
Bear –
Ach 6C, 14A, 17A, 18E, 19C, Elect. 1A, 10A
MORE ACTIVITIES
Sam Houston Area Council

From the Cub Scout Leader How-To Book:
- Can You Clean the Water? – page 4-16
- How to hold your own Conservation Day - pp 6-12
- Beach Bag from six-pack plastic rings – page 2-19
- Milk Carton Bird Feeder – page 4-22
Incredible Edible Landfill
Our Special Thanks to:
Maurita Hudson, Educator
Dearborn County Solid Waste Management District
Aurora, IN
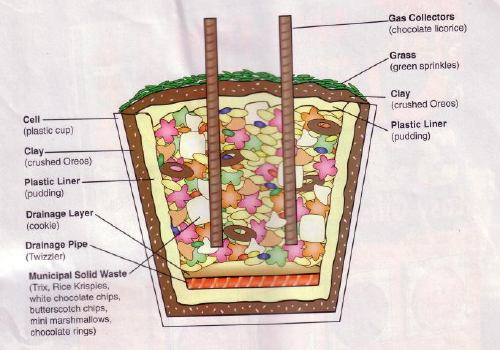
You should copy this picture and enlarge to full page.
Materials
Base layer
- Plastic cup or container"
- 1 tsp. Oreo cookie crumbs
- 2 tsp. vanilla pudding
- Two 4" Twizzlers®
- One shortbread cookie
Municipal waste (middle layer)
- 1 tsp. Trix® cereal
- 2 tsp. Rice Krispies® cereal
- 1 tsp. white chocolate chips
- 1 tsp. butterscotch chips
- Six mini marshmallows
- Four chocolate rings
- 1 tsp. mini M&M's®
- Chocolate syrup
Final Cap (top layer)
- 2 tsp. vanilla pudding
- 1 tsp. Oreo cookie crumbs
- 1 tsp. green sprinkles
- Two 4" chocolate licorice pieces
*Designer used clear Solo® cups.
Instructions
Add each ingredient in order listed to plastic cup. The layers of a landfill are described below.
Base layer
Layer 1 (cell): Landfills range in size from four to six acres of land. The area, or cell, must be free of debris and able to hold the weight of the landfill mass. This is represented by the plastic cup.
Layer 2: This layer is three feet of clay which prevent fluids from seeping out of the landfill. This is represented by pressing 1 tsp. of Oreo cookie crumbs firmly into bottom of cup.
Layer 3: This layer is a thin liner of plastic which is designed to prevent leaks in the ground beneath the landfill. This is represented by adding 2 tsp. of pudding.
Layer 4: These are pipes that make the leachate collection system. They collect leachate which is a liquid that is squeezed out of the garbage leachate then travels to a treatment pond. This is represented by laying two Twizzlers across pudding.
Layer 5: This is a drainage layer that protects the pipes from being damaged. This is represented by laying the shortbread cookie on top of the Twizzlers. (Note: No trash has been added yet. Layers 1-5 are designed to protect the environment by disposing of garbage safely.)
Municipal waste (middle layer)
Municipal solid waste is all of the garbage from peoples' homes and businesses.
Layer 6: This layer is composed of the following:
- Organic waste (Trix) is yard waste and food scraps.
- Paper (Rice Krispies) consists of cardboard, newspaper, and, packaging products.
- Plastics (white chocolate chips) include milk and soda bottles and food containers.
- Glass (butterscotch chips) range from bottles to old building windows.
- Metals (mini marshmallows) include tin and aluminum cans and appliances or sheet metal.
- Tires (chocolate rings) include those from cars and trucks.
- Other garbage (mini M&M's) contains old toys, shoes, and clothing.
This is represented by adding 1 tsp. Trix, 2 tsp. Rice Krispies, 1 tsp. white chocolate chips, l tsp. butterscotch chips, six mini marshmallows, four chocolate rings, and 1 tsp. mini M&M's. Spread evenly.
Layer 7: This layer is the leachate that forms. It seeps through all of the layers to the pipes which filter the liquid out of the landfill. This is represented by squirting chocolate syrup around the edge of the cup.
Final Cap (top layer)
This outermost layer prevents rainwater from entering the landfill and keeps gases from leaving and polluting our air.
Layer 8: This layer is the top plastic barrier that seals the landfill. This is represented by adding 2 tsp. of pudding.
Layer 9: This layer is five to seven feet of soil. This is represented by sprinkling 1 tsp. of Oreo cookie crumbs onto pudding.
Layer 10: This layer is grass which prevents soil erosion. This is represented by adding 1 tsp. of green sprinkles.
Gas collectors. These pipes are placed in the closed cell and act as methane gas collectors. They prevent fires by collecting the gas produced from decaying trash. This is represented by inserting two chocolate licorice pieces vertically into the cup.
Maurita was kind enough to share some secrets:
- The Solo cups she uses are 9 or 10 oz ones with hard plastic side. Very wide at the top.
- She, also, told me to keep talking during the assembly. Ask boys what impermeable, leachate, organic, perforated mean Start a discussion about what can become leachate. She says these usually get to be fun Ask them what some of the items represent before you tell them (e.g. ask what the chocolate cereal rings look like (tires))
Cardboard Tube Marble Maze:
Great Salt Lake Council
This one was recently in Baloo but it fits well with this theme. Also, I saw it done at our White Horse District RT and they had a contest to se which group could design the best raceway. Everyone had fun laying out, building, and then using their raceways. CD
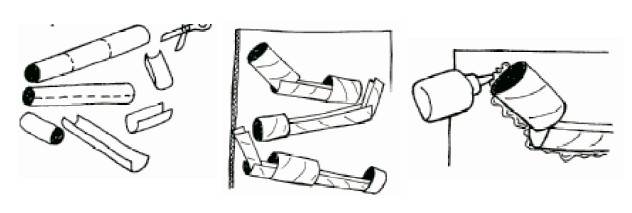
You will need:
- Lots of cardboard tubes (toilet paper tubes, paper towel tubes, etc.),
- Scissors,
- Craft glue and tape,
- A large piece of corrugated cardboard,
- Marbles,
- Stickers,
- Markers or crayons.
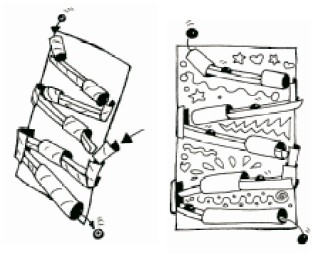
Directions:
- Cut the tubes into different sizes and shapes.
- Lay the tubes on the large cardboard so that they are all slanted slightly downward. Each tube should empty into the next tube.
- Glue the tubes in place. Allow the glue to dry.
- Prop the maze against a wall and test it with a marble. If a marble jumps out of the maze, glue or tape on pieces of tubes to fix it.
- Decorate.
Plastic Bag Parachutes:
Great Salt Lake Council
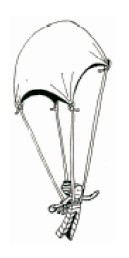
- You will need:
- A plastic grocery bag, scissors,
- A ruler
- A pencil,
- Yarn,
- A clothespin pal/small plastic toy (any similar small weight will suffice).
Directions:
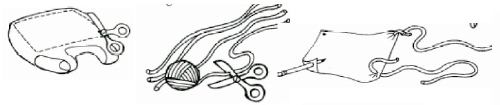
- From the grocery bag, cut a piece of plastic at least 14 inches square.
- Cut four pieces of yarn, each 24 inches long.
- Use the pencil to poke a hole in each corner of the plastic. Knot a piece of yarn in each hole.
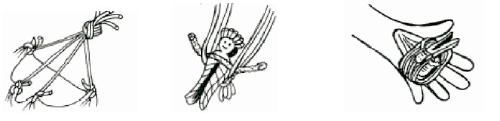
- Hold the four yarn ends together and fasten them in an overhand knot as shown.
- Tie the yarn around your weight (clothespin pal/small plastic toy/etc.)
- To prepare your parachute for sky-diving, hold it by the center of the parachute so the strings and weight hand down.
- Fold over the parachute and loosely wind the strings and pal around it to make a small bundle.
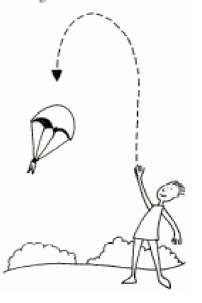
- Toss up the parachute bundle as high as you can. It should float gently to the ground.
RECYCLED CRITTERS
Sam Houston Area Council
Materials:
Toilet paper tubes, paper towel tubes, fast food containers, 2-liter bottles, candy wrappers, empty soft drink cans, cereal boxes, juice boxes, tape, glue, markers, paint
Instructions
This is a great den team building activity. In planning for the pack meeting, tell each den to design and create a critter for display at this month’s pack meeting. You can either supply materials or give them a list of allowable materials See which dens are the most creative
Gold Medal Awards
Baloo's Archives
Materials: Jar lids, Margarine bowl lids, and/or other flat round lids, Ribbon or colored string, markers, decorations, hole punch, spray paint. If you are short on lids, cut circles out of cardboard.
Directions:
Spray paint the discs. Write the name of the event on the disc then decorate the disc appropriately. Designs can be drawn or stuck on. Punch a hole in the top and thread the ribbon through the hole. Make sure the ribbon is long enough that medal hangs about mid torso. Ribbons are placed around the neck.
You might want to save this one for May 2008 when the theme is "Go For the Gold" CD
Puzzle Tree
Capital Area Council
Supplies:
- Yellow and brown construction paper
- Old jigsaw pieces
- Scissors and glue
Directions:
- Cut a tree shape from the brown construction paper.
- Glue the tree on the yellow paper.
- Glue the puzzle pieces on the tree for leaves.
- If your puzzle pieces have lots of red, orange, and brown colors on them you can make an autumn tree and glue some of the pieces at the base of the tree, to make leaves on the ground.
- Pink pieces mixed with light green pieces make pretty spring trees.
- Green pieces are just right for a summer tree.
Why not make all three to show the different trees during the changing seasons?
Hint:
If your puzzle pieces are not the right color for the tree just turn them over and paint them the color you want.
Reduce It - Reuse It
Capital Area Council
This one’s made from scratch and has never been tested that I know. Best of luck! And if it or a variation of it works well, let the world know about it. This game focuses on the idea of “Reduce, Reuse, Recycle” as the way to minimize personal pollution. It will take a little bit of courage on someone’s part (the Den Leader’s?) because someone has to come forward with their recycling bin and whatever is in it. The object of the exercise is to get the boys thinking about the “stuff’ we throw out on a regular basis and how we might eliminate some of it.
The leader brings in the recycle bin of “stuff’ and, one at a time, displays their wares. The boys then discuss/disgust what, if anything, could have been done to reduce or reuse the items shown. [Note: If you’ve got beer or other alcoholic beverage bottles in the bin, please remove them before doing this game!]
CD Fish
Baloo's Archives
Materials: 2 CDs per fish, string, Scrap pieces of craft foam or cardboard, glue, scissors, markers
Directions:
- Create a pattern for fish fins, eye, mouth, scales
- Have boys cut out needed pieces in colors they desire
- Glue fins, tail, mouth to back (non-shiny side) of one CD
- Create a loop of string and loop through hole in other CD
- Glue the two non-shiny sides together
- Glue on eye
- Have boys draw scales and other fish features on the CD without the string
Note: If boys come up with ideas for other creatures to be made with the CDs (e.g. spiders, people, birds, snowmen, pigs, …), let them go with it!!
Craft: Litter to Glitter Regatta
Baloo's Archives
I learned this one from Steve who lead the "Strictly for Cubmaster's" course at Philmont I took in 2005. CD
Materials: Give each team – one Styrofoam cup and plate and a straw. Have glue, tape and markers available. Raingutters and water will be needed to run a regatta
Directions:
- Instruct teams to design and build a boat that can be blown down the regatta course (a raingutter) from parts of the cup, plate and straw.
- Although all three pieces must be used they do not need (actually cannot be) used in their entirety
- Race is run following normal Raingutter Regatta rules.
GENIUS KITS
Great Salt Lake Council
Place 13 or 14 items that might be recycled such as clothespins, pipe cleaners, ribbon, a nail, cork, lids, string, paperclip, etc. in a bag for each Cub Scout. Then they have to use those items to invent something. You can provide glue, tape or glue gun for them to stick it all together. Have a contest to see who did the best job. This could be done at a pack meeting or prepared before and brought with.
JELLO BOX FRAME
Great Salt Lake Council
Materials:
- Jell-O Box,
- 1” x 3” piece of cardboard,
- two 1” x 2” pieces of cardboard, scissors,
- glue
- contact paper.
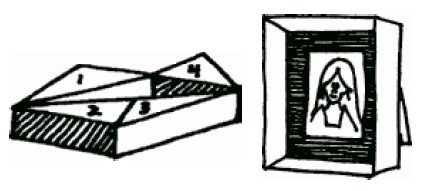
Instructions:
- Glue flaps back together.
- Cut from corner to corner on one side of box.
- Cut off the four sections to make a frame.
- Cover the box with contact paper.
- Glue 1” x 3” cardboard to back of Jell-O box.
- Glue the other two pieces of cardboard together and glue inside of Jell-O box.
- Glue photo to center of frame.
MAGAZINE HOLDER
Great Salt Lake Council
Materials:
- Laundry soap box or large cereal box,
- magazine pictures or colored paper,
- scissors
- glue.
Instructions:
- Cut top off the box and opposite sides on an angle.
- Decorate with magazine picture or colored paper in collage style.
LOG PLANTER
Great Salt Lake Council
Materials:
One large juice can.
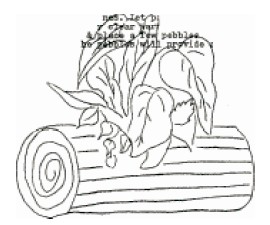
Instructions:
- Remove part of the side.
- Apply moist paper mache to the can pressing until surface is smooth. It is not necessary to get a perfectly even finish.
- Tuck edges over & against inside opening in can.
- Using a fork make lines with prongs to simulate bark lines.
- Let dry then paint.
- Apply clear varnish.
- Line can with aluminum foil
- Place a few pebbles in bottom of can before filling with soil to help with drainage.
HANGING PLANTER
Great Salt Lake Council
Materials:
- 2 liter bottle or other bottle with same basic shape,
- scissors,
- yarn,
- hole punch,
- small pebbles,
- potting soil,
- small plant
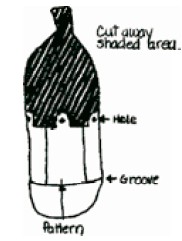
Instructions:
- Cut bottle according to diagram.
- Punch holes in tabs.
- Put pebbles in bottom of bottle then soil and plant.
- String yarn through holes in tabs and bring up tying in knot at top.
GROCERY BAG KEEPER
Sam Houston Area Council
Materials:
- 2-liter soda bottles
- Knife and scissors
- Plastic grocery bags
Directions:
- Wash and dry bottles thoroughly.
- Cut off about 3 inches off the top of the bottle and about 2 inches off the bottom of the bottle.
- Stuff the bottles with plastic grocery bags.
CLEAN]UP YOUR HANDS JUG
Sam Houston Area Council
My troop made these al the time on camping trips. Try one on your next Pack family camping Trip. CD
Materials:
- Clean empty milk jug, golf tee, string
Directions:
Punch a hole several inches from the bottom of the jug on the side opposite the handle. This hole should be the size that a golf tee can fit into it. Fill the jug and hang from a tree. To wash your hands remove the golf tee... and out comes the water. Open the cap of the jug a little bit for more pressure.
Another version:
Cut off the bottom of a milk jug and hang upside down. Fill the jug from the bottom. Unscrew the cap and out comes the water.
PLASTIC VOLLEYBALL/BADMINTON NET
Sam Houston Area Council
Materials:
- Plastic holders from six packs of sodas, string or cord
You’ll need lots of six-pack plastic holders. Tell den members to start collecting well ahead of time.
Directions:
Have boys take a handful of the holders and begin tying them together with string or cord. Make the net about 3 feet tall and 15 feet wide. After all of the holders are tied, run a long length of cord through the entire top row of holes, weaving the cord in and out. Repeat for the bottom of the net. Tie the ends of the cord between two trees and you’re ready to play.
LITTER TO GLITTER – THREE MOBILES
Sam Houston Area Council
It would be a disservice to this Litter to Glitter theme if we didn’t provide at least one totally frivolous, absolutely glittery Litter to Glitter project. What Cub Scout has not at some point in his life looked at some gaudy, shiny, sparkly, glimmering item and said, “Mom, I think that’s beau-ti-ful?” So, here are three Ultimate Litter to Glitter mobiles (To hang in the front yard for the entire world to see!)
Materials:
A variety of glittery discards that will reflect the sun such as aluminum pie tins, clean, used aluminum foil, used CDs, mylar (old mylar balloons or the inside of some snack bags. Clean with soap and water first.) gift wrap, garland, silvery buttons and baubles, miscellaneous shiny packaging like candy and gum wrappers, iridescent ribbon, old shiny ornaments, sequins, leftover glittery craft items, clear 2-liter soda bottles and a paper plate (not glittery.) You will also need glue, scissors and thin wire, string or cord.
SHINY SPIRAL
Sam Houston Area Council
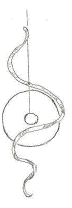
Directions:
- Start by forming a long thin snake from the pieces of used foil.
- Scrunch and twist them together until it is a long tube about the width of a finger.
- Make sure that the separate pieces are connected in some way either by folding the foil together or using some glue.
- Twist this shimmery snake around your hand to make a spiral shape.
- Tie a piece of string around the top of the spiral.
- Tie the other end of the string around a CD.
- Leave some extra string at the top so you can hang it.
- Add smaller shiny items using glue or wire.
- Add more spirals and more CDs if you want.
- After all, when it comes to glitter, isn’t more better?
CURLY BEL MOBILE
Sam Houston Area Council
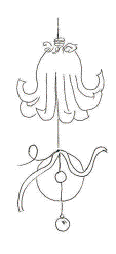
Directions:
Cut the bottom off a 2-liter clear soda bottle. Cut long strips, about 1/2 inches wide about two-thirds of the way up the bottle. Roll each strip up with your fingers or around a pencil and it will stay curled.
Take some string and attach a 1 inch circle of cardboard about halfway up. Do this by poking a hole in the cardboard. Thread a button below the cardboard so it will stay in place. Attach shiny decorations to the half of the string below the button. Use CDs, ornaments, strips of mylar and anything else that shimmers.
Take your curly bell and thread the top of the string through the bottom of the bell. It will sit on the cardboard circle.Add an iridescent bow or other shiny thing to the top of the bottle. Hang from a tree branch with your shiny spiral.
ONE LAST SHINY INDULGENCE –
SHIMMERY SPINNING PLATES
Sam Houston Area Council
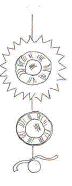
Directions:
- Draw a zigzag around the edge of a paper plate and cut it out.
- Attach an aluminum pie tin to the center of the plate.
- Cover both sides of the plate with lots of shiny things – candy wrappers, sparkly paper, sequins, buttons, foil, and whatever else you have.
- Attach string to top and bottom.
- Continue to add shiny items, and even another pie tin to the bottom of the string.
- Use the top of the string to hang the Spinning Plates in the breeze
UNNATURAL HIKE
Sam Houston Area Council
Leader will need to plan and set up the trail for this hike in advance.
- Collect items such as a plastic cup, extension cord, old tire, tennis ball, ceramic pot, clothes hanger, packing peanuts, a piece of clothing, old tools, a light bulb, tin and aluminum can, glass bottle, etc.
- Place these items along the trail as if they belong there. For example, hang an extension cord from a tree limb like a vine, have a tennis ball peeking out from a pile of leaves, scatter a few packing peanuts with pebbles at the side of the path.
- With a partner, Cubs will walk the trail.
- Let them know that they will be looking for items that aren’t supposed to be there and making a list of what they see.
- When the boys return they will probably have found more than you put there.
- Have them compare their lists with each other and then with your list.
- Talk about how it feels to see unnatural items in a natural setting.
- Ask them if they have noticed items in places they don’t belong when they have been hiking or walking before.
- Ask how they think those items get where they don’t belong.
- Talk about what they and others can do to prevent discarded items from invading our natural spaces.
- Go together to pick up the unnatural items from the trail they just walked.
- Take a few minutes to read the Outdoor Code or the principles of Leave No Trace together.
PENCIL HOLDER
Great Salt Lake Council
Using a clean soup can, wrap paper around the can and have the Cub Scouts decorate the can.
You could attach arms and a head if you would like.
We still have the one our son made on our refrigerator full of pens. CD
Home Made Band
Great Salt Lake Council
This was my session at Pow Wow this year we had a blast CD
- Kazoo - Cover one end of a toilet paper tube with a 4” square of waxed paper and place and elastic band to hold it in place. Punch three holes in a row (about 1” apart) lengthwise along the side of tube. Decorate.
- Tambourine - Decorate 2 paper plates, put a handful of seeds or beans in one plate, place the other face down on top of the other plate and staple, tape or punch holes in and tie with yarn or ribbon. Add ribbon for streamers if desired.
- Drum - Using an oatmeal box, margarine container, ice cream container or coffee can (with lids) have the Cub Scouts decorate them using paper, crayons, markers, etc. Use a wooden spoon for drum sticks.
- Sand Block - Use two blocks of wood and wrap sandpaper around the block and staple to the sides. Glue or nail a thread spool to each block to form handles.
- Maracas - Put a handful of pebbles or seeds in the soda pop can and place a piece of tape over the hole, use a hammer and nail to punch a hole in the center of the bottom of the pop can and push an unsharpened pencil through the bottom hole of the can for a handle. Place tape around the pencil to keep it from sliding. Decorate the maracas using scraps of paper, construction paper, wallpaper, etc.
Goofy for Cub Scouts
(Cub Scout Tuba, Bagpipe or Digeroo)
Darby, my daughter, who learned this from a PTC Cub Week faculty member.
Directions enhanced by Steve from North Carolina who taught my Strictly for Cubmasters course at Philmont
Materials:
- A long, fairly stiff, hollow tube (Paper, plastic, or most any material will work for the tube. Larger diameters make for deeper musical notes.) I like the plastic tubes in the center of the 36 inch paper used on the plotter where I used to work but a real stiff tube from any paper roll will work or make one by rolling a piece of poster board. I have one made from a carpet roll, too!!
- A latex glove
- A straw
- Tape (Electrical tape, duct tape, etc. Masking tape may tear easily.)
Construction Instructions:
- Cut a few inches of the straw
- Put a pin hole in the end of the thumb of the glove (My daughter and Steve say use the thumb. Reason becomes evident, below.)
- Push the straw part way through the hole and tape where the straw and glove intersect
- Take the wrist opening of the glove and stretch it over one end of the tube.
- Tape the wrist end of the glove to the tube by wrapping tape around the glove's wrist and the tube.
- Grab the fingers of the glove and stretch the palm/ back of hand of the glove taut across the tube, sort of sealing the entire circumference of the tube with the palm / back of hand of the glove. . (The glove palm/back will make a “drum” over one end of the tube. This “drum” will be the vibrating membrane, which makes the noise.)
- Holding the glove taut across over the opening, pull the four loose fingers up the side of the tube.
- After you have successfully produced music, if you wish, use tape to secure the four fingers to the side of the tube to evenly tighten your “drum” / your tympanic membrane.)
Playing:
- Resting the top (open end) of the tube on your shoulder
- Blow into the straw; you should get a tuba like sound
HINT - If you get nothing -
Try readjusting the glove across the opening or change angle on the tube
Soda Bottle Spinners
Baloo's Archives
Materials: 2 liter Plastic Soda Bottle with cap, Sharp Cutting Tool (e.g. Xacto Knife, Single edge razor blade knife for use by adult), sharp scissors, gloss enamel paint, small artist type paint brush, Crayon or Marker, Masking Tape (or similar), Ornament hanger or bent paper clip.
Directions:
- Remove label from bottle and dry bottle.
- Find seam on bottle and mark in two places: where the top and bottom of the label was. This is essentially where the straight section ends and bottle begins to taper
- Place a piece of tape on each mark going around the circumference of the bottle. Place 13 marks on the tape about 1" apart. The circumference of the bottle is 13 ½”.
- Make a or choose a pattern.
- Place pattern against bottle going from top band to bottom band at a mark.
- Mark pattern on bottle with crayon or marker. Repeat this 13 times, once at each mark
- Have a leader or parent using the sharp knife, go around the bottle and cut the first 3/4 inch or so of each line of the pattern. If your pattern has two sections per line, be sure to start both parts.
- Cub Scouts may finish cutting of the lines with a sharp pair of scissors. Do not separate/ spread/unfold the cuts/ flaps/ shapes !!!!
- One Color Painting – If you wish the bottom of the bottle to remain clear - cover it with masking tape. If you wish the bottom of the bottle to be the same as the top, leave it uncovered.
- Using spray paint, spray the entire bottle.
- Wait for paint to dry (overnight or next den meeting).
- Remove tape if applied.
- Multi-Color Painting: For multi-color bottles, paint each stripe individually with the artist's brush.
- Allow to dry.(see above)
- After the bottle is thoroughly dried, you may apply any desired decorations. (e.g. spots, sparkles, markings) Now you may fold out the flaps, shapes.
- Drill or punch a hole in the cap.
- Insert the ornament hanger (or wire). Use a bead or knot inside the cap to keep the wire from pulling out.
Milk Jug Luminary
Baloo's Archives
Materials: Sand, empty plastic gallon milk containers, tea lights, scissors, fireplace matches.
Directions:
These are different luminaries. They don't blow over or go out if it's wet and windy. They have a lovely white light.
- Clean milk containers and remove all labels.
- On the side nearest the handle, cut a slit one inch tall and three inches long about one inch up from the bottom.
- Pour about one inch of sand into the container. Shake to distribute sand evenly.
- Push tea light into the middle of the sand. Use fireplace matches to light. Care must be taken to place the tea light near the center of the container but not directly under the spout.
Recycled Wind Sock
Capital Area Council
Supplies:
- Plastic margarine, Cool Whip, or similar tubs
- Scissors and knife
- Bells
- Glue
- Crepe paper party streams,
- Plastic bags,
- Ribbon,
- Nylon fabric, or yarn
Directions:
- Cut the bottom out of the plastic tub.
- Cut the center out of the lid, leaving the outer ring.
- Cut 2-foot streamers from the crepe paper, ribbon, or plastic bags.
- Arrange streamers around the rim of the tub so that they hang down over the edge.
- Put a small bead of glue all the way around the inside of the lid and snap it over the rim of the tub to hold the streamers in place.
- Tie the bells onto a 1-foot length of yarn.
- Tuck the two ends of the yarn under the lid so that it forms a hanger.
- Hang outside where the wind will blow it.
Soda Cans
Capital Area Council
Before a soda can gets to the store, before it has soda in it before it’s even a can, it is part of the earth!
As a conservation project for your den, recycle the aluminum cans your family uses. These cans can also be used for crafts.
Materials needed:
- Aluminum cans – empty,
- Paint that will hold on aluminum,
- Hot glue or 6000 glue,
- Materials needed for decorating the cans
Directions:
- Wash the can thoroughly of all soda.
- Crush the can so that the can top is on one side and the can bottom is on the other side.
- This may take several cans in order to get them crushed correctly. Make the can as flat as you can.
- Paint the can any way you choose. An example: make a Cub Scout
- Glue on any accessories needed.
- A magnet could be attached on the back.
Sock Cactus
Capital Area Council
Supplies:
- Old white socks
- Toothpicks
- Sand
- Rubber band
- Glue
- Green poster paint or green spray paint
- Large detergent bottle cap, hair spray cap, or similar
Directions:
- Cut the foot off of a sock just after the heel.
- Stuff the part of the sock you cut off into the foot to make the cactus. You may need to put in part of another sock or pillow stuffing to make it full enough.
- Close the sock with a rubber band.
- Trim off some of the extra sock if you need to, but be sure to leave about 3 in. for “planting” the cactus.
- Paint the cactus green and let it dry.
- Break several toothpicks in half, dip them in glue, and push them into the cactus to make the spines.
- Let the glue dry.
- To plant the cactus, mix glue into the sand so that it moistens it completely. Use enough sand to almost fill the cap.
- Stand the cactus in the cap and pack the sand into the cap around the cactus. Let the sand and glue dry overnight.
The Eggheads
Capital Area Council
This year, give your bald Easter eggs a head of hair.
Materials:
- Eggs and carton,
- small nail,
- soil,
- grass seed,
- permanent markers,
- film canisters.
Procedure:
- Use a small nail to make a hole about the size of a quarter in one end of an egg, the drain the egg and rinse out the shell. Draw funny faces on shells and put them back in carton.
- Fill the shells with soil (using spoon makes it easier), then plant with grass seeds.
- Moisten the soil, cover with plastic wrap, and place in a sunny window until the seeds sprouts - generally less than a week. When the eggheads have a thick, green mane, remover the covering and place them on a stand (empty film canisters work for this.)
- Style the hair into pigtails, buzz cuts, or Mohawks and water every day.
Milk Carton Bird Feeder
Capital Area Council
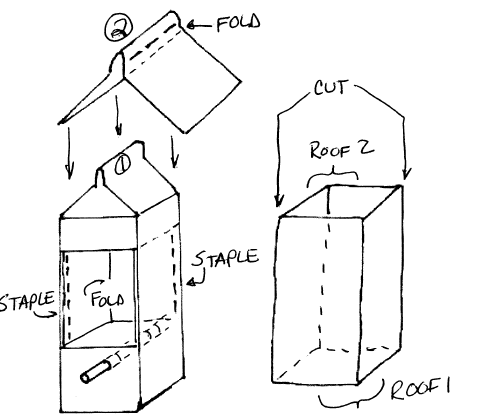
Materials:
- 3 half-gallon milk cartons make 2 feeders,
- two 8" lengths of 3/16 inch wooden dowel,
- pencil, utility knife, carpenter's square, stapler,
- leather punch, wire coat hanger, wire cutters, pliers.
Instructions:
- Using the carpenter's square, mark 2 lines, one 2 1/4 inch from the bottom and one 11/4 inch from the top of the milk carton.
- Repeat on the opposite side of the milk carton.
- Have an adult set the utility knife so that the least amount of blade is exposed and cut all four of the lines you just drew.
- Now cut opposite corners between the lines to create a flap on each side of the milk carton.
- Fold the flaps in and staple them to form double thick walls.
- Use the pencil to punch a hole centered one half inch below each opening. Make the holes only big enough to insert the dowel.
- Cut the top and bottom of a second milk carton off and then cut apart at opposite corners to form two roof sections.
- Measure the top vertical portion of the milk carton.
- Using the carpenter's square and pencil score a line on either side of the fold inside of the roof section. These lines should be the same distance from the fold as the measurement you took of the top of the carton.
- Fold on the scored lines and attach the roof with staples as shown.
- Have an adult punch a hole in the center of the roof ridge with a leather punch.
- Have an adult cut the coat hanger into two equal pieces with the wire cutters and bend each piece into a hanger for the two feeders.
- Fill with bird seed and hang outdoors where you can observe the birds that will flock to your feeder.
COFFEE GROUND 'FOSSILS'
Capital Area Council
What You Need
- 1 cup of used coffee grounds
- 1/2 cup of cold coffee
- 1 cup of flour
- 1/2 cup of salt
- Wax paper
- Mixing bowl
- Some small objects to make impressions in the dough
- Empty can or a butter knife
- Toothpicks, optional
- String to hang your fossil, optional
How To Make It
- Stir the together the coffee grounds, cold coffee, flour, and salt until well mixed.
- Knead the dough together and then flatten it out onto the waxed paper.
- Use the can to cut out circles of the dough or use the dull knife to cut slabs large enough to fit your "fossil" objects.
- Press your objects firmly into the dough. When you take the object out, you have your "fossil". If you want to hang the fossil, poke holes into the edge to hold the string.
- Let the fossil dry overnight and then hang it if you wish.
Tip - Bake them for a short period to get the "dough" to harden.
Creating Critters
Capital Area Council
Object: To create a new insect.
Materials: Scissors, glue, and a variety of colored construction paper.
How to play:
- Divide the boys into small groups.
- Give each group scissors, glue, and a variety of colored construction papers.
- Within a given time limit, each group designs and constructs a new species of insect.
- They must decide on a name for their bug, tell where it lives and what it eats.
- When all groups are finished, a spokesman for each group introduces their critter to everyone.
Hairy Harry
Capital Area Council
Supplies:
- Old panty hose or knee-highs
- Potting soil
- Grass seed
- Wiggle eyes
- Red paint marker
- Small black pom pom
- Lo-temp hot glue gun
- Scissors
- Rubber band
- Water
- Small flowerpot
Directions:
- If using panty hose cut off the foot end so that it is about a six inches long.
- Carefully place a scant teaspoon of grass seed in the tip end of the hose.
- Place enough potting soil on top of the seed so that you form a 3 to 4 inch ball.
- Secure the loose end of the panty hose with a rubber band.
- Hot glue the wiggle eyes below the seeds.
- Hot glue the pom pom in place for a nose and use the marker to draw a mouth.
- Hot glue the soil filled panty hose ball to the flowerpot, seed side up.
- Water and keep moist and in a few days “Harry” will grow “hair”.
Coffee Can Stilts
Capital Area Council
You need two large coffee cans.
Clean and dry them. Get your Den Leader to help you make two holes in the can, one on one side and then one on the other. Then you do the same with the second can.
Run the end of a rope into one hole and then the other end through the other hole on one of the cans. Get help to measure how long the rope should be according to how tall you are while your standing on the can.
After you have the length you need tie the two loose ends together inside the can. Cut off any excess rope. Repeat for other can.
Now you have stilts to walk around on. Lots of fun.
See Wolf Book for pictures on this project. CD
Trash Monster
Capital Area Council
You'll need for each Monster
- Two paper lunch bags,
- Construction paper,
- Markers, scissors and glue.
Directions
- Cut an oval opening in the bottom of one lunch bag.
- Open the other lunch bag and slide the first one inside it so the hole is at the top (monster's mouth) and the other bag's bottom is on the bottom.
- Decorate the bag, as you like with construction paper eyes and accordion-folded arms. Or use markers.
- Set the monster on a desktop and feed it small pieces of trash!
Materials found in Baloo's Bugle may be used by Scouters for Scouting activities provided that Baloo's Bugle and the original contributors are cited as the source of the material. |
|