October 2008 Cub Scout Roundtable Issue |
Volume
15, Issue
3
November 2008 Theme |
Theme:
Seeds of Kindness
Webelos:
Citizen and Communicator
Tiger Cub
Achievement 2 |
PACK AND DEN ACTIVITIES
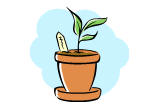
"Spreading Seeds of Kindness " Planter
Baloo Original (almost)
This little planter would look great
with a painted pot and full of flowers.
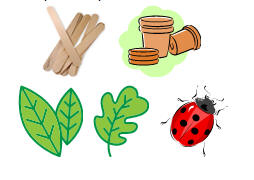
What you will need:
Large craft
stick,
green fun
foam,
another
color of fun foam (red if you do a ladybug),
permanent
marker,
thin black
wire and
glue.
Potting
soil
Plants for
the pots (optional?)
What to do:
Before the boys get there:
·
Create a simple leaf pattern. Look at leaf
pictures in their books or a Boy Scout Handbook or on the web for ideas.
·
Create a pattern for a bug. A red ladybug
would look great but ants, bees, and others work, too
·
Set up the other supplies
When
the boys get there, have each one:
P
Cut out a leaf shape using your pattern and
green fun foam
P
Cut out the bug using fun foam (red if a
ladybug)
P
Decorate the bug with a permanent marker.
(Black spots and head for a ladybug)
P
Glue black wire onto to back of the bug for
antennae.
P
Glue the leaf to the large craft stick..
P
Glue the bug onto the leaf.
P
Write "Spreading Seeds of Kindness" on the
leaf.
P
Plant the plant in the potting soil in the
pot
P
Water
P
Stick the large craft stick into the potting
soil.
Service Activities
Piedmont Area Council
«
Give some of the toys Cub Scouts may have
made as part of the Craftsman badge to a children's home, hospital, or
institution for handicapped children.
«
Use Craftsman skills to repair or refurbish
toys for the same purpose.
«
Collect good used books and magazines for the
library of a children's home or institution for the elderly.
«
Service, best exemplified by the daily Good
Turn has long been a tradition in Scouting. Good citizenship is best taught by
service in action.
«
To get the most Cub Scouting has to offer,
boys should have opportunities to take part in den and pack service projects.
This is one of the best way to show boys that helping other people is not only
beneficial to others, but is fun and rewarding for themselves. They will
experience a warm feeling that comes from giving to others.
Seeds Of Kindness Starters –
Service Project Suggestions
Sam Houston Area Council
«
Visit a nursing home and spend time with the
elderly – playing checkers, reading to them, listening to them, writing letters
for them, etc.
«
Bake cookies for the entire staff at a
school, including custodial, clerical, cafeteria, and administrative employees,
as well as teachers and their aides.
«
Make puppets and put on a show for a
children’s hospital.
«
Host a faculty/staff breakfast for a school.
«
Collect pet food, blankets, towels, toys, and
other supplies for an animal shelter.
«
Collect canned food and provide a
Thanksgiving dinner for a family in crisis.
«
Rake leaves, shovel snow, or trim yards of
people who are incapacitated, grieving, or accident victims.
«
Collect winter hats and mittens for children
and families at shelters and crisis centers.
«
Clean up litter around the place you hold
your meetings, whether it is a faith organization, a school, or other building.
Don’t forget the playground.
«
Collect donations and make pans of lasagna
for a soup kitchen or other food service facility. (Check with them first about
any guidelines or restrictions.)
«
Collect food door-to-door for a food bank.
«
Work with a housing nonprofit to build
household items, such as benches, planters, window boxes, coat hook racks, and
letter holders.
«
Collect nonfood items, such as toiletries,
new underwear, or socks for a homeless shelter.
«
Collect books for a homeless shelter or safe
house.
«
Clean up a school and plant trees or flowers
there.
«
Buy coffee and donuts for school bus drivers.
«
Set up a bagel table for teachers.
«
Trim landscaping around a school, faith
organization, or museum.
«
Pick up litter at a park.
«
Run errands for the elderly.
«
Put up and maintain a birdfeeder(s) for
outside strategic windows at a nursing home.
«
Make get well cards for patients in a
children’s hospital.
«
Collect food, coats, and Halloween candy for
children on a reservation.
«
Collect used eye glasses for organizations
that can distribute them to people who need them.
«
Plant or weed a garden.
«
Prepare a meal for someone in need.
«
Write a letter of appreciation.
«
Hug at least three people a day.
«
Say “Thank You” to everyone who helps you for
one day. Then try doing it for two days. Pretty soon it will be a habit.
Never Too Early to Start Some Holiday Den Activities
Capital Area Council
This list fits great with our theme and by starting to prepare now to
spread some seeds of kindness, you will be ready to deliver in December. CD
Cubs need to be reminded periodically that not all people face this holiday
season with the same anticipation. Help them look closely at your own community.
Are there people who may not have enough to eat or enough money for a tree and
decorations (let alone presents) or people who are in need of company? Some of
these may say for “Christmas,” but starting now gives the boys more time to
participate and if you are working with an organization, you often have to sign
up well in advance. Churches or specific organizations have some plans for
addressing these issues. Maybe you can join in those efforts or devise your own
"good turn." Here are some ideas:
ü
Collect clothing, toys, book, school
supplies, decorations, and canned goods for shelters for needy families.
ü
Make decorations for someone's home or
apartment.
ü
Help an elderly person or shut-ins to
decorate their home for Christmas. Be sure to help them take down the
decorations after Christmas.
ü
Save money from recycling and purchase a
Christmas tree for a needy family.
ü
Make a full holiday meal and serve it to
low-income elderly (assign each den family to make a certain item).
ü
Go caroling on the children's floor at the
hospital, at the nursing home or around town.
ü
Visit the elderly and share a craft or put on
a simple skit or read to them.
ü
Select some needy person and become their
"secret Santa." Each week of December, mail them some little knick-knack, card,
or memento.
ü
Make bird feeders: String popcorn and
cranberries and hang them where the elderly and the shut-ins may watch the birds
come to feed.
ü
Have each family bring a piece of clothing
(gloves, hat, socks etc.) to the Pack meeting. Have them hang these on a
clothesline. Donate all the items to a local homeless shelter.
ü
Do yard work regularly during the month for a
church, temple, elderly, or shut-ins.
ü
Clean up the grounds or plant flowers for the
chartered organization.
ü
Collect books and magazines for needy
families and send them with homemade bookmarks.
ü
Share what blessings each of us has
Please note:
Most institutions have restrictions, so be sure to clear with them before you
undertake a project. When you are visiting a place that is normally isolated
from the outside world, like a nursing home or convalescent home, please be
careful about taking children who have severe colds. The patients/residents are
susceptible to outside germs. Remind the boys that a service project is not
limited to the holiday season. Many organizations need help throughout the year.
The holiday season is just a good time to start a service project. Have the boys
get involved in service projects year round. Projects don't have to be big.
Please read pages 9-10 to 9-11 in the Cub Scout Leader Book for a service
project that will be ideal for other times of the year.
See more other Service Activity ideas from
Alice under Theme Related Stuff
Field Trips
Grand Teton Council
ü
Local food bank
ü
Thrift stores
ü
Salvation Army - How do they help?
ü
Visit a Humanitarian Center where they help
those in need
Activities
Grand Teton Council
ü
Shovel walks
ü
“Giving Tree” (in many communities, they have
a tree where needs of individuals are placed, and people can choose to help
anonymously. Your community may have something similar)
ü
School bags
ü
Gifts for children’s ward of hospitals
ü
Gifts for homeless shelter
ü
Party for younger children
ü
Thanksgiving dinner - help with soup kitchen,
etc., or invite someone to share your own dinner
Service Circle:
Grand Teton Council
To start this, each boy draws
the name of another boy in the den out of a bowl. Then during the upcoming week
they need to do an act of service for that boy. It can be done anonymously. At
the beginning or end of each den meeting have each boy tell what service they
received. Help the boys understand what service is, by you or their parents
doing an act for each of them before the first den meeting of the month. And
then as a den, talk about this act of service. Instead of putting in the den
members’ names, you could put in general names of people in their family they
could serve. There are many ways this idea could be adapted to your own
situations and circumstances.
Seed Packet Patterns
Baloo
There are several items in
this issue that call for you to use or make seed packets. This used to stump
me. But now thanks to the internet, I have found many places that have patterns
and ideas you can download for seed packets.
Most of the patterns look
something like this -
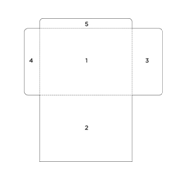
If you
go to
http://www.modishblog.com/modish/2008/03/project-seed-pa.html
You can se this one and get
details instructions on how to decorate it. She even has some downloads for
premade patterns (But boy-made patterns are better!!!!)
And her
are some more that I found -
http://www.daniellesplace.com/html/garden_crafts.html
http://www.southernliving.com/southern/gardens/seasonal_gardens/article/0,28012,1116001-2,00.html
http://www.squidoo.com/flowerseedpackets
http://apartmentfarm.wordpress.com/2007/07/13/make-your-own-seed-packets/
http://www.masdudiable.com/A55C37/mdd.nsf/dx/Make-your-own-seed-packets.htm?opendocument&comments
or do
your own search -
Seed
Packets
Seed packet
templates
Make your
own seed packets
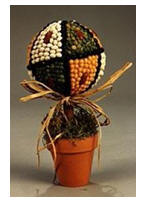
SEED TOPIARY
Heart of America Council
Gather seeds and beans to
create a wonderful geometric design in a clay pot. Learn how to divide and
measure a round object the easy way, using rubber bands.
You will need: (for each
topiary)
Dried green
and yellow split peas
Dried
black, red kidney and navy beans
4”
Styrofoam ball
2 ½”
Styrofoam ball
6” cinnamon
stick
2 ½” clay
pot
Tacky glue
Small
handful of green moss
3 strands
of natural raffia
4 rubber
bands
Fine point
permanent marker
Toothpicks
Scissors,
#2 soft pencil, Ruler
Instructions:
·
Glue the 2 ½” ball into the pot.
·
Push hard on the foam with your fingers until
the foam is level with the top of the pot.
·
Make a hole in the center of the foam with
the pencil.
·
Place a rubber band around the 4” ball
dividing it into 2 equal parts.
·
Place two more rubber bands around the ball
dividing it into six sections.
·
Place the fourth rubber band around the
center of the ball across the other rubber bands. There are now 12 sections.

·
Make lines along the rubber bands with the
marker;
·
Then remove the rubber bands.
·
Sort the different types of peas and beans
(an egg carton works well for this).
·
Work first on one side of the center line.
·
Glue the black beans along the lines to form
sections.
·
Spread one section with glue.
·
Glue a kidney bean in the center and fill
with navy beans. Repeat this process first with green peas, then with yellow
peas.
·
Continue until all sections at the top are
filled.
·
Let dry.

·
Make a 1” deep hole at the bottom on of the
ball and glue the cinnamon stick onto it.
·
Glue black beans over the lines to form
sections, then glue different types of bens in each section as you did the top
portion of the ball.
·
Glue the cinnamon stick into the hole in the
clay pot.
·
Allow to dry.
·
Glue moss around the base of the cinnamon
stick to cover the foam.
·
Tie raffia bow around cinnamon stick at
bottom of ball and trim tails to 4”.
·
This makes a good centerpiece for
Thanksgiving.
GROW YOUR OWN CORN
Heart of America Council
What you'll need:
Kernels of
popcorn
Ziploc bag
Dirt
Water
Directions:
1.
Place some dirt in a Ziploc bag;
2.
Add some water and a few kernels of
popcorn.
3.
Seal the bag and place it in a sunny
window.
4.
You should see some growth within a week
Sweet Gum Pod Mouse
Heart of America Council
Almost all the supplies for this Sweet Gum Mouse can be gathered on a
nature walk. (Hint)
What you'll need:
Sweet gum
pod/ball with stem, Dried (no seeds)
Acorn or
other small nut
2 (5 MM)
Wiggle eyes
Low temp
glue gun or tacky glue
2 tiny
Brown pom-poms
Dried pine
needles
Scissors
Slice of
dead tree branch or other piece of wood for base (about 1/2" thick and 2"
across)
Gold spray
paint
How to make it:
1.
Glue the pod to the wood with the stem
sticking out. The stem will be the tail.
2.
Glue the acorn to the other end of the
pod, slightly at an angle for the head.
3.
Glue on the wiggle eyes and the pom-poms
for the ears.
4.
Cut the dried pine needles to the desired
size and glue on for the whiskers.
Tips
The sweet gum pod needs to be dried (without seeds) and brown in
color. If the pod is green it has not released its seeds yet.
Experiments with Seeds
How Plants Grow
Heart of America Council
Nature has given plants a
powerful will to grow, and all you have to do is assist her by supplying their
basic needs -moisture, light, air, food and space.
Here are some growing
experiments to help you understand the growing process more clearly.
Germination
Seeds need moisture and warmth
to germinate. To watch them grow, line the inside of a glass jar with a piece of
wet blotting paper. Between the blotter and the glass, place birdseed, radish or
grass seed that has been soaked overnight in warm water. Put an inch of water in
the bottom of the jar so the blotter will stay moist. Watch for the seeds to
develop roots and tiny leaves in a few days. To show the effect of warmth,
prepare two identical glasses and set one in the refrigerator.
Root
Growth
To show how strong is the
instinct of plants to grow with their roots downward seeking a supply of
moisture, put a cover on the jar with the sprouted seedlings and turn it upside
down. In a day or so the roots will turn downward toward the supply of water.
Stem
Growth
Stems grow upwards with equal
force, seeking air and light. To observe a plant as it twists its way toward the
light, make an obstacle box from a one-pound cracker box or shoe box. Cut a
window about 2" x 3" near the top. Cut two pieces of cardboard as wide as the
box and tape them to the sides. Bend them down, leaving a small space. At the
bottom, set a small pot with a bean seedling growing in it.
Need of
Water
To trace water through plant
tissues, make a fresh cut at the bottom of a carrot and piece of celery. Soak
for a while in water then place in a fairly concentrated solution of red ink or
dye. After a few hours, cut the carrot from top to bottom and cut across the
celery stalks.
In the celery, you will find
color even in the veins of the leaves. Bi-colored carnations, sometimes seen at
the florists, are made by splitting the stem partway and putting each half in a
different color. Try this with other white flowers, if available.
Kindness Books
Sam Houston Area Council
Materials: 3” x 5” paper and markers, pencils or pens
Purpose: To emphasize
that helping others includes those in our own families.
Boys could make coupon books
to give to their parents.
Leader prepares slips of paper
ahead of time; 3” x 5” is a good size.
Give each boy about 10.
Boys decide what they can do
to help their families and write one thing on each coupon or illustrate it by
drawing.
The books are then stapled
together, and each boy gives his parents the book.
Parents can redeem the coupons
by giving one to their son.
He agrees to perform the
action illustrated on the coupon.
Suggestions for coupons could
be: doing something without being asked, picking up toys, a bear hug, helping
prepare a meal, drawing a special picture, doing an extra chore, etc.
BRAILLE CARDS
Sam Houston Area Council

In the Braille alphabet, a
pattern of raised dots represents each letter of the alphabet. A person can
"read" through his fingertips by feeling the raised letters. Here is an alphabet
written in Braille. The colored dots represent the raised dots. If you poke a
pinpoint through the back of each of the colored dots, you can "raise" the
letters. Try feeling the pattern with your fingers. Now try to write your own
coded message in the Braille alphabet.
Have the boys glue seeds or
lentil beans onto index cards. Write the letter on the back for Reference.
Use the cards to make
messages.
Try it blindfolded.
Good Deed Paper Chain
Sam Houston Area Council
Make a
paper chain and have the Scouts write the name of a family member on each link.
Direct
them to remove a link each day and do a good deed for the person whose name is
on the link.
Giving Back Day
Sam Houston Area Council
Ask your
Scouts to find a gently used toy, game or book to donate to a local organization
that supports children.
Fill
bags they have decorated with the items and make a special delivery.
Family Information Board
Sam Houston Area Council
Materials:
12 inch
square adhesive-backed cork tile,
12 inch
cardboard square (a packing box is good)
Heavy rope
or twine,
Wire,
Tape and
glue
Instructions:
ü
Remove the paper backing from the cork tile
and stick the tile to the cardboard.
ü
Cut a 4-foot length or heavy rope or twine
and glue it around the edge of the tile as a border.
ü
For the hanger, glue or tape a wire loop on
the back.
ü
Now your family will have a place to post
important information.
Thank You Cards
Sam Houston Area Council
Materials:
paper or
index cards,
markers or
crayons,
magazine
pictures or stickers,
glue,
envelopes
Instructions:
ü
Fold the paper or index card in half to make
a card.
ü
Have Cub Scouts think about someone who has
done something nice or helpful for him. The card could be for a parent, brother,
sister, grandparent, neighbor, babysitter, teacher, etc
ü
Once the Cub Scouts have thought of someone
that they would like to make a card for, let them use their creativity and make
it.
ü
Then, make sure they get the opportunity to
deliver the “thank you” – by mail, in person, etc.
Food Basket
Sam Houston Area Council
P
There may be a family or individual that pack
members know or that your chartered organization may be aware of that may need
some help having a Thanksgiving dinner.
P
As a pack you could assign canned vegetables,
etc for boys to bring.
P
Some boys could bring fruit, others could
bring pumpkin pie mix, etc.
P
The pack might even be able to donate a small
turkey.
P
At a den meeting, the boys and leaders could
bring all items together and then as a group could help deliver the food to the
family or individual. (You could also keep the name of the family or
individual anonymous and have a discussion with the boys that sometimes we help
people even when we may not know their names.)
Favorite Play Doh
Alice, Golden Empire Council
Not strictly grub, although
it won’t hurt if you eat a little during play. It looks, smells, works and even
tastes just like the play doh you buy in cans!
Ingredients:
Liquid -
- 1 tbsp vegetable oil
- 1 cup water
- Food coloring (Paste
works best and you can do any color, even black, but regular will work too)
Dry -
- 1 cup flour
- ½1/2 cup salt
- 2 tbsp. cream of tartar
Directions:
ü
Mix the liquids together,
ü
Then add the dry ingredients.
(This is a different way to do it, but this way,
you don’t have food coloring staining everything in sight)
ü
Now add in the dry ingredients:
ü
Mix all ingredients in saucepan.
ü
Heat on medium, stirring constantly until
ball forms. (The color will suddenly change, and the consistency will become
rubbery looking) Takes only 3-5 minutes.
ü
Pour out onto a board, let it cool a little,
then knead it till soft and pliable.
ü
After kneading, store in an airtight
container or baggie.
It will last a long time.
ü
This recipe makes about 4x as much as you get
in the little cans.
ü
Snack baggies work great for making sets of
different colors to give to individual children.
I’ve done this recipe with
lots of children, some as young as two, and they always have fun with it. I’ve
even used it for a project for the Christmas Bishop’s storehouse – each child
made a batch, then they got to take home just a snack baggie full of the color –
the rest went for stockings for other children who needed a Christmas. One
time, my den watched one of those claymation cartoons (Gromet or Gumby) then we
made play doh in whatever colors the boys wanted. Then, either in pairs or
groups, they “produced” their own claymation films – with a parent handling a
video cam. Great fun!! Alice
p.s. – it really does taste the same – I tried it!!
Grow A Sock
Heart of America Council
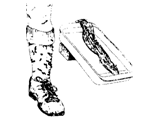
ü
Dress each boy in an old pair of high (knee)
socks.
ü
Go for a walk through a densely vegetated
area.
ü
An empty lot overgrown with weeds would be
excellent
ü
Look at the socks! Then take them off.
ü
Wet the entire sock
ü
Place it in a cake pan placed on a slant.
ü
Fill the lower portion of the pan with water
so the sock remains wet.
ü
Place the pan in a warm place and watch the
seeds sprout
Seed-head Shooters
Santa Clara County Council

Some
kinds of wildflowers have seed heads left at the tops of their stems when the
petals have fallen off. Pull up a long-stemmed seed head and twist the stem
around and over itself as shown.
Using
the thumb and forefinger of one hand, grip the bent stem near the seed head,
and, in a quick, snapping motion, attempt to pull the seed head through the bent
stem loop. The seed head will shoot out (somewhere between a few feet and
several yards, depending on the age of the stem and the skill of the shooter),
and may hit a target.
Windowsill Bird Feeding
Heart of America Council
Jays, nuthatches, and
cardinals are bold, curious birds. They will fly right onto a window ledge for a
meal. Start by putting bread crumbs on a windowsill. Birds can spot them
quickly. When the birds are used to coming to your house to eat, you can switch
to sunflower seeds or wild birdseed.
Here's a
quick windowsill treat:
Roll 1 cup of peanut butter in
birdseed or sunflower seeds to make a ball.
Squeeze it in your hands until
it holds together well.
Put the ball on your
windowsill. (If you have a backyard, you can put it out on a fencepost).
Bird
Feeding Tips
If you can, set up two or
three bird feeding stations.
Some birds are bullies. Once
they find an eating spot, they will drive other birds away. If there are several
eating places, all the birds have a better chance to get their share. Once you
start feeding the birds, DON'T STOP. They will come to depend on you for food.
If you stop suddenly in the winter, they may starve.
Who
Likes What
Sunflower Seeds: Jays, cardinals, chickadees, goldfinches, nuthatches,
sparrows
Millet: Juncos, sparrows, goldfinches
Peanuts: Jays, chickadees, goldfinches
Suet and bacon fat: Woodpeckers, chickadees, starlings
BIRD BISCUIT
Heart of America Council
What you'll need:
Flat wooden
heart (or any wooden shape)
Peanut
butter
Birdseed
Drill
Approximately 4 feet of 1/4 inch wide ribbon
Bowl
How to make it:
1.
Drill one small hole in each side of the
heart - same distance from the top so that the heart is not lopsided.
2.
Cover the wooden heart completely in
peanut butter and then place the heart in a bowl of bird seed.
3.
Cover the entire area of the heart with
the birdseed making sure no bald spots are left anywhere on the heart.
4.
Cut two lengths of ribbon each 2 feet
long and run one length of ribbon through each hole.
5.
Tie all ends of the ribbons together in a
bow or knot.
6.
Hang bird biscuit in a tree or somewhere
birds have easy access to it.
MARBLED PAPERS
Heart of America Council
About this project—
With this project you can make professional-looking cards, envelopes,
stationery, and anything else you can think of! You may want to monitor your
young children, though, because oil paints and marbling inks can be harmful if
swallowed. This project is rated EASY to do.
Supplies -
·
Assorted colors of oil paints or marbling
inks (the inks work better)
·
Plain, white paper (computer paper works
best)
·
An oven pan covered with tin foil (make sure
the pan is big enough to fit your paper)
·
Water to fill the saucepan
·
1 teaspoon of vinegar (if using marbling
inks)
·
Newspaper to cover your work area
·
A pencil or toothpick
Project how to -
1.
Fill the oven pan (with the tin foil over
it) with water.
2.
If you are using marbling inks, put the
teaspoon of vinegar in the oven pan, and mix well.
3.
Put in just a tad of the marbling inks or
oil paints (using two or more colors works best).
4.
Swirl the colors with the pencil or
toothpick.
5.
Put the paper in the pan slowly. Work
quickly, especially when using oil paints. If you do not work quickly, the paint
will make a sheet on top of the water, and you will not be able to marble.
6.
Take the paper out and put it face down
on the newspaper for about a minute.
7.
You are done!!
8.
Use the paper when completely dry.
PINE CONE TURKEYS
Heart of America Council
About this project—
This turkey is colorful and easy for youngsters to make. When complete, they
make cute table decorations at each place setting for Thanksgiving dinner or
holiday parties.
Supplies –
Plump
Pine Cones (spherical about 1 1/2"-2" diameter)
Bumpy
Chenille Wires (1 red, 1 orange, 5 other colors)
Glue
(craft, wood, or all purpose that dries clear)
Wire
Cutter
Project how to –
1.
Make sure each pine cone is dried
thoroughly.
2.
Cut the bumps apart in each chenille
wire. Using wire cutters, cut in the center of each place where the wire narrows
down--you want the bumps whole and fluffy.
3.
Take one red bump and shape into an 'S'.
Glue this to the rounded end of the cone with the bump protruding somewhat above
the cone for the head of the turkey.
4.
Take one orange bump and shape into a
'V'. Glue this under the bottom of the round part of the cone for the legs and
feet. The feet can be shaped later. Toes can even be added.
5.
Take five to seven other bumps and
carefully bend them so the narrow ends can be twisted together leaving the puffy
end somewhat rounded. Glue as many of these as nicely fits close to the flatter
stemmed end of the pine cone remembering to use glue only on the twisted end of
the chenille wire.
6.
Let dry and then adjust shaped of
chenille wires to make your turkey look more realistic.
Tip:
If you would like to use these as napkin rings, cut the orange
chenille wires longer and make them into a circle and glue circle on bottom of
turkeys.
Boy Scout Emblem Pony Bead Pattern
Heart of America Council
You need:
65 Ivory
Pony Beads
39 Blue (or
Green) Pony Beads
3 Yards
Satin Cord
1 Lanyard
Hook

Basic Instructions:
Fold your ribbon in half to
find the center.
Use a half hitch (see detail)
to secure it to lanyard hook.

Lace beads using pattern at
right as a guide.
Finish by tying off with a
double knot.
Add beads to laces and knot
ends.
MORE GAMES AND ACTIVITIES
Sam Houston Area Council
From the Cub Scout Leader
How-To Book –
ü
Pack Autumn Harvest Festival, page 6-10
ü
Seed Collections, page 4-6
ü
Seed Planting Relay, page 3-27
Materials found in Baloo's Bugle may be used by Scouters for Scouting activities provided that Baloo's Bugle and the original contributors are cited as the source of the material. |
|


