Write to Baloo (Click Here) to offer contributions, suggest ideas, express appreciation, or let Commissioner Dave know how you are using the materials provided here. Your feedback is import. Thanks.
Theme:
Chinese New Year
Webelos:
Scholar & Engineer
Tiger Cub
Requirement 4
WEBELOS
WEBELOS -to- Boy Scouts Bridging Ceremony
Del-Mar-Va Council
I picked this up at Del-Mar-Va Council Pow
Wow a few years ago and it has become my favorite bridging ceremony. The bridge
I made for this ceremony generally gets used several times each year as other
Packs in my district borrow it for the ceremony. CD
Props
4 - 5 to 6 foot 4 X 4's (or
2X6s) for foundation notched to interlock
5 - 4 foot 2x10's - one
plain, one yellow, one blue, one green, one red
All words are spoken by same person (Narrator,
Cubmaster) but you could divide them up amongst several leaders.
WEBELOS leader, will you please place the first
post on the stage in a North/South direction. (WL places post)
WEBELOS Asst. leader, please place the second
post on the stage three feet away from the first post in the North/South
direction. (WA places post)
These two posts placed here are symbolic of the
foundations of Scouting that these WEBELOS leaders have instilled in their
WEBELOS Scouts through activities and outings as represented by the natural
brown color.
Scout Master (name) and Assistant Scout Master
or Senior Patrol leader), please place your posts in an East/West direction 3
feet apart over the North/South posts that are already in place. (SM and SPL
place posts)
As represented by the structure assembly, Boy
Scouting will build on the Scouting foundation begun in WEBELOS. These leaders
have set the stage for bridging the boys from Cub Scouting into Boy Scouting.
WEBELOS Scout (name), will you and your parents
please bring the unfinished plank forward and place it across the east/west
posts. (Scout places plank)
This unfinished plank represents the boys as
they arrived in Cub Scouting, full of potential but unfinished.
WEBELOS Scout (name), will you and your parents
please bring the blue plank forward and place it snuggly against the unfinished
plank. (Scout places plank)
This Blue plank represents the Wolf and Bear
years of Cub Scouting where with the help of their parents the Scouts became
true blue and loyal friends.
WEBELOS Scout (name), will you and your parents
please bring the gold plank forward and place it snuggly next to the blue
planks. (Scout places plank)
This Gold plank represents their golden years in
Cub Scouting as Webelos learning important skills through activity badges and
culminating in the Arrow of Light.
WEBELOS Scout (name), will you and your parents
please bring the green plank forward and place it next to the gold plank.
(Scout places plank)
This green plank represents their new beginning
as Boy Scouts, who will soon be green Tenderfoot scouts, anxious to begin the
Boy Scout trial toward Eagle.
WEBELOS Scout (name), will you and your parents
please place the final plank onto the bridge. (Scout places plank)
This last plank is red the predominant color in
the Eagle Scout Badge and represents the fact that as they step off the bridge
from Cub Scouting to Boy Scouting they are beginning of their journey to
becoming Eagle Scouts.
Webelos entering Troop (number), please assemble
with your parents at the unfinished board of the now completed Bridge to
Scouting?
As we present you with your Pack graduation
Certificate, will each parent please remove your sons Webelos neckerchief and
slide.
Scoutmaster invites boys across the bridge,
calling each by name and (performing whatever ceremonies are customary for your
pack and troop)
After all have crossed - Pack (number) please
stand and show your pride to the new Boy scouts from this Pack. (Cheer (Blast
Off), Applause)...
We are very proud of you all.
SCHOLAR
MENTAL SKILLS GROUP
Sam Houston Area Council
Background
Scholars do their BEST in
what they commit to do. Scholars - Believe it can happen, Expect success, Set
their mind, and Try, try, try. These steps to do their best can be used at
school and in everything that they do.
Ideas For Den Activities
Prepare a chart of the school system and
explain and discuss with boys.
Have the boys create a word search.
Stretch the boys minds with brain teasers.
Make your own puzzle.
Play Scout Scattergories.
Invite the parents of Webelos to come to a
den meeting dressed in the type of clothes they wore to school. Have them
bring along such things as class pictures, yearbooks, report cards, etc. and
allow each ample time to share his/ her school days with the den.
Take a tour of your local library.
Tour some specialized schools like karate,
flying school, scuba diving, etc.
Invite a teacher to come and talk to the den
about being a good scholar.
Homework How To's
1.Set a definite study time each school
day. Your study period should have a start and an end time. If you finish before
time is up, review. Take a break from school before you begin your homework.
Its O.K. to schedule one or more short breaks in your study period.
2.Find a proper place for studying away
from the TV, stereo, and other distractions. You need a place to write and
adequate light.
3.Be prepared before you start. Gather
all materials needed to complete your assignments. (Pencils, sharpener, eraser,
and paper for younger students. Older students may need a pen, ruler,
dictionary, graph paper, calculator, and more.)
4.Get organized. For starters, a
notebook with dividers for different subjects and pockets for loose papers could
make a big difference.
5.Make a daily list of homework
assignments - check it at the end of the school day - make sure you take all
necessary materials home. If necessary show your teacher your assignment sheet
before you leave for home to make sure youve got it all right.
6.Work backwards to plan for long-range
assignments. Record due dates on a special blank calendar...then write in what
needs to be done each day/week to complete the assignment on time. Work
backwards - if a short paper is due Monday - the last step is writing the final
draft. Estimate when the first draft must be completed, including time for
revisions and the final draft. Next estimate when to start writing the outline
for the first draft. Last, when to start reading and note-taking.
7.Start the most difficult assignment
when you are most alert. Save easier tasks for off-peak times, and tackle more
difficult assignments during your sharpest time. (Try using an easier assignment
as a break from a more difficult one.)
8.Get your feet wet...then plunge in!
Start a big project at the easiest part, or schedule just a 10 or 15 minute work
session for starters. Even getting together all the supplies youll need is a
start.
Activities
Brain Teasers
1.I walked up the street to the top of
a hill and counted 50 windows on my right. I turned around and walked back and
counted 50 windows on my left. How many windows did I count?
[Fifty; The windows on my right going up were the same as my left coming back]
2.Papa duck, mama duck and baby duck
went for a swim. Baby duck said, Arent we four having a lot of fun? Why did
baby duck say four instead of three?
[Baby duck couldnt count]
3.Take the number of toes on both feet.
Multiply by the number of pints in a quart. Add the number of months in half a
year. Subtract the number of thumbs on two hands. Divide by a dozen oranges.
[2]
4.Two cars start from Denver to drive
to Colorado Springs, a distance of 80 miles. They are the same make of car, and
both are being driven at the same speed. One of the cars makes the trip in 80
minutes while it takes the other car one hour and twenty minutes. Can you
explain the reason?
[Eighty minutes = one hour and twenty minutes.]
Name The States Game
Give each boy a piece of
paper and pencil and have them write down all 50 states. The first one that has
all 50 yells STOP and other boys count up how many they have.
School Of The Future
Materials: You will
need lots of old magazines, construction paper, scissors, glue markers and
pencils.
Directions
Have the boys discuss what
they think school will be like 25 years from now. Will the students all be at
computers? Will they interact with their teachers from a TV hook-up at home?
Will they travel to Mars for mathematics and Saturn for science? Will someone
have invented a smart pill for each subject?
In the future, will we do
away with some of the subjects that are taught now? Which ones? Can they imagine
any new subjects that might be taught instead? Which ones? After the discussion,
divide the boys into two or three project groups to make posters of their view
of education in the future.
Inkwell And Quill Pen
Materials: baby food
jar, cardboard circle the size of the jar top, self-drying clay, turkey feather,
utility knife (for adults to use) ink
Directions
Inkwell
The baby food jar is our inkwell.
Cover the top with a circle of cardboard with a
hole poked through the center for the pen point.
Cover the jar on the outside with the clay and
let dry.
Decorate the inkwell and spray with acrylic to
seal.
Quill Pen
A turkey feather will be our quill pen.
Trim off the rounded tip of the feather.
Split through the middle of the shaft for about
half an inch, using the utility knife.
Cut away one side.
Sharpen the remaining part of the tip into a
point.
Using It
Dip pen into ink, shake off excess ink
carefully, write.
Do not press down too hard or point will get
dull quickly or could break.
Point can be sharpened again with the utility
knife.
The Educational System Careers In Education
Materials needed:
Lots of old magazines, glue
Construction paper,
scissors
Directions
Guidance Counselor
Principal
Health Services College
Professor
Sports Coach Kindergarten Teacher
Elementary Teacher Social Worker
High School Teacher
Librarian
«Have each boy choose one of the listed
careers in education and think of what is involved in that career.
«Using old magazines, have each boy make a
collage of pictures that relate his ideas about the career.
«You may be surprised at a Webelos Scouts
perception of these jobs.
«When the collages are complete, discuss
them and clarify any misconceptions.
«Display the collages at the pack meeting.
Make A Graduation Mortarboard
Materials: poster
board, yarn, glue, scissors, brass paper fasteners
Directions
Cut an 8x 8 square out of the poster board
(or bigger if youd like a bigger hat)
Cut a rectangular strip out of the poster
board that is 3 ¼ wide and 2 feet long
In this strip cut v shaped notches. The
bottom of these notches should go half-way down on one side of the strip.
Make these notches about every 4 inches along the strip. Fold the strip in
half.
Form the notched strip into a circle (with
the notched part facing in), adjust the circle to fit your head and then
glue the ends into place.
Glue the hat band onto the mortar board
putting the glue on the upper notched side of the strip.
To make the tassel Wrap the yarn around a
5 piece of cardboard about 8 times. Carefully remove the tassel from the
cardboard and tie a small piece of yarn around the middle of the yarn. Tie a
longer piece of yarn to one end of the yarn loops formed on one end of the
cardboard. Cut the other looped ends of the yarn.
Attach the long piece of yarn to the
mortarboard with the brass paper fastener in the middle of the board (might
have to poke a small hole in the top first so that the fastener will go
through the board).
Baltimore Area Council
The quality that a Webelos
leader will find most helpful on this badge is the ability to listen to a boy
and praise him for his school accomplishments. Advance planning is important to
make this badge appealing to a 10 year old. You will need to find out who works
at the school and how the education chain-of-command works in your locality. The
school secretary can usually be very helpful. Also, the Board Education will be
glad to furnish you information, PTA officers; will also be able to help you get
information.
Try to find out some of
these things:
·What jobs are there at school for the
boys to do?
·What extra curricular activities are
available?
·For what community activities is the
school used?
·Who are the people on the office staff,
cafeteria staff, and custodial staff? What are their responsibilities?
·What are some of the problems of the
school and how can you help?
DEN ACTIVITIES
1.Invite a teacher or principal to one
of your den meetings. Not only will this provide you some expert help, but also
it will give the boys a change to relate to this adult on an informal basis
outside the classroom.
2.Let the boys talk about whats going
on in school. Dont try to change any of their ideas, but guide the discussion
in such a way that they will see the value of an education.
3.Prepare a chart of the school system
and explain and discuss with the boys.
4.Obtain some old school books for the
boys to browse through it will be interesting for them to see how fast
education is moving forward.
5.Discuss possible den service project
for the school.
6.Take a tour of the Board of
Education.
7.Exhibit: Chart of school system, old
school books along side current books.
Demonstration: Oral
report on field trip. Explain chart of school system, oral report on
responsibilities of employees of school.
NOTE: Most of the work on this
badge will be done by the boy in school, but dont let this deter you from
planning interesting den meetings. You neednt limit the meetings to discussion.
You might take a trip to a high school or college to show the difference from
elementary school. The service project will make the badge seem more real to the
boys.
Here are some suggestions
to help a Webelos leader increase the value and effectiveness of the boys
education, which can be worked into the den program
By keeping physically fit, the boy is more
likely to get the most out of school. Emotional health is as important as
physical health. Help him with his emotional development. Encourage him to
talk about his problems and listen when he does. Pat him on the back when he
does well.
Help each boy lead a balanced life studies
should be counter-balanced with recreational and social activities.
Help him make wise use of this time. Horace
Mann wrote, Lost, yesterday, somewhere between sunrise and sunset, two
golden hours, each set with 60 diamond minutes no reward is offered for
they are gone forever.
A boy feels about school, to a certain
extent, according to how he thinks adults feel about it. Hes looking to you
for guidance.
Activities outside the classroom strengthen
and extend the learning that goes on in school. His Webelos program is
enhancing his education and you, as his leader, are an integral part of his
growing up process.
BRAIN TEASERS
1.Take the number of pennies in a
dollar. Multiply by the number of thirds in a circle. Divide by the number of
inches in a foot of string. Subtract the number of nickels in a quarter
ANSWER: 20
2.If three cats can catch three rats in
three minutes, how many cats could catch one hundred rats in one hundred minutes
ANSWER: the same 3 cats
3.A boy, driving some cows, was asked
how many cows he had. He said, when they are in line, there are two cows ahead
of a cow, two cows behind a cow, and one cow in the middle How many cows were
there? ANSWER: 3
4.Do they have a 4th of July in
England? ANSWER: Yes
5.Why cant a man living in Winston
Salem, North Carolina be buried west of the Mississippi? ANSWER: He must be dead
first
6.How many birthdays does the average
man have? ANSWER: 1
7.If you have only one match and you
enter a room in where this is a kerosene lamp, an oil heater and a wood burning
stove, which would you light first? ANSWER: the match
8.A man built a rectangular house
each side has a southern exposure a big bear comes wandering by what color
is the bear? ANSWER: white
GAMES
SCOUT LAW DART BOARD
Equipment: dart
board and darts. The dart board should have spaces with numbers through 12
Directions:
Each boy, in turn, throws a dart at the dart
board and scores a point if he can recite a point of the Scout Law
represented by the number in which his dart sticks.
Score one point for each correct throw and
identification.
Permit each boy to continue throwing until
he misses, either in his throw or in his identification of the point of the
Law.
MATH
Arrange the numbers 1 through 9 in a three
by three box so that the totals for each column, row and diagonal are equal.
Each number may be used only once.
Can you calculate what each row, column and
diagonal are going to equal before you solve the puzzle?
Now try to arrange the numbers 1 through 16 in a four by four box so that the
totals for each row, column and diagonal are equal.
ANSWERS:
QUIZ GAMES
For laughs, ask your Scouts
the following:
?At what time was Adam born? (a little
before Eve)
?What is it that cant run and cant walk,
has a tongue and cant talk? (a wagon)
?On which side is a pitcher handle? (the
outside)
?What is the best bet ever made? (the
alphabet)
?What increases in value when its turned
upside down? (the number 6)
?What is it that cant talk but always
tells you the truth? (a mirror)
?What insect can be found in school? (a
spelling bee)
FOLLOWING DIRECTIONS
1.If you ever saw a cow jump over the
moon, write V in spaces 2, 3, 28 and 19. If not, write L in these spaces.
2.If X comes before H in the alphabet,
write Z in space 16. If it comes after H, write W.
3.If 31,467 is more than 12 dozen,
write G in spaces 8 and 12.
4.If you like candy better than
mosquitoes, write an O in spaces 13 and 14. If not consult a psychiatrist at
once!
5.Closing one eye and without counting
on your fingers, write the 5th letter of the alphabet in space 11.
6.If Shakespeare wrote Twinkle,
Twinkle Little Star, put an O in spaces 9 and 17. Otherwise put an I.
7.If white and black are opposites,
write V in space 10, if they are the same, write nothing.
8.If 16 quarts makes one pint, draw an
elephant in space 7, otherwise, write an S.
9.If summer is warmer than winter,
write the 3rd, 2nd and 4th letters of the alphabet in spaces 4, 6 and 15
respectively.
10.If you can read this sentence, place
the first and last vowel in spaces 1 and 5 respectively.
Now, read the message it
makes sense!
1. ______ 8.
______ 15. _______
2. ______ 9.
______ 16. _______
3. ______ 10.
______ 17. _______
4. ______ 11.
______ 18. _______
5. ______ 12.
______ 19. _______
6. ______ 13.
______
7. ______ 14.
______
ENGINEER
TECHNOLOGY GROUP
Sam Houston Area Council
Background
Engineers take the raw
materials of nature and change them for the use of all of us. There are many
kinds of engineers from civil engineers to chemical engineers to mechanical
and electrical engineers. Webelos Scouts may find a type of engineer that they
want to be someday.
Ideas For Den Activities
Learn to use a level.
Make a pulley and use it correctly.
Visit a construction site and see the plans
which are being followed .
Make catapults and demonstrate them at Pack
meeting.
Make a home made flashlight.
Learn electricity safety.
Invite an architect to come and visit. Have
the architect show and explain a floor plan of a house.
Discuss property lines. Have a surveyor show
how property lines are determined and measured.
Discuss different types of engineers. If one
can visit your den, let the engineer describe briefly what he does.
Hanging By A Thread
Upon completing this
project, your den will have built a suspension bridge. The instruction seems
long and complicated, but it isnt really. Use illustrations as a guide.
Materials needed:
Heavy cardboard 2 x 4
Large ball of strong string
Duct tape (heavy tape)
Lightweight cardboard (6 x 5)
4
bricks or wooden blocks
Yardstick
Scissors
Directions:
1.Place the heavy cardboard on a firm
surface. This is the base for the bridge.
2.Place the 4 bricks on end on the
cardboard base so that they form the corners of a rectangle 7 wide and 2 long.
These are the towers.
3.Tape one end of the string to one 2
edge of the cardboard in line with one of the bricks. This is the anchor. Drape
the string over the top of the brick, straight across the space between the
bricks, and over the opposite brick. Leave enough string so that it hangs down
between the bricks about 3. Tape the loose end of the string to the opposite
side of the cardboard. This will form the other anchor. Cut the string. The
length of string hanging between the bricks is called the cable.
4.Do the same thing on the other side
of the bridge, using the other two bricks. Make sure this string hangs down the
same distance as the first cable. You now have two cables.
5.Carefully slide the lightweight
cardboard so it stretches the length of the bridge and lies between the bricks.
This will be the platform or roadway.
6.Cut seven 12 pieces of string. Tie
one end of each piece of string every 4 along one of the cables. These are your
suspenders.
7.Slide each of the suspenders under
the lightweight cardboard. Tie the free end of each of the suspenders to the
other cable. The suspenders closest to the towers should be longer than those in
the middle of the bridge. In the middle of the bridge the platform should be
suspended about 3" above the cardboard base. Trim the excess string from the
suspenders.
8.Now that the platform is hung, gently
bend the ends so that they touch the cardboard base. Tape the ends to the
base. You now have a road that goes across the bridge.
You have created a suspension bridge. The suspenders take the weight of the
platform up to the cables. The cables then carry this weight to the towers and
the anchors. The weight of the platform pulls up on the anchors and downward on
the towers. The towers are strong rigid structures, like your bricks, so they
can support weight. The anchors need to be well secured to a firm object
(usually land). Suspension bridges use much less material than traditional
bridges and can span large distances.
Craft Stick Truss Bridge
Purpose: To build a
bridge spanning 12 inches that will hold 50 pounds. The bridge is made only of
craft sticks and glue.
Materials
114 Craft Sticks
2
or 3 heavy books
Ruler
Glue (school or wood glue is best)
Rubber bands, small clamps
Saw or sandpaper
Directions:
1.1 Select 9 sticks. Break one in
half. Place 3 against the ruler. Glue the sticks together forming a beam 3
sticks long and 3 sticks thick. Follow the pattern in above figure. Clamp or
rubber band it together and allow to dry. Repeat this step 3 more times so that
you have created 4 beams.
2.Select 6 of the sticks. Break one in
half and lay 2 against a ruler. Glue the sticks together; forming a beam 3
sticks thick and 2 sticks long. Follow the pattern in above figure. Clamp or
rubber band it together and allow it to dry. Repeat step 2 one more time to have
2 beams.
3.Select 12 sticks and one long beam
(from step 1) and one short beam (from step 2). Lay them on a table with the
flat part of the beams down. Glue 6 sticks on top of the beams in a triangular
pattern as in figure three. Then glue 6 more sticks on the underside in the same
fashion. Press with books. Repeat step 3 once more so that you have 2 walls.
4.Lay the 2 remaining long beams on a
table. Glue 33 craft sticks onto them, forming the road. Press with books.
5.Glue the 2 walls at right angles to
the road. Hold the walls in place until the glue sets.
6.Glue crossbeams on top of the walls.
You will use a total of 9 sticks. Allow this to dry. Smear some extra glue on
the joint between the wall and the road. This will reinforce the joint. Allow it
to dry and youre done!
Pea And Toothpick Building
Materials:
Dried peas
Round toothpicks
Paper plates
Small bowl
Directions:
*Before the meeting, soak the dried peas
in water for about 8 hours.
*Give each Scout a plate for a building
surface, a bowl of peas, and a box of toothpicks.
*Using the toothpicks as connectors
between the peas, the boys can construct buildings (or other ideas).
*After the constructions are finished,
allow them to set for at least a day until the peas have dried out and shrunk
again.
*This will make the joints super strong.
(Works with gumdrops, jelly beans and
other such stuff, too. CD)
Peanut Catapult
*Divide the den into two teams.
*Give each player three peanuts.
*One at a time, the players try to
catapult their peanuts into an empty milk carton, which is sitting on the floor.
*They do this by holding one end of a
ruler in one hand, holding the peanut against the other end of the ruler and
bending it back, then releasing it so the peanut will sail towards the carton.
*Score one point for each peanut that
lands in the carton.
Make A Block And Tackle
*To make a pulley, you need a spool and a
coat hanger.
*Cut off the hanger as shown and bend the
ends at right angles through the spool. (Be careful with the cut ends of the
wire!)
*Then bend down the ends so they wont
spread.
*Make sure the pulley turns easily.
Capital Area Council
Den Activities
«Have an engineer or surveyor visit your
den meeting.
«Draw a sketch of a bridge to build.
«Visit an office
of civil engineers.
«Obtain a blue
print of a building and ask an engineer to discuss the plans. Then tour the
building.
«Visit a
chemical production plant.
«Visit a college
engineering department.
«Have an engineer visit your den and tell
about his profession. He might be able to bring a set of blueprints, and explain
the symbols used, and show how he uses blueprints.
«Demonstrate the basic principle of
leverage by using a teeter-totter or a plank with a fulcrum made of bricks or
blocks. Show how this principle is the same one used in block and tackles using
a single pulley as a block and tackle.
«Visit (with permission) a housing projector a commercial building construction site, possibly in conjunction with a
visit by an engineer as a guest speaker at your meeting.
«Visit The Corps of Engineers office if
you are near one.
«Visit a bridge and take a tour.
«Measure the
dimensions of your meeting place and include the location of doors and windows.
Show how to sketch a simple floor plan with these measurements.
«Make catapults
and have a contest. Demonstrate for the pack meeting.
«Have a resource
person demonstrate the use of drafting tools.
«Visit a
construction site with a contractor. Ask him to explain the use of blue prints
and the order of construction.
«Have someone
explain how to read topographic maps.
«Find pictures
of different bridges and discuss the differences in their construction.
Block and Tackle Experiment
This simple apparatus shows how block and tackle increases power. You need two
lengths of broomstick and a length of clothesline. Fasten one end of the line to
one of the sticks. Wrap line loosely around both sticks as shown. Have two of
your biggest den members grasp the sticks and try to keep them apart while the
smallest den member pulls on the line. He should be able to pull the sticks
together no matter how the others try to keep them apart.
Catapult Experiment
Use a ruler and an eraser or other soft projectile. Have a boy strike the short
end of the ruler. How far did the projectile go? Now have him try it with half
the ruler over the edge and hit it with the same force. Is there a difference in
the distance? Why?
Measure The Property Line Where You Meet
Do this in small groups. Have someone write it down. Compare the results when
all of the groups have finished. Discuss why the results were the same of
different. Ask the Scouts why people have and measure property lines. Ask the
Scouts if there is a way that they could measure the property line and be sure
of the results and what might happen if the line were measured wrong.
Measure Your Meeting Room
Measure the dimensions of the room you meet in using a ruler, yardstick, and a
tape measure in small groups. Compare results and discuss measuring experiences
and problems. Equate their experiences with what an engineer might do as a part
of his work.
Build a Dollhouse from a Kit
Obtain a simple doll house kit from a craft store. Have one Scout read the
instructions and supervise the building (The Scouts' jobs might change as they
find they are better at some skills than others), one assemble the tools and
keep the materials straight, two build, etc. After the house is built, paint
will need to be obtained (ask for donations), shingles attached, and of course
the inside will need to be decorated.
The Scouts will work together and discuss each stage of the building. Try to
stand by with assistance if needed and to record decisions made by the group.
They might wish to extend the activity by making furniture for the inside.
Imagination is the only limit to the way the Scouts can make the furniture.
When the house is completed, what will you do with your house? Set it to a vote
of the members of the den. (Citizenship Activity Badge). Possibilities are
putting all of the boys' names in a hat for a drawing, or donating it to a sick
child or a school (giving the den its year's service project).
Careers In (Fields of) Engineering
Aeronautical Engineering:
Deals with the whole field of design, manufacture, maintenance, testing, and the
use of aircraft both for civilian and military purposes.
Astronautical
Engineering: Closely related to aeronautics, but is concerned with
the flight of vehicles in space, beyond the earth's atmosphere, and includes the
study and development of rocket engines, artificial satellites, and spacecraft
for the exploration of outer space.
Chemical
Engineering: Concerned with the design, construction, and management
of factories in which the essential processes consist of chemical reactions.
Civil
Engineering: Perhaps the broadest of the engineering fields; deals
with the creation, improvement, and protection of the communal environment;
providing facilities for living, industry, and transportation, including large
buildings, roads, bridges, canals, railroad lines, airports, harbors, and other
constructions.
ElectricalEngineering/Computer Science: Divided broadly into the engineering
of electrical power distribution systems, electrical machinery, and
communication, information, and control systems.
Geological & Mining
Engineering: Includes activities related to the discovery and
exploration of mineral deposits and the financing, construction, development,
operation, recovery, processing, purification, and marketing of crude minerals
and mineral products.
Industrial or Management
Engineering: Pertains to the efficient use of machinery, labor, and raw
materials in industrial production.
Mechanical Engineering:
Broadly speaking, covers the design and operation of all types of machinery
and small structures.
Safety Engineering:
Concerned with the prevention of accidents.
Sanitary Engineering:
A branch of civil engineering that has acquired the importance of a
specialized field due to its great importance for a healthy environment,
especially in dense urban population areas.
Some Engineering Functions
Research: A
search for new scientific knowledge, with the objective of applying it to
solving problems.
Development:
Applied research which results in working model.
Design:
Conversion of developed ideas into economical, reliable, and producible plans of
manufacture, use, or construction.
Maintenance:
Plan and direct the methods of making the design and transforming it into a
useful product.
Sales:
Define and explain the application of the product and the sale of it.
Management:
Administrate any or all of the engineers which perform the functions listed
above and any other personnel required to perform the assigned task.
The Right Person for the Job!
Use a word from this list
to fill in the correct answer.
Aeronautics Chemical Computer
City Agricultural
Electrical
Physical Industrial Mechanical
Civil
?An engineer who designs plants to make
water safe to drink.
?An engineer who designs machines in a
factory
_________________________________________
?An engineer who tests new processes and
checks old ones in a chemical plant.
?An engineer who plans new circuits and
directs workers in an electrical plant.
?An engineer who designs and tests new
space techniques
?An engineer who designs and test new
techniques for new equipment for industry.
?An engineer who designs and tests
equipment for farmers and ranchers.
Bridges and Machines
Use words from this list to
fill in the correct answer.
Catapult Pulleys Beam Bridge
Plank
Bridge Truss Bridge Levers
Suspension
Bridge Block and Tackle
Pier
Bridge Arch Bridge
?A flat surface over two supports
________________________________________
?A flat surface over three or more
supports
_________________________________________
?A flat surface over an arched support
_________________________________________
?A flat surface with turned up edges
_________________________________________
?A bridge with sides made up of a series
of triangles
_________________________________________
?A bridge that appears to hang from strong
strung cables
_________________________________________
?A pulley(s) and a rope or cable
_________________________________________
?A slingshot or other device used to
project something
_________________________________________
Do-it Yourself Flashlight
This flashlight can be assembled easily and
provide a fun project for the boys. And better yet, it actually works!
Materials:
Flashlight battery
Bulb
Plastic pill bottle with a flexible lid
Insulated wire
1.Find a pill bottle large
enough for the battery and bulb base to fit inside it. The wire should be the
kind that can be bent easily.
2.Scrape the insulation from one end of
your wire and form it into a flat coil.
3.Attach the coil to the bottom of the
battery with adhesive tape.
4.Cut an opening in the center of the
pill bottle lid, so that the base of the bulb will fit.
5.Push base of bulb through hole in
lid.
6.Scrape the other end of the wire and
wind it around the base of the bulb. Secure in place with some tape.
7.Crumple small pieces of paper. Place
enough of this in the bottom of bottle so that when battery is inserted and the
lid is tightly in place, the bottom of the bulb will just make contact with the
raised center top of the battery.
8.Hinge one side of the lid to the
bottle with tape.
9.When lid is closed, the bulb will
light.
10.To shut off your flashlight, flip the
lid up.
This light creates a dim glow. If you want
a larger light, use two batteries in a larger container.
ACTIVITIES
*Ask a parent in your den or pack who is
an engineer to come and talk about their career. How did they get interested?
Where did they go to school, what kinds of courses did they take? Have they
moved up through several jobs to get where they are? What is their future?
*Visit the municipal offices of the city
engineer or surveyor. Look at a map of your town and try to find your house.
Look at some of the surveying equipment and learn some of the simple math
calculations.
*Tour the city water works, sanitary
facility or recycling center. Ask about the current workload, and the kinds of
daily activities that go on. How do they handle emergencies?
*Visit an operating draw bridge, grain
elevator, ship or train loading operation, or other large industrial operation
involving large cranes or other lifting equipment.
*Visit a jeweler and look at various gems
under the microscope. How does the pattern affect the way a jewel is cut?
*Invite someone from an Orienteering Club
to bring some topographical maps to your meeting. Learn how to read a map,
picking out landmarks.
*Ask Webelos to look through books and
magazines at home and bring in pictures of bridges. Note the differences in
construction.
*Ask your local Boy Scout troop give a
demonstration of some of the skills needed for the Pioneering Merit Badge. One
particular item of interest would be to see a rope monkey bridge being lashed
together.
*It's fun to water the grass! Gather a
variety of watering devices and demonstrate them during the den meeting. Analyze
how the water is distributed and what patterns are made. If a family has an
underground sprinkling system, look at the layout of the heads and the
connections needed to cover the whole yard.
Den Floor Plan
Invite the high school
drafting teacher to your meeting. Learn to use T-squares, triangles, straight
edges, and other equipment needed to accurately draw a floor plan. Measure the
dimensions of your den meeting place. Make a simple floor plan sketch, including
location of doors and windows.
Survey Maps
The U.S. Department of the
Interior publishes geological surveys of the whole county. Quadrangle maps can
be purchased at some sporting goods stores.
Look at a map which
includes your town and try to find your house. What is the exact longitude and
latitude of your home? Find your meeting place, nearby lakes, and other points
of interest.
TIE SLIDE
Materials needed
7/16" machine bolt about I 1/2" long, a nut to fit,
20
gauge stem wire,
pliers.
Instructions:
·Thread nut onto the bolt a short way in
from the end.
·Twist the stem wire around both ends of
the bolt to form the slide loop.
·Use pliers to tighten the twists and cut
off excess.
Pack Meeting
Conduct a demonstration of
the strength in different types of bridges.
GAMES
How Does Your Den Measure Up?
Line the Webelos up in the
following manner and then take measurements.
Use a 50-foot tape measure.
This would be fun to do as
teams, too.
See how they measure up -
1.Shoulder to shoulder.
2.One foot in a line, heel to toe with
the next boy.
3.Arms out full length to sides,
fingertips touching.
4.All boys lying down in a line, head
to feet.
5.Palms only, one boy beside the other.
6.Add up the circumference of all
heads.
7.Add up the hand to elbow distance of
all boys.
Word Lightning
Divide the den into two
teams.
The leader announces the
category such as bridges, electric currents, engineer jobs.
Each team must say one word
in that category, then the other team says a different word.
Continue back and forth
until one team is stumped
Electric Current
*Players form a circle holding hands while
the "electrician" is out of the room.
*One player is designated to be the
sender. He starts the current going around the circle by squeezing either the
left or right band of the next boy.
*The "electrician returns and stands in
the middle of the circle.
*He says, "Time to turn on the electric!
*He then tries to locate the current being
passed.
*If he can spot a squeeze, that person
trades places with him.
*Repeat.
Topographical map Relay
Line up in two teams for
this relay.
The leader stands at a
table with a "topo" map.
Teams take turns.
One player at a time comes
forward and the leader points to a symbol to identify or asks a question.
If the boy is correct, be
runs back and tags the next person.
If be is not correct, the
other team begins its turn.
ESTIMATION
Materials needed
Objects of various sizes,
weights or lengths.
Instructions:
*Often times people describe objects by
large measures - feet, miles, tons, etc.
*Try your hand at describing these smaller
objects which are used or seen every day. (Examples: a piece of rope, a Kleenex
box, a can of food with weight covered, five pound bag of flour, a belt, the
leaders weight, a long board or pole)
*This can be a team effort or done alone.
*Have boys write down their estimates.
*Measure or weigh to find who is the
closest.
Raining Marshmallows (or popcorn)
Take homemade catapults to
the pack meeting. Demonstrate how they work by shooting marshmallows into the
audience.
AWARD CEREMONY
Have several sizes of boxes
arranged on the floor. As each Webelos comes forward to receive his badge, he
picks up one and builds on another one. Boxes can be decorated with Scout logos
or names of the Pack leadership.
Catapult
Materials:
Catapult Arm
Four popsicle sticks
Plastic spoon tied on with wire and
tape (twist wire for rubber band stop)
One rubber band
Base
Wooden slat 1 x 2
10" long
Sides
Eight popsicle sticks
Two 2 1/4" nails
Six 3/8" wood screws
Directions
Assemble in accordance with
picture
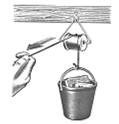
Make Your Own Single Pulleys
Materials:
Wire
Thread spools
String
Screw in Hook
Toy bucket full of heavy objects
2.Bend about 8 inches of wire into a
triangle shape and push the ends into a thread spool.
3.Find a suitable place to hang your
pulley. A book in the shed or garage or the hook at the end of a plant hanger
will do.
4.Tie one end of the string to the
handle of the load.
5.Wind the string over the thread
spool.
Questions:
?Is it easier to lift the load with the
pulley?
?How much string do you have to use to
lift the load 1 foot?
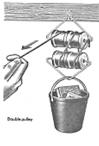
Try a double pulley
1.Make two wire triangles. Use about 1
foot 2 inches of wire for each one.
2.Attach two spools to each triangle.
3.Thread the string around the pulleys
as shown in the diagram. Use about 6 ½ feet of string.
4.Attach the heavy load to the pulley
as before.
Questions:
?Is it easier to lift the load with the
double pulley?
?How much string do you need to raise the
load 1 foot?
How It works
*The pulley with one thread spool allows
you to lift a heavy load directly underneath the pulley.
*The double pulley means you have to pull
only a ¼ as hard, but you have to pull for 4 times as long.
Bridge Building
Ever since man found roads that would let him
travel from one place to another easier and faster, he has been faced with the
problem of crossing streams, rivers, gullies and canyons. So he invented bridges
structures to leap from these obstructions and make the way smoother. At
first, he used two basic geometric forms to build these structures the arch
and the triangle and built his bridges of stone and wood. Today, highway and
railroad bridges that we see crossing interstate highways, rivers and canyons,
are made from steel plates, wire cable, angles, Ibeams, H beams, and concrete.
The design of a bridge and the type of
construction depend upon the kind and width of the obstruction, the load it is
expected to carry, the kind of ground or rock found at the site and the cost.
Dont just draw bridges, build them! A drawing cannot demonstrate the structural
strengths and weaknesses of the various bridge types.
To build the bridges, use construction paper or
poster board strips. Use building blocks, bricks or whatever for supports. Use
toothpicks and thread for suspension bridge. Using toys cars, pile them on the
bridge until they collapse. The boys love to try to bring about the demise of a
bridge and are astonished at the strength of the truss and suspension bridges.
Fountain in a Jar
Materials:
2
Jars one with screw type lid
Modeling clay
Large nail and hammer
2
plastic drinking straws
Water
Scissors
Ruler
Directions
*With the help of an adult, use the nail
and hammer to punch two holes in the lid of the jar the size of the straws.
*Push the end of one of the straws about
1/2 inch through one of the holes and the other straw about 2 inches through the
other hole.
*Cut the second straw so that about 4
inches sticks above the lid.
*Use the clay to seal the openings around
the straws.
*Now fill the jar about half full of water
and screw the lid in place.
*Fill the other jar with water and place
it near the edge of the sink.
*Quickly turn the jar with water and place
it near the edge of the sink.
*Quickly turn the jar with the lid upside
down and lower the shorter straw into the water in the other jar.
*You will see a fountain of water appear
in the upper jar.
The fountain occurred because the water flowing
from the longer straw reduced the air pressure inside the closed jar. The
higher air pressure on the water in the open jar pushed the water up the short
straw and created the fountain.
Materials found in Baloo's Bugle may be used by Scouters for Scouting activities provided that Baloo's Bugle and the original contributors are cited as the source of the material.
Materials found at U. S. Scouting Service
Project, Inc. Websites may be reproduced and used locally by
Scouting volunteers for training purposes consistent with the programs
of the Boy Scouts of America (BSA), the World Organization of the Scout Movement (WOSM) or
other Scouting and Guiding Organizations. No material found here may be
used or reproduced for electronic redistribution or for commercial or other
non-Scouting purposes without the express permission of the U. S. Scouting
Service Project, Inc. (USSSP) or other copyright holders. USSSP is not affiliated
with BSA or WOSM and does not speak on behalf of BSA or WOSM. Opinions expressed
on these web pages are those of the web authors. You can support this website
with in two ways:
Visit Our Trading Post at www.ScoutingBooks.com or make a donation by
clicking the button below.