PACK AND DEN ACTIVITIES
Genius Kits
One of the suggestions for this theme is to give Scouts a Genius Kit and have them build something. Here are a few ideas for Genius kits I found on the Web and in Pow Wow Book. Don’t get hung up in the specifics – make the contents fun, use your imagination. This is a perfect project for the boys to use their imagination and satisfy their desire to make something that does something as Bill Smith, the Roundtable Guy says. CD
York-Adams Council
From February 2003 Baloo’s Bugle
I can’t imagine that anyone hasn’t at least seen a description of the Genius Kit activity, but for those that haven’t I am including my description here. And for those that have never done a Genius Kit activity, you are really missing out on one of the most incredible, eye-opening activities you could possibly imagine. We run one of these activities at least every couple years because they are always fun and the results are never the same.
What is a Genius Kit?
Well it’s a group of 20 or more odds and ends thrown together into a container and given to a boy to turn into something. (Variations include letting the boys pick their own items from a large open container, but again, the items are odds and ends.)
What is the purpose of the Genius Kit activity?
The object is to let the kids use their imaginations to come up with some of the most unbelievable creations from the junk they have. You will be amazed at the results!
How do you run a Genius Kit activity?
I have seen them run two different ways. First, as said above, is to give the kids a chance to pick their own items from a general junk bin and then let them work on making their creations. The other way is to give each boy an identical Genius Kit and have each one come up with his own creation. We also apply rules depending on how we are running the event. For example, when we’ve given the boys all the same items, we’ve said no painting and only the materials supplied and clear glue can be used. This keeps them from adding to their creations beyond the “level playing field.”
Finally, this activity doesn’t lend itself to a large group setting. The hot glue and white glue can end up everywhere and might hurt someone. If you want to incorporate it into the Pack Meeting, have the boys work on them at home and bring them in for display and judging. (This is just my opinion.)
How do you judge the Genius Kits?
For either “method,” we try to have enough categories that virtually all of the creations get ribbons. It isn’t easy for the judges, let me tell you. Your best bet is to make sure you have ribbons or certificates for all participants and then you can come up with some Top Prizes.
Baltimore Area Council
For a Pack meeting idea have a “Genius Night”. This theme is designed to challenge the creative imaginations of parents and sons. In preparation for the Pack meeting, parent-son teams are each given a bag of identical scrap objects. The object is to see which team can “dream-up” & build the most unusual “invention” - making the best use of the parts. At the previous Pack meeting, distribute the materials and explain the rules for the subsequent Pack meeting. A committee should have collected the materials ahead of time (enough for every Scout to have an identical set of parts). Suggested items:
1 piece of cloth (12x18 inches) 1 golf tee
4 ice cream sticks 12-inch piece of ¼-inch dowel
4 corks 12 tacks
1 board, 1x6x10 inches 8 nails, 1-inch long
1 small tube of glue 4 feet of string
1 No. 2 can 1 wire coat hanger
6 pipe cleaners 2 empty thread spools
Rules:
ü Bring parent & genius construction to the Pack meeting
ü Use only the materials found in the kit bag. You do not have to use everything, but cannot add anything
ü You make cut the parts into pieces as you want
ü You may use hand-tools (drill, knife, saw, hammer, sandpaper, or any other tool)
ü Use lots of imagination and have fun!
Genius Night with a Shut-in Friend
Plan a special night with an adopted shut-in and other residents in a care center. Have the boys collect things for a gigantic genius kit. You will not need multiples of each item, just a large variety of ‘things”. Try to include yarn buttons, material scraps, seeds, scrap wood, straws, old wheels from broken toys, macaroni, paper bags, lids, twigs, paper clips, etc. The more stuff the more fun you’ll have. Don’t forget to take along hammers, nails, glue, scissors, needles, thread and large pieces of cardboard. Now take your “genius kit” and Cub Scouts for a visit to the care center.
Divide the boys into groups of two to work with each group of adults. Each group then creates something from all the items you have brought. After all the groups are done with their projects, take a picture of the project and the genius makers. If possible, have a Polaroid, if not, be sure to go back with the developed pictures. Take a lot of pictures, enough so the boys can each have one and the adults can each have one.
Pack 326, Los Alamos, NM
http://www.losalamos.com/bsa/pack326/
YOUR TASK: Create a never-seen-before Genius Kit Invention using the rules below.
Rules for Genius Kits
ü Your parents or other adults may help with hints and suggestions, but it should be your project.
ü Bring your Genius Kit project and your adult helpers to the Pack meeting.
ü Be prepared to explain to the judges what it is and how you made it. Each den will have a display table.
ü Use only those materials listed below in Contents of your Genius Kit and Optional Extras.
ü You don't have to use everything, but you cannot add anything else.
ü Cut them or shape them any way you like. Use any tools you want. (Please do not use power tools without a parent’s permission).
ü Use your imagination and have fun.
Contents of your Genius Kit
2 plastic cups 1 clothes-pin (keeping the bag closed)
2 balloons 1 slime-colored, brick-shaped block
2 flexible straws 1 spark doodad (without a spark)
1 green sphere 1 flat, rectangular mesh
4 shiny pipe cleaners 2 wooden Popsicle sticks
2 paperclips
Optional Extras
ü You may use the bag if you wish
ü In addition to the Genius Kit items, you may use: Glue, Tape, String or Wire, provided that the final Invention does not have more of these extras than the original items in the Genius Kit.
ü The project may be mounted on a piece of Cardboard or Board no larger than an 8 ½″ x 11″ size piece of paper.
A posting on Scouts-L by
Barb at Creighton University
This is similar to Baltimore’s but there are differences. CD
Here's one we've used with success:
Sometime during the month, each Cub Scout is given a "genius kit" which is a sack of odds and ends. The results are up to the boys' imaginations.
They can build something useful, decorative, silly or solemn. No matter how they turn out, the boys' creations will be full of fun!
Here’s an idea for contents
12" x 18" piece of cloth 1 can
12" piece of <" dowel 1 wire coat hanger
1 board, 1"x6"x10" 6 pipe cleaners
8 nails, 1" long 2 spools
1 small tube of glue 4 corks
4' string 12 tacks
4 ice cream sticks 1 golf tee
Rules:
1. A parent may help you with your creation.
2. Use only materials from the list; you don't have to use all items.
3. You may cut the board, string, cloth, etc. as so desired.
4. You may use a saw, hammer, jackknife, sandpaper, drill or other tool.
5. Use your imagination, have fun and bring creation to pack meeting!
Southern NJ Council
1992 Pow Wow Book
Genius Kits are used by boys and parents to assemble any contraption or artistic display the boys can think of, using assorted scrap materials in the kit. The kit is simply a collection of odds and ends. The kits must have identical materials for each Cub Scout.
It is designed to encourage creativity. Its also aimed at bringing parent and son closer together by having them work cooperatively on the major project of the month - making something from a "Genius Kit". Work on the genius kit should not be done in the den or home. This is supposed to be a parent-and-son project at home. They are displayed at the month's pack meeting and judged.
Suggested categories:
Most Ingenious Best Workmanship
Most Unusual Most Useful
Most Original Best Invention
Most Uncommon Most Creative
Most Scientific Funniest
Largest Smallest
Use all categories or as many as suits your needs. Don’t like these?? Make up your own. Keep in mind, the more categories, the more boys you are able to recognize.
Promote parent participation by selecting a kit committee to decide on articles to be included in the genius kit and to secure them, bag them, and arrange far distribution to the boys and fathers. Select a judging committee to obtain ribbons or make certificates for all entrants. If possible it would be best to have judges from outside the pack.
Suggested items for genius kits:
2 wrap wood blocks 3 pieces scrap leather
1 coat hanger 1 foot of rope
4 feet string 6 nails
3 nuts 4 buttons
4 spools 12 tacks
6 pipe cleaners 3 pieces sponge rubber
6 assorted corks 8 peanuts
2 screws 3 pieces scrap cloth
12 beads 1 tin can
4 pieces craft strip 1 tube of glue
Rules for this lad-and-parent Cub Scout invention:
1. Bring your parent and invention to pack meeting.
2. You don't have to use everything in kit, but you can't add anything.
3. You may cut the boards, cloth, wire, spools, etc. as needed into as many pieces as you like.
4. You may use saw, hammer, jackknife, sandpaper, drill, or any other tool.
5. Use your imagination and have gun.
The dens can research some modern day inventors and their inventions. The Denner can give a report about the inventor at the pack meeting.
Awards can be diplomas with a light bulb that lights up when it is time for an award.
Judging the genius creations can be the final item of the evening. Make large pin-on cardboard light bulbs for the winners and questions marks for all who tried
Genius Kit from BSA
I hesitate to put this out here, but BSA Supply Division does sell a Genius Kit. Here is the description. Remember – Leadership by example - If we want the boys to use their imaginations, we should use ours in designing the kit and its contents. CD
Fun-filled craft kit includes enough pieces for eight Scouts to create almost anything! Includes eight 1" and eight " wooden spools; eight balloons; 24 pipe cleaners; 16 wiggle eyes; 24 poms; 24 plumes; four 9" x 12" sheets of foam; 16 bells; 10 yards of gold elastic cord; wax; and an idea sheet. Great for den meetings. WW7540 $9.00
Super Sparker
Longhorn Council
Supplies:
Clean Styrofoam tray from your supermarket,
Scissors, masking tape, aluminum pie tin
Cut a piece off one corner of the Styrofoam tray, as the picture shows. You’ll have a long bent piece that looks a little like a hockey stick.
Tape the bent piece to the center of the pie tin. Now you have a handle!
Rub the bottom of the Styrofoam tray on your hair. Rub it all over, really fast.
Put the tray upside down on a table or on the floor.
Use the handle to pick up the pie tin. Hold it about a foot over the Styrofoam tray and drop it.
Now, very slowly, touch the tip of your finger to the pie tin. Wow! What a spark! (Be careful. Don’t touch the Styrofoam tray. If you do, you won’t get a spark!)
Use the handle to pick up the pie tin again. Touch the tin with the tip of your finger. Wow! You get another spark.
Drop the pie tin onto the Styrofoam tray again. Touch the pie tin. Another spark! Use the handle to pick up the pie tin. More sparks!
You can do this over and over for a long time. If the pie tin stops giving you a spark, just rub the Styrofoam tray on your hair again, and start over.
Sparks in the dark………..
Try using your Super Sparker in the dark. Can you see the tiny lightning bolts you make? What color are they?
What’s going on? What makes the Super Spark spark?
When you rub Styrofoam on your hair, you pull electrons off your hair and pile them up on the Styrofoam. When you put an aluminum pie tin on the Styrofoam, the electrons on the Styrofoam pull on the electrons. Some of the electrons in metals are free electrons—they can move around inside the metal. These free electrons try to move as far away from the Styrofoam as they can. When you touch the pie tin, those free electrons leap to your hand, making a spark.
What does all this have to do with lightning?
The lightning bolt is a dramatic example of static electricity in action. You see lightning when a spark of moving electrons races up or down between a cloud and the ground (or between two clouds). The moving electrons bump into air molecules along the way, heating them to a temperature five times hotter than the surface of the sun. This hot air expands as a supersonic shock wave, which you hear as thunder.
Rock Tester
Longhorn Council
How do geologists identify their specimens? This is one way. It is best to do this experiment in a sink or basin. Vinegar may be substituted for the lemon juice.
What to do: Pour the lemon juice over the rocks.
What happens: The liquid bubbles on some, but not on others.
Why: When the lemon juice bubbles, the rock sample is either limestone or marble. Limestone, a sedimentary rock formed under water from mud and silt, contains a carbonate form of calcium, an alkaline earth metal. When you add the lemon (an acid) to the alkaline of the limestone, it forms carbon dioxide. That makes the liquid bubble up, just as pancakes and cakes puff up when you add baking soda to the batter. Actually, baking soda can be made from limestone. Marble is a rock formed under great heat and pressure from limestone. It reacts to acid just as limestone does. You get similar results if you add lemon juice to chalk, because it, too, is made of limestone.
Returning Drum
Baltimore Area Council
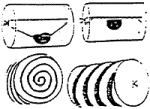
Make a drum from a large cylinder of cardboard or find a large cocoa tin. Make two holes in the middle of each end. Thread a length of string through it. Weight one section with a lump of plastic clay. Pull the string until the clay is just clear of the side and the other section of string is taut. Tie the string and cut off the ends. Decorate the drum with a spiral of tape. Stick a disc of paper over each end and draw spirals on them. Gently roll the drum away from you to wind up the string, and it will stop and return to your hand.
Digital Images
Great Salt Lake Council
Many modern printers and computer screens create images made of dots. Using three flashlights and a graph, show how this is done. You will need red, yellow and blue transparent cellophane and three flashlights. Attach a piece of cellophane over the end of each flashlight. Shine the flashlights onto a piece of white cardstock, in a darkened room. You will be able to see the three primary colors. Position the flashlights so that the three circles of colored light overlap in a cloverleaf pattern. Overlapping colors mix to give new colors.
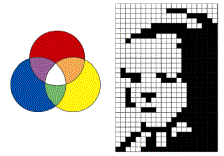
To see how an image is broken down into a digital image you will need, a ruler, tracing paper, photograph, black felt pen. Measure lines 1/4 in. apart to cover the tracing paper in squares. (Place graph paper under the tracing paper and copy the lines) Put the paper over the photograph. Use the pen to fill each dark square. Leave each light square white. The digitized image contains less detail than the original photo. You could increase the detail by using a greater number of smaller squares.
Invention Neckerchief Slide
Baltimore Area Council
Materials:
Bag of many small items
small block of wood (size appropriate for slide)
cable staple 5/8” x 11/8”
Give each boy a bag of small items; screws, pipe-cleaners, nails, felt, construction paper, washers, paper clips, etc. Hammer the cable staple in the back of the block of wood. Let the boys’ imaginations loose and see what they can do with their invention neckerchief slides.
Do-It-Yourself Flashlight
Circle Ten Council
A perfect boy’s project – I remember being excited when I built a flashlight that worked. CD
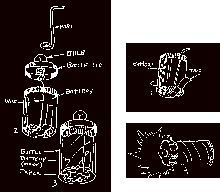
Materials: Flashlight battery, a bulb (#222), a plastic pillbox with a flexible lid, and some insulated wire.
The pillbox should be large enough for the battery and bulb base to fit inside it. Choose wire that can be bent easily, and have a supply of adhesive tape on hand.
Scrape the insulation from one end of your wire and form into a flat coil. Attach the coil to the bottom of the battery with adhesive tape.
Next cut an opening in the center of the plastic bottle lid, large enough for the base of your bulb t fit through. Push the base of the bulb through hole at the top of the lid.
Now scrape the other end of the wire and wind it around the sides of the base with a small piece of tape.
Crumple small pieces of paper. Place enough of this into the bottom of the bottle so that when the battery is inserted and the lid in tightly in place, the bottom of the bulb will just make contact with the raised center top of the battery.
Hinge one side of your lid to the bottle with tape. When the bottle is closed, your bulb will light. To shut off your flashlight, flip up the lid with your fingers. When not in use, make sure that ;your flip the lid up completely so that there is no battery contact. Otherwise, your battery will run down.
This light creates a dim glow. If you want it to be brighter use more batteries. If you wish, cover the outside of flashlight with decorative paper or plastic.
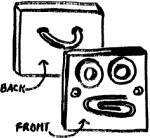
ODDS AND ENDS ROBOT
Circle Ten Council
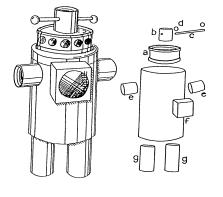
Materials:
Oatmeal box 2 beads Tuna fish can
2 cardboard tubes from inside rolls of paper towels
Pencil Liquid white glue Poster paints
Waxed-paper towels Straw
Crayons or colored felt-tipped markers Watercolor brush
Let’s begin:
1. Remove the lid from a tuna fish can.
2. Glue the can to the top of an oatmeal box, open side down, Fig. A
3. Cut one of the cardboard tubes in three equal parts.
4. Punch a hold with a sharp pencil completely through the center of one of the tube sections. You can use a paper punch.
5. Glue this tube to the top of the tuna can. Fig. B.
6. Push a straw through both ends of the tube. Fig. C.
7. Glue a bead to both ends of the straw, Fig. D
8. Glue the other two sections of the cut tube to the oatmeal box, close to the top. Fig. E.
9. Cut off one end of an empty waxed-paper box.
10. Glue the waxed-paper box section to the front of the oatmeal box. Fig. F.
11. Cut the other cardboard tube into two equal parts.
12. Glue both parts of the tube to the bottom of the oatmeal box. Fig. G.
13. Paint the robot with gray poster paint.
14. Paint red circles on the tuna fish can, and blue circles on the front of the box.
Periscope
Longhorn Council
Materials:
Large shoe box 2 pocket mirrors
2 strips of cardboard 1 l/2” wide Heavy-duty tape
Optional: Markers or paint
Instructions:
ü Cut out rectangular windows at opposite ends of the box’s long sides.
ü Place the box on a flat surface and lean the mirrors across the corners opposite each window.
ü Make cardboard hinges and attach the mirrors.
ü Use the 2 strips of cardboard, Glue the back of a mirror to the center of each strip.
ü After the glue dries, fold back the end tabs of the strips and apply more glue.
ü Adjust the angles of the mirrors until you can look in one window of the periscope and see clearly out of the other.
ü Then press the end tabs down firmly and let dry.
ü After the mirrors are securely in place, be sure to take a sneak preview before taping the lid on the box.
ü Optional: The box may be decorated before putting in the mirrors.
Balloon Launcher
Longhorn Council
Supplies:
Scissors, glue, round balloon
plastic lid from cottage cheese container,
push-pull squirt cap from a bottle,
Instructions:
ü Cut a hole, ¾ inch in diameter, in the center of the plastic lid.
ü Center the push-pull cap over the hole and glue it to the lid, with the lid’s writing face up. Use enough glue so that no air spaces are left between the plastic surface of the cap and the plastic of the lid.
ü Let dry completely.
ü Blow up a round balloon and slip the opening of the balloon over the opening on the closed squirt cap.
ü Place the device on a smooth surface, such as a table top, or you can launch it in water.
ü Lift the squirt cap opening so that the air escapes from the balloon. Your balloon launcher will glide effortlessly.
Charcoal Crystals
Longhorn Council
Supplies needed per boy:
1 charcoal briquette, 1 clay pot fragment, 1 bowl
4 tablespoons non-iodized salt, 1 tablespoon ammonia,
4 tablespoons liquid bluing, 4 tablespoons water.
Instructions:
ü Place the charcoal briquette and clay pot fragment into the bowl.
ü Mix the non-iodized salt, ammonia, liquid bluing, and water.
ü Stir till salt is partially dissolved.
ü Spoon this into the bowls making sure some salt falls over the charcoal and the clay.
ü Put drops of food coloring (different colors) on various parts of the garden.
ü Leave it several days and crystals will form.
Somersault Clatter Blocks
Baltimore Area Council
For this project smoothly sanded blocks and a package of twill tape are needed. Any number of blocks may be used, but it seems to work best with between four and seven (four seem to work well for cubs to manage). Length of blocks is to be 2½”, and width may be the same or may be narrower. A large yardstick will work well (1¾” wide by ¼” thick). Loosely weave two outer tapes around blocks as shown, stapling tape at top of each block (very small nails can be used instead). Then weave a double center tape through blocks in the reverse direction, stapling at the bottom of blocks. Grasp end block, tilt forward and back, and blocks somersault down tapes.
Handy Sandy
Here is a gift that will be appreciated by any car owner during the winter months.
Materials needed:
Sand Paint
Funnel Baby powder box or Salt box
To assemble:
ü First thoroughly dry about a pint of sand (heat in oven, if necessary).
ü Then paint and decorate any box or carton that has access for filling and a pouring spout or sprinkler top, such as a baby powder box or salt box. While you can pry off the cover of the powder box for filling, you will need a funnel for filling the salt box.
ü When painting the box, do not paint the area under the lid, or it will be difficult to get the lid off and on.
ü Fill the container with sand and add a little verse on your card such as:
When wheels won’t move in slush,
A helper would be dandy;
Don’t race your motor in a rush,
Just use this Handy Sandy!
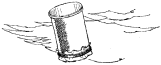
Simple Waterscope
Baltimore Area Council
Cut out the ends of a half-gallon can and slip a clear plastic bag over one end. Hold the bag in place with heavy rubber bands. Put the closed end below the surface of the water for a clear view.