PACK/DEN
ACTIVITIES
Blue and Gold Fiesta Ideas
Circle Ten Council
Decorate (and wear, if possible)
red, green, and white (the colors of the Mexican flag), make (or buy) some
Mexican food, play festive Mexican music, and have a great time! For dessert,
fill a Piñata with candy, and challenged your guests to one swing each,
blindfolded, to see who can break open a Piñata, for all to enjoy the candy
inside.
Fun
Invitation ideas for a Mexican Fiesta include:
Mexican flag design
Sombrero shape
Photo of Chihuahua dog
Fun Party
Favors for a Mexican Fiesta include:
Spanish word book
Maracas
Finger cuffs
Jump rope
Marbles
Party favors can, also, include
individual boxes of Mexican Jumping Beans, treat bags with poppers, toys, and
candy from the piñata.
If you have access to a
large Mexican flag, hang it at a focal point in your room. Then, use smaller
flags to decorate the walls and doors, etc. Or,
Mexican Flag bandanas
to decorate, or as napkins!
For an authentic touch, visit
your local travel agent and try to get posters of Mexico - some city scenes,
some beach scenes and scenes of some of the historic ruins. You can mount
these on foam core and hang them on the walls.
For appetizers, you could do
something as simple as salsa and chips. Check the grocery store for different
types of chips -- they have blue and black tortilla chips as well as flavored
tortilla chips (including lime). Serve them in a Sombrero chip & dip holder
for more fun! You could then have an assortment of salsas -- some mild, some
spicy, etc. You could also make nachos, a bean dip and a cheese dip. Of
course, you will have to serve guacamole. If you don't feel like making this,
check with your local Mexican restaurant -- they can definitely supply you
with some. Fajitas, quesadillas, refried beans and Mexican rice would be super
for your entree. Be sure to have both beef and chicken fajitas, as well as
veggie fajitas, to accommodate all tastes.
Everyone loves to make their own
tacos, so try Tacos with their favorite toppings: cheese, lettuce, tomatoes,
salsa!
Have Maruichi music playing at
the party or have a Maruichi band playing. Los Lobos would be a good band to
select for music your Fiesta. Once the party gets going, play the Macarenas
and get everyone out dancing!
For Drinks serve a non-alcoholic
sangria mix, soda and sparkling water garnished with lime slices.
Set the mood and create instant
fun when you set your table with brightly colored plates, cups and napkins.
Fiesta flowers, carefully placed houseplants, live Cactus Plants , colorful
tin candles as centerpieces on the tables.
Gotta have chips and
salsa, try serving the chips in a sombrero or sombrero chip and dip tray. Put
on some
festive music,
and you're ready to party Fiesta-style. Serve Frozen paletas
Serve Frozen Juice Bars for
dessert.
"Choco-Tacos" (ice cream
sandwiches made with flat cookie cone folded over like a taco) for dessert.
Greet Your Amigos In Spanish
Great Salt Lake Council
English
Spanish
Pronunciation
Good day
Buenos dias
(Bweh'-noh.s dee'-ah.s)
Good
afternoon Buenas tardes
(Bweh'-nahs tahr'-dehs)
Good
evening Buenas noches
(Bweh'-nahs noh' chehs
Good-bye
Adios
(ah-dee-os)
How are
you? Como esta usted?
(Koh'-moh eh-stah ' oo.s-tehd?)
Very well,
thank you Muy bien, gracias
(Mooy bee-en
grah'-see-ahs)
Mexican Fish Yarn Painting
Santa Clara County Council
Material:
Cardboard
Pencils,
crayons or markers
Yarn or
embroidery floss of various colors, cut in 6” lengths
White craft glue
Draw a circle in the middle of
your piece of cardboard. In the middle of the circle, draw the outline of a
fish. Draw other fish, ocean creatures, seaweed and shapes in the area
outside of the circle.
Spread glue on the body of the
fish drawing in the center of the circle. Place pieces of yarn on the outside
line of the fish body, then fill in the body with the yarn strands. Cover the
tail in the same way. Next, spread glue around the fish inside the circle.
Working out from the fish, cover the entire circle in yarn.
Then work on the shapes outside
of the circle. Spread glue on each shape, then cover each shape with yarn.
To complete your picture, work on the space in between each of the shapes
until all of the space is covered with yarn.
Take a look at some
Mexican yarn paintings online at:
www.huicholartonline.com
Pufferfish Pinata
Santa Clara County Council
Supplies:
Newspaper Spoon
Large
balloon Paint
Plastic
bowl Paintbrush
White craft
glue Pin
Water Candy/Toys
Small
drill Blindfold
Wire or
string Broom/stick
Note: this is a messy
project, so prepare some workspace prior to starting.
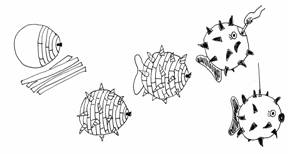
Begin the project by tearing off long strips of newspaper, blowing up the
balloon, and mixing the white craft glue in the bowl with some water to make a
thin paste. (Try a mixture of half glue and half water to make the paste.)
Dip each strip of newspaper
completely into the paste and place it on the balloon. Continue this process
until you have covered the entire balloon except for a small hole in the
bottom. Add 2 more layers, then let the newspaper dry overnight on your
piñata.
At this point, your piñata looks
like a ball, but here’s how to make it look like a spiny pufferfish. Tear the
newspaper strips into smaller squares. Dip each square into the paste. Roll
the small squares into cones and press them onto the piñata. These will be
the spines of your pufferfish. Shape a tail with the newspaper, and glue it
onto the piñata at the opposite end of the hole.
Allow the piñata to dry
completely, then paint it.
When the paint has completely
dried, pop the balloon with a pin and fill the piñata with candy and small
toys. Plug the hole with a few crumpled sheets of newspaper. Complete the
pufferfish by rolling up some of the newspaper to form two lips. Glue the
lips over the hole. When dry, paint them.
Drill a couple of holes in the
top of your piñata. Thread a wire or strong string through the holes and hang
it overhead. (If possible, hang it over a beam or on a ceiling hook on a long
rope so that it can be raised and lowered to adjust the height.) One at a
time, have children, while blindfolded, take swings at the pufferfish to try
and break the piñata and release the candy.
Paper Bag Pinata
Santa Clara County Council
Here’s a simple to make
piñata that you can make from materials around the house.
Materials:
A Large Paper Bag String,
Tissue Paper
Glue Scissors
Crepe Paper
Streamers Markers
Paint Googly
Eyes (Optional)
Fill the paper bag about ½ full
with candy and small prizes.
Roll the top of the bag down,
staple the folded top shut and punch out two holes along the top.
Cut the tissue paper into
strips; add fringes to the strips if desired.
Glue the tissue paper onto the
paper bag, completely covering the bag.
Decorate the bag with paper
cut-outs, markers, paint, googly eyes (for a face), and any other material.
Glue the crepe paper streamers
to the bottom of the piñata.
Tie a long string through the
two holes at the top. The string will be used for hanging up the piñata.
Hang up the piñata, and break it
open with a soft bat.
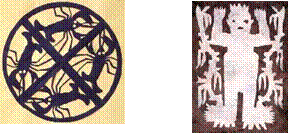
Ojo de Dios (aka God’s Eye)
Cadette Girl Scout Troop
1333,
Squirrel Hill, Pittsburgh PA.
http://trfn.clpgh.org/gs1333/crafts.html
Ojo de Dios (aka God’s Eyes) are
made by the Huichol natives (pronounced Wee-chol-les) who live in the Sierra
Madre Mountains in Jalisco, Mexico. They are intended to be a means through
which the Eye of God will see the person who is asking for health and long
life (usually for their children). The cross of the Ojo de Dios is that of
the four directions: earth, fire, water, and air (not the Christian
symbolism). "God's Eyes" were made so that the gods could watch over the
praying people and protect them. They are now more often sold in markets,
reminding us that God looks with love on people everywhere.
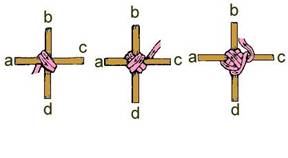
Materials: 2 wooden sticks (popsicle) and Variegated yarn (knitting
worsted weight) 5 1/2 to 6 yards
1.
Cross the sticks in the middle
and hold the sticks at right angles. Leaving a short tail held with the left
thumb, lash the yarn over the two places where the sticks cross, making an X.
Be sure to pass the yarn over the tail. See pictures below
2.
Wrap the yarn twice more in
each arm of the X making the “eye”.
3.
Bring the yarn to the front of
stick, then pull the yarn under the stick and back over it.
4.
Then carry the yarn to the
next stick going over, under and back over it.
5.
Keep on wrapping the yarn on
top, behind and then back over each stick (see figure 4). As you continue
making the rounds, always be sure that the yarn lies next to, but never on top
of the yarn in the previous round. After the first few rounds, you will see
the woven pattern of the "eye" beginning to form.
6.
Keep weaving the "God's Eye"
until you are about 1/2 inch from the ends of the sticks. Knot the yarn a few
times around the last stick (use two half hitches) and leave an approximately
6" tail. Tie the tail in a knot to itself, in back, to make a hanging loop. A
"God's Eye" this size can be use as a decoration, hung almost anywhere. At
Christmas you can even hang them on your tree.
If you have trouble with
these instructions, go to website list for other sites with instructions on
making Ojo de Dios or God’s Eyes. CD
"The eyes of the LORD
are everywhere, keeping watch on the wicked and the good." Prov 15:3
Shoe Box Guitar
Santa Clara County Council
Here is an easy to make
guitar from recycled materials.
Materials:
An old tissue box or old shoe
box
rubber bands
paper towel tube
scissors pencil
With adult supervision, cut out
an oval-shaped hole in the top of the shoe box. Some tissue boxes already
have an oval hole; remove the plastic that is inside the hole.
Stretch 3 or 4 rubber bands
length-wise around the box and over the hole.
Place a pencil under the rubber
bands width-wise on one side of the hole.
Tape a paper towel tube to one
end of the show box.
Decorate the box guitar with
markers or paint.
Paper Plate Maracas
Santa Clara County Council
A maraca is
a Mexican rattle. The original maracas were made from hollow gourds filled
with pebbles or seeds. A simple maraca can be made from one or two paper
plates stapled together, filled with dried beans or popcorn.
Materials:
One Or Two Paper
Plates
Rice Or Poporn
(Un-Popped) Dried Beans
Wide Wooden Craft
Sticks Markers
Crayons Or
Paint Stapler, Glue
Place a handful or two of dried
beans, rice, or popcorn on a paper plate.
Turn another plate upside down
and cover the first plate. Staple the plates together along the edge of the
plates. You can also use a single plate by folding a paper plate in half,
adding the beans, then stapling the edges shut.
Staple two wooden craft sticks
onto the paper plates, one on each side of the plates, to make a handle for
the maraca. Glue the two sticks together.
Decorate the maraca with
crayons, markers or paint.
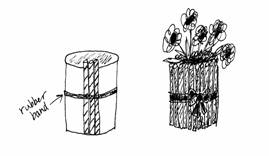
Festive Centerpieces
Santa Clara County Council
Supplies
for each centerpiece:
24-27
colored candy sticks (at least as high as the can)
1 empty
16-28-oz can
1-2 rubber
bands
20” ribbon (1-1.5 inches wide)
The number of candy sticks
you’ll need will depend on the type you use and the size of the can. Place a
rubber band around the can. Tuck candy sticks (still in their wrappers)
behind the band, keeping the bottoms flush with the bottom of the can.
Continue to add them around the can until it is completely covered. If you’re
having trouble keeping the candy in place, add a second rubber band toward the
bottom, then tuck the sticks beneath both bands. Remove one rubber band and
center the other on the can before continuing to the next step.
Hide the rubber band with a
ribbon that coordinates with your table decorations.
Fill the can about half full
with water. (Be sure not to get water on the candy, or you’ll wind up with a
sticky mess.) To complete the centerpiece, add fresh flowers.
Water Bottle Maracas
Circle Ten Council
Materials needed for each maraca:
Plastic water bottle, a cup of
rice, construction paper, Cinco De Mayo stickers
Directions:
Put rice in
the bottle.
Cover
bottle with construction paper.
Decorate them with the Mexican
stickers.
Paper Plate Maracas #2
Circle Ten Council
Materials needed:
9-inch
paper plate
Markers or
crayons
Handful of
dried beans or rice
Stapler
Five or six strips of colored
crepe paper or streamers.
Directions
1.
Decorate the outside (bottom)
of the paper plate- use bold designs and bright colors!
2.
Fold the plate in half and put
a handful of beans or rice inside.
3.
Staple it shut.
4.
Then staple the colored
streamers to the curved side of the plate.
5.
Now shake your maraca, and
make your own music!
Red Pepper Streamers
Circle Ten Council
Materials needed: tissue
paper, masking tape, red paint
-
Twist tissue paper into the
desired shape
-
Then cover them with masking
tape
-
Paint them red.
-
When dry, secure to a strand
of jute rope and hang
Paper Flowers
Circle Ten Council
Materials needed: long,
colorful, tissue paper, one pipe cleaner per flower
Directons
First, take the tissue paper and
put six pieces, one on top of each other, and then, fold it like you would
fold a paper fan. Next, take one pipe cleaner and tie it around the center.
Now, take
the tissue paper that is still folded like a paper fan and pull the paper up.
Make sure you do not pull too hard or it will tear. Now, you should have a
paper flower.
Papel Picado
Circle Ten Council
In Mexico,
papel picado
(perforated paper), refers to the traditional art of decorative cut paper
banners. Papel picado are usually cut with sharp fierritos (small
chisels) from as many as fifty layers of colored tissue paper at a time.
Designs may incorporate lattice-work, images of human and animal figures,
flowers, and lettering. Many papel picado are made especially for the Mexican
festival
Making Simple Papel Picado
Circle Ten Council
Fold a
rectangular piece of paper in half. In pencil, sketch one half of a design on
one of the folded halves. Rulers may be used to divide the paper into grids or
sections. Objects or designs must touch and connect to other areas of the
paper as they form the positive shapes on the paper. Negative areas to be cut
away may be shaded in pencil to aid in cutting. Use scissors or a craft knife
to carefully cut away negative areas of the design (cut over cardboard if
using craft knives). Open slowly, flatten, and glue to a background paper. To
create more complex designs, fold the paper more than once. Try using
different kinds of paper: butcher paper, fadeless colored paper, origami
paper, and colored tissue paper.
Tin Can Maracas
Longhorn Council
Use empty
tomato sauce cans and duct tape. Put beans, rice, and/or un-popped popcorn
into one can.
Put the cans top-to-top. Secure
with duct tape around the joint between the two cans.
Art Contests
Longhorn Council
Boys design
projects or posters on a particular subject for fun or to be judged.