PACK & DEN ACTIVITIES
Electives and Achievements that tie in with this theme
Sam Houston Area Council
May Tiger Activities
- Elective 25 – Snack time
- Elective 30 – Plant a seed
- Elective 14 – plant a garden.
May Wolf Electives
- Elective 8 – Machine power
- Elective 15 – Grow something
May Bear Achievements and Electives
- Achievement 6b – Take care of your planet. Plant a tree.
- Achievement 9a – bake oatmeal cookies for the den.
- Elective 15 - Water and Soil Conservation
“Digging in the Dirt” Picnic Pack Meeting
Sam Houston Area Council
Planning your May Pack meeting as an outdoor event is a great way to involve all of your Pack families in your last Pack meeting of the school year. With all of the boys at a weekend Pack Meeting, with their families looking on, they can experience a meaningful transition ceremony to their next level in Cub Scouting.
Pre-opening
Pre-opening activities include a Pack picnic.
Scouting for Food Collection Drop-off.
Map and Compass Activities – set up activities in the area so Cubs can work on the Map and Compass Belt Loop and Pin or another award (e.g Sam Houston Council offers a Disabilities Awareness Award. Check it out at https://www.samhoustonbsa.org/Home/Forms/CubScoutDisabilityAwar/Cub%20Scout%20Disability%20Awareness%20Badge.PDF
Displays
Have the boys display projects made this month
Opening/Flag Ceremony
See “THE MUD PUDDLE” in the Opening Ceremonies Section:
Baloo Songs/Activities
Baloo is a Cub leader who knows how to have fun, and likes to share that fun with others. Start every pack meeting with a fun participation song or activity for all Cubs and family members. This should be led by an energetic adult (or Webelos Scout) acting as Baloo for the Pack meeting. This encourages people to be at the pack meeting on-time and it gets the show rolling with a bang. Later in the Pack meeting, Baloo will also be the one leading cheers for songs, skits and awards.
Baloo runs across the presentation area yelling “Squirrels! Squirrels!” He does this on several occasions between skits and songs. On the third time, the Cubmaster stops him, and asks “What about the squirrels?” Baloo replies, “The squirrels are after me. They think I’m NUTS!”
Other ideas for things for Baloo to say can be found under “Things that make you go Hmm,” in Stunts and Applauses
Skits/Stunts
Check out “Digging a Hole to China,” “Cub Scout Garden, ” “Texas Fisherman,” and other skits in the Skits section.
And be sure to look at the “Stunts and Applauses” section for cheers and run-ons to keep your meeting lively.
Announcements
- Committee Chair: tell about planned summertime activities including Day Camp, Twilight Camp, Resident Camp
- Pack Recruiting chair: tell about Rally Night plans
Songs
Have Baloo come up and lead a peppy theme related song or two. If it has hand motions, that is even better
Recognitions
Recognize all of the leaders and parents that have helped all year long. Call each of them up front individually, and tell what leadership positions that they have taken on. Keep people up in front as the Cubmaster keeps calling more volunteers up front to be recognized. At the end, we hope that every parent is up front, having pitched in for some Pack duty during the year.
Cheer: The “A Pat on the Back” cheer would be most appropriate now. (Everyone raise your right arm, reach back over your shoulder and give yourselves a pat on the back)
Treasure Box Award Ceremony
This will be the final Pack meeting for awards at their current level. Pre-bury the awards in waterproof box(es), and ceremoniously dig up the treasure box(es) before award presentations.
With an outdoor pack meeting, get permission to dig the holes. Otherwise cover them so that it looks like you’re digging them up.
Be sure to have small flags to know which boxes to dig up.
Transition Ceremony
It is now time to transition (promote) each den to the next level. See the “Everyone Helps” Transition Ceremony in the Advancement Section for a suggestion on how to do this.
Cheer: The “Cloud of Dust” Cheer (everyone stomps their feet until the dust rises) would be appropriate.
Cubmaster’s Minute
Have the Cubmaster slow down the meeting and prepare the group for closing with a thought provoking Cubmaster’s Minute from the Closing ceremonies section
Closing
End on an upbeat with a closing ceremony such as “Who is Akela?” from the closing ceremonies section
If you are outdoors and this is an all day event, you will be probably be starting to run some Group Games at this point. Check out the Games Section
Field Trips and Service Projects
Heart of America Council
- Visit a nursery, or lawn and garden shop.
- Visit a wildlife center.
- Go fishing.
- Clean the park.
- Plant flowers in an elderly neighborhood, church or park.
- Hang Flags for Memorial Day.
Planting Flowers for Yourself and the Birds
Alapaha Area Council
Adapted from Georgia Dept of Natural Resources Website
There are many plants that are both pleasing to the eye and provide songbirds with valuable sources of food long after the flowers themselves have withered and died. Here is a partial list of some plants that are easily grown in Georgia gardens:
Bachelor Button - This hardy plant is related to Georgia's native thistle and normally blooms in midsummer. Like the thistle, goldfinches and one or our states newest residents, the house finch favor bachelor button seeds.
Chicory - This plant provides gardeners with attractive blue blossoms. In fact, the blossoms and seedpods are often found on the plant at the same time. The seeds of this European weed are considered to be a choice food of the American goldfinch.
Cockscomb - This tropical plant is becoming increasingly more common in flower gardens throughout the state. The large, frilly, red blooms do actually look something like a rooster's comb. Cockscomb seeds are eaten by a number of birds.
Cosmos - These plants are often used as border plants. The seeds formed from the plant's daisy like blooms are eaten by our resident American goldfinches and winter migrant white-throated sparrows and dark-eyed juncos.
Four-o'clocks - These interesting plants bloom in the afternoon and early morning and close their petals during the heat of the day. Four-o'clocks will bear yellow, white, pink or red blooms. Quail, cardinals and other songbirds consume four-o'clock seeds
Petunia - The petunia is one of the most common flowers grown in Georgia gardens. These colorful fennel-shaped flowers produce seeds that are relished by goldfinches, fox sparrows and dark-eyed juncos
Verbena - This plant grows well in small places such as window boxes. Verbena flowers are rose, red, purple, and even deep blue. The seeds are eaten by swamp sparrows, cardinals, and others.
Zinnia - One of the favorite flowers of Georgia gardeners are the zinnia. Zinnias are available in a wide array of colors and sizes. While providing a profusion of blooms through the summer, these hardy plants produce seeds that are the preferred food of the American goldfinch. In fact, goldfinches are so fond of zinnia seeds that they often will alight on a zinnia stem and pluck the still-green seeds from the seed head.
Materials
- Flower pots
- Seeds (one of the above)
- Paint
- Water
- Pebbles
- Gloves
- Potting soil
Instructions
- Have the boys decorate the flowerpots with the paint however they want.
- Put pebbles in the bottom of flowerpot for drainage.
- Fill the pot with potting soil, use gloves for handling soil.
- Plant seeds in the pot according to package directions.
- If you plant more seeds, some of the seedlings can be transplanted outside at home.
- Water well and regularly.
- Make sure the flower gets plenty of sunlight.
COFFEE GROUND 'FOSSILS'
Circle Ten Council
Create these fossils for your Cubs to dig up – CD
What You Need
- 1 cup of used coffee grounds
- 1/2 cup of cold coffee
- 1 cup of flour
- 1/2 cup of salt
- Wax paper
- Mixing bowl
- Some small objects to make impressions in the dough
- Empty can or a butter knife
- Toothpicks, optional
- String to hang your fossil, optional
How To Make It
- Stir the together the coffee grounds, cold coffee, flour, and salt until well mixed.
- Knead the dough together and then flatten it out onto the waxed paper.
- Use the can to cut out circles of the dough or use the dull knife to cut slabs large enough to fit your "fossil" objects.
- Press your objects firmly into the dough. When you take the object out, you have your "fossil". If you want to hang the fossil, poke holes into the edge to hold the string.
- Let the fossil dry overnight and then hang it if you wish.
Tip - Bake them for a short period to get the "dough" to harden.
Ant Farm:
Sam Houston Area Council
Materials:
- Large glass mayonnaise jar with lid
- Smaller sealed jar that just fits through the mayonnaise jar opening
- Well-sifted garden soil
- A source of larger size ants (not fire ants)
Directions
- Place the smaller jar centered inside the larger jar.
- Punch small pin-hole sized air holes in the jar lid. These holes must be smaller than the ants.
- Add soil to the larger jar, so that there is about one inch of dirt between the two jars.
- With a garden trowel scoop the ants into the jar. It works best if you can scoop up the queen too.
- Fill the dirt up to just below where the larger jar begins to get smaller.
- Place a moist piece of bread and something sweet like honey on top of the dirt.
- Now screw on the lid.
- Cover the outside of the jar with a dark paper sleeve, so that the ants build their trails clear out to touch the glass, and so that you can easily remove the sleeve to look.
BUGS, BARK, BIRDS, AND BOYS
Sam Houston Area Council
Learn to be a nature detective, an explorer or scientist! There are exciting things outside! A bug hidden under a leaf, footprints in the mud, or a pile of fur and bones. Learn to explore the world around you, looking for clues and signs to solve the mysteries of Nature. Nature mysteries can be found anywhere; in your yard, the woods, or a pond, puddle or stream. Some of the clues can only be found during a certain time of the year, while other signs can be found all year.
Good nature detectives and explorers have a sense of adventure. They also remember to leave only footprints as clues to the wildlife that they have been in an area.
Primary Tools of a Nature Detective
Eyes - To closely inspect any find, and to search an area.
Ears - To listen for any sounds of animals moving or communicating.
Nose - To sniff out suspects, use your nose to smell a flower or an animal.
Hands - To feel all the parts of a clue, to turn over logs and leaves or to feel the shapes and textures of things.
Rules For Nature Lovers
- Never take all the leaves and flowers from a plant. Take just what you need.
- When you pick a flower, break or cut the stem. Don't pull the plant up by the roots.
- Don't taste or eat any plants, berries or seeds you find outdoors. Some plants are very poisonous. Check with an adult.
- Don't pick a flower from anyone's garden or backyard without asking permission. Remember that in many public parks and gardens, flowers must not be picked.
- Don't pick a wildflower if there are only a few of its kind growing where you find it. Greedy picking might mean this kind of flower will not grow in that spot anymore. Then no one else will ever be able to enjoy it again.
- Never touch poison ivy, poison oak, or poison sumac. Touching these plants creates an itchy rash on the skin. REMEMBER: "LEAVES OF THREE, LET IT BE" and “WHITE BERRIES, BE WARY.”
- Dress according to the seasons, and keep in mind that a good nature detective checks out all clues and sometimes this means lying down on your belly, crawling on your hands and knees and even stepping into water. So wear old clothes and sneakers.
Wormy Experiment:
Sam Houston Area Council
& Baltimore Area Council
Try this experiment to show your den how worms work.
- Put four to five inches of rich soil in a large glass jar with about 6 earthworms.
- On top of the soil, put an inch of light sand.
- Sprinkle corn meal on the sand.
- Wrap black paper around the jar to shut out light.
- At your next den meeting, take off the paper and see what has happened.
- The worms will have moved dark soil up into the sand the sand down into the soil.
- You will see tunnels along the glass marking their travels.
- Explain that the worms’ tunnels bring oxygen and nitrogen to nurture life and that the tunnels help the soil hold water.
The following is similar but not quite the same – CD
Make Friends with a Worm:
Heart of America Council
Equipment Needed: Earthworms, glass container, black paper, soil, sand, dead leaves.
Put layers of soil, dead leaves and sand in a deep glass container. Sprinkle water on each layer. Cover the outside of the glass with dark paper so that the worms will tunnel close to the glass.
Keep this paper on except when you’re observing the worms. Make sure the container is covered with a few small air holes in the lid.
Feed the worms pieces of lettuce, dead leaves, grass clippings or bits of table food. Lay the food on the surface of the soil.
(Remove uneaten food so it doesn’t spoil.) Be sure to keep the soil moist by sprinkling water on it every day. The boys can watch the worms move and tunnel around in the dirt.
Make Your Own Adobe Bricks:
Sam Houston Area Council
Materials:
- 1 bag of Sand,
- 1 bag of non-organic soil,
- straw,
- 2x4 lumber
Directions:
- In a wheelbarrow, put a 50/50 mixture of sand and soil. The soil must have no organic materials. It must be from a sub-soil layer deep underground or similar.
- Straw is not a requirement, but a few handfuls per wheelbarrow full will help the adobe dry evenly.
- Thoroughly mix the materials with water so that it is the consistency of thick pancake batter.
- For best results, let this sit overnight, and then add enough water the next day to make it the consistency of thick pancake batter again.
- With your 2x4 lumber, cut and hammer them together to make rectangular brick forms. Make the brick forms approximately 5”x7” rectangles, so that the boys could build a small structure with their bricks.
- In a sunny, flat patch of your yard, with clear dirt, lay the forms down on the ground and shovel the adobe mixture into them.
- Dry completely before removing them from the forms.
Heart of America Council
Leaf Litter: When dead leaves collect under a tree, they form what is known as leaf litter. Find out what lives in the leaf litter or soil beneath your tree. Here are some creatures you might find: Millipedes, spiders, wood lice, daddy-longlegs, springtails, They help to decompose the leaves and twigs that fall from your area.
What’s in the Dirt: Fill a pan with soil and place it in the sunlight. Water the soil to keep it moist. What do you see in the dirt? Is anything growing?
Squish It: While on the ground, feel clumps of grass, get a hunk of mud, roll it into a ball, feel it and squish it, make a snake or some other friend out of the ball of mud. Save it to take back to the den home, place it in the sun to bake.
WATER ROCKET LAUNCHER
Sam Houston Area Council
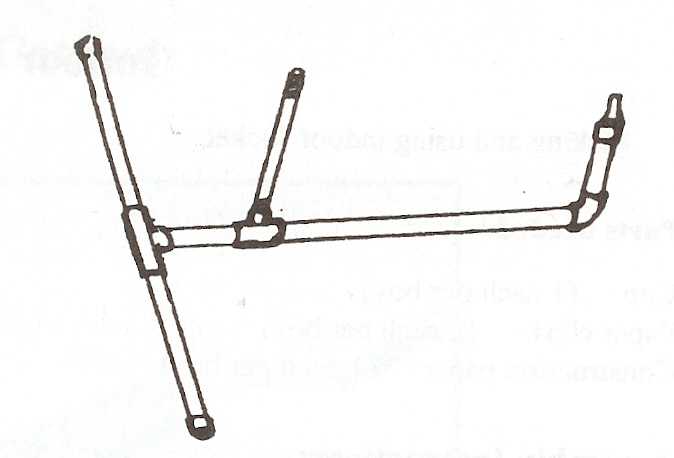
Materials:
- Valve
- 3 each ¾” PVC Cap
- One ¾” PVC Tee joint
- One ¾” x ½” threaded Tee joint
- 5’ of ¾” PVC schedule 40 pipe
- One ½” x 8” threaded riser pipe
- One ¾” 90 degree ell (“L) joint
- 1’ electrical tape
- One tire inner tube valve
- PVC pipe cement or epoxy
(important: use protective gloves and goggles when gluing!!!)
Assembly Instructions:
- With a hack saw, cut the 5’ PVC pipe into two 6”, two 12” and one 18” length.
- Drill a ½” hole in the middle of one ¾” Cap.
- Push the valve stem into this hole and trim the rubber so that it will have a tight seal.
- Glue this cap to one 6” pipe, being careful to have the pipe end push the rubber to be tightly sealed against the cap.
- Assemble the launcher as shown, glue the joints.
- Wrap the threaded riser pipe where it joins the threaded Tee, so that there is a tapered, water-tight connection when a 2 liter bottle, with a few cups of water in it, is pushed onto it.
Bugs
Sam Houston Area Council
Did you ever see a bug creature up close? Most grown-ups would much rather do their looking from a distance, but kids like to catch the bug and confine him temporarily for a closer look. That's okay, but too often the confinement takes place inside a mayonnaise jar with a perforated lid. The bug may be safe inside, but a kid chasing after a butterfly while clutching the glass jar might not be. And maybe the bug is safe, but is he really happy? It gets pretty hot and damp inside a jar, and sometimes it's difficult to climb glass walls.
Try this cage from Alapaha Area Council - CD
Bug Cage
Alapaha Area Council
Materials
- Two tuna cans (washed and dried)
- Piece of screen, about 12” x 12”
- Plaster
- Twig
- Bottle cap
- String or thin wire
Instructions
- Roll screen to fit into tuna can.
- Staple together where it overlaps.
- Pour about ½” of plaster into tuna can into which rolled screen is placed.
- Push bottle cap into plaster for a water dish.
- Place twig into plaster to serve as a perch.
- Use the other can as a cover.
- Pass string or thin wire through the screen to act as a handle.
- Catch interesting bugs in the cage, observe them, and then set them free.
Terrariums
Alapaha Area Council
Terrariums are easy to make from plastic soda or water bottles.
- Clean off the entire label, then cut the bottle in half.
- Put pebbles and potting soil in the bottom half.
- Plant some small plants and water sparingly.
- Use the top half with the cap on as a lid.
- Cut four 1” slits on the cut edge of the lid so it will fit over the bottom planted part.
- The plants will then water themselves from condensation on the inside of the bottle.
- They last a long time without care.
- You can add a ceramic or toy rainforest animal.
Discovering Nature:
Sam Houston Area Council
- In a park or yard, stake out 10 foot squares in the grass, preferably near some trees.
- Give each boy a plastic bag and ten minutes to find items from nature.
- Award one point for every unique type of item, and no points if an item died during capture.
- In an area that large, they should be able to find grass, weeds, pinecones, leaves, insects, worms, etc.
- When they’re done collecting, the leader will tally the results, and give the bags back to the boys to return nature to where they found it.
Discover Leaf Pigments:
Sam Houston Area Council
- Take green leaves from several different kinds of trees.
- Tear each leaf up into small pieces and place each leaf into a different glass.
- Just cover the leaf pieces with rubbing alcohol,
- Set glasses into a pan of warm water for an hour or so.
- After the liquid in each glass is dark green, tear up a coffee filter into 1” wide strips.
- Suspend the filter piece from a pencil sitting over the rim of the glass and have it dangle in the green liquid of the glass.
- As the liquid wicks up the coffee filter, the unique colors of each leaf will show.
- Do any of the colors look like the fall colors of that tree?
Night Creatures
Your backyard is part of your environment. You share it with all sorts of busy little creatures. There are some you usually don't see because they're nocturnal. That means they're active at night. Here's how to have a look at them without staying up all night.
Things you will need include:
- A wide-mouthed glass jar
- A garden trowel
- A small, flat piece of wood
- A few small stones or small wooden blocks
Directions:
- You're going to set up a trap for night creatures. It won't hurt them; it will just hold onto them until you get a look at them. You need to dig a hole in the ground for this. Ask permission before you dig.
- Make a hole in the ground big enough to hold your jar. It should be deep enough that the mouth of the jar is level with the ground.
- Cover the jar with a flat piece of wood. Use stones or blocks to hold it about half an inch above the jar. Your cover will keep the rain out. If rain got into your jar overnight, it could drown your captives.
- Check the jar the next day. See what is there. Be sure to let the creature go!
Garden With A Difference
Heart of America Council

- Split a small piece of bamboo and scrape out the pith.
- Put the two pieces on a sheet of paper.
- Carefully fill both pieces with not-too-wet light soil and water mixture.
- Put seeds of annuals at about 2 cm intervals along the length of one of the strips.
- Place the two pieces together and tie at about 4 or 5 places with cotton. Do not tie too tightly .
- Push one end of the bamboo into a pot of soil and water the bamboo and soil once a week.
- Soon tiny plants will push their way out of the bamboo and different plants will bloom from the same branch.
Sprouts to Watch
Baltimore Area Council

Materials needed: Blotter paper (buy at office supply stores), water, beans soaked in water for three hours, quart size jar
- Roll the blotter paper to fit the jar:
- Cut off excess on top.
- Pour some water into the jar and wet the blotter paper.
- Press wet blotter paper to the side of jar so it sticks.
- Empty out excess water.
- Pull blotter paper carefully, a little at a time, away from the jar and drop in seeds.
- It doesn’t matter how the beans are turned. In fact, if they are turned sideways or upside down, they are more exciting to watch.
- Gently push blotter paper back against jar.
- Add ½ inch of water to the jar so that the bottom of the blotter paper is always kept in water.
- Add water as this evaporates.
Potato Block Printing
Baltimore Area Council
- Cut a slice of potato so that you have a perfectly flat surface.
- Trace a simple design on the flat surface.
- With a sharp knife, cut away the potato around the design, leaving the design raised about 1/8”.
- Press the potato on an inkpad and then onto a piece of paper to print.
- If you do not have an inkpad, cut a piece of blotter to fit in a jar lid and saturate blotter with ink or poster paint.
- For additional effects, cut designs on sponge or use erasers of various shapes.
Inchworm Ruler
Heart of America Council

On a narrow strip of paper, mark inches and half inches, using a regular ruler as a guide. Fold the inches up , accordion-style and paste head behind first inch. To make rulers more durable, run several strips of cellophane tape along them.
Pine Cone Garden
Heart of America Council
Materials:
- Pine Cones
- Grass Seed
- Small Flower Seeds
- Nail
- Circular scrap of wood
- Saucer

Directions
- Nail a big, loosely-shaped pine cone to a circular scrap of wood. One nail will do .
- Set the pine cone and wood in a saucer of water.
- Plant grass and small flower seeds between the pine cone’s sections. No soil is necessary.
- Keep saucer filled with water.
- Watch for sprouting seeds and a little pine cone garden.
Bear Growler
Sam Houston Area Council
Materials:
- 3’ length of ¾” nylon braided rope
- Plastic bucket or garbage can
Directions
- Whip the ends of the rope, so it won’t fray.
- Tie an overhand knot near one end of the rope
- Soak the rope in water.
- Hand drill a ¾” hole in the exact center of the bottom of the bucket.
- Thread the rope through the hole so that the knot is on the inside of the bucket.
- With a bare hand, grasp the rope near the bucket and slide your hand along the rope.
- The vibrations of the rope are amplified by the bucket to sound like a roaring bear. The bigger the bucket, the bigger the bear will sound like.
HHHMMMmmm – This sounds like the turkey Squawkers we made last month, only deeper to be a Bear!!! CD
“Leather” Pencil Holder:
Sam Houston Area Council
Father’s Day Gift for Dad’s Desk
Materials:
- Soup cans (empty and washed)
- Masking Tape
- One can of shoe polish (and a rag)
Directions
- Tear off small (~1”) bits of tape, and completely cover a soup can’s outside and bottom surfaces.
- Overlap the tape just a bit as you stick it to the can.
- When the can is covered, make sure that the tape is pressed down firmly.
- Run one smooth piece of tape just inside the top rim
- Lightly wipe brown (or black) shoe polish over the tape, to give it a textured leather look.