PACK AND DEN ACTIVITIES
Pet Photo Frame
Santa Clara County Council

Supplies:
Dog biscuits, kitty treats or other favors to represent the animal you will feature in the photo (for a bird, how about small seed bells, or other bird toys)
1 picture of your favorite animal
acrylic paint- any color
fine tipped marker
craft glue
paint brush- a small foam one will not leave brush marks
5X5 inch piece of cardboard or photo matting- cereal boxes work great
craft knife
sealer- Design Master Super Surface Sealer, clear Sealer and Satin Finish 383 works great
ribbon or magnet
Directions:
1. Center your picture on top of cardboard and trace around it.
2. Use craft knife to cut out hole for picture.
3. Paint the front of the frame in the color of your choice.
4. Glue treats on to the frame.
5. On one of the treats or an open space on the frame write the animal's name, plus the dates of birth and death if they are now little angels.
6. Seal with sealer.
7. On the backside of the frame glue or tape the picture in place.
8. Add ribbon or magnet to the back to hang.
Here is another way to make frames CD -
Fridge Frames
Baltimore Area Council
Make a frame for your favorite pet photo and hang it on your fridge. Glue craft sticks together to form the frame. Let dry. Paint decoupage solution on dog biscuits, goldfish crackers, or animal crackers. Let dry. Glue to frame. You can make a birdseed frame by spreading the edge of the frame with glue and sprinkling on seeds. Let dry. Paint with decoupage solution. Stick 2 magnetic strips on the top and bottom of the back of the frame. Center the photo and use masking tape to attach it to the frame.
VIRTUAL PET SHOW
Piedmont Council
Instead of having a real pet show, boys bring drawings or photos of their pet (see Bear Elective 11). Set up an area in the room where the boys can display their “pets.” People can go around the area looking at the virtual pets. Each boy stands next to his pet’s photo and talks about his pet. They can also bring one or two of their pet’s favorite toys, food, or maybe a taping of the pet’s voice. Those boys who do not have pets may create imaginary ones (pet dinosaur? petgorilla?) and have a showing with drawings and other paraphernalia.
FIELD TRIP IDEAS
Piedmont Council
ü Zoos
ü Veterinarians: Ask a vet if your den could visit
ü Feed Shop
ü Aquarium
ü Pet supply shops: Find out if your den could visit
GUEST SPEAKER
Piedmont Council
ü A veterinarian to come to your pack meeting and talk about the importance of caring for your pets properly.
ü A Feed Shop owner to come and talk about animal nutrition
ü A pet shop owner or manager
ü A volunteer at the local SPCA or other animal shelter
ü A county or city animal control officer
ü Someone who raises show animals
ü A person who judges dog or cat or other animal shows
ü One who cares for horses
Easy Turtle Racers
Baltimore Area Council
Materials Needed: Egg Carton, permanent markers, marbles, scissors
Cut the cups from the egg carton and use markers to color them so they resemble turtles. Place a marble under each cup. Start your race at the top of a paved incline or wooden ramp and race them down the hill. Try to predict which turtle will win the race.
Cat Grass
Baltimore Area Council
Indoor cats will adore this munchable treat. Dip a pencil eraser in black paint. Stamp a paw print on a terra cotta pot. Let dry. Fill the pot with soil. Sprinkle with l-tablespoon oat grass seed (find it at large retailers). Cover with more soil and moisten. Place the pot in a warm location and add water daily to keep soil moist. The grass will sprout in just a few days. When grass is about 4 inches tall, it’s ready. Set pot by kitty’s food for grazing.
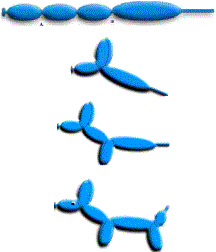
Balloon Dog
Baltimore Area Council
Materials: Long thin balloons (available in craft & hobby stores)
Optional: Hand or Foot Pump
ü The first trick to making a balloon animal is to blow up the balloon. This is hard. You can buy a hand pump or use a football pump to help blow up the balloons. Do not blow the balloon up all the way. Leave the last half of the balloon unfilled. Experiment to find the proper amount.
ü Carefully tie the balloon. When twisting a balloon, always start at the end with the knot. Do not worry, it will not break if you twist it, but you must hold on to both ends of the balloon. Otherwise, the balloon will untwist. The balloon will not stay twisted by itself. You have to twist the balloon together.
Directions -
1. Blow up the balloon half way.
2. Start at the beginning with the knot and twist a 3 to 4” bubble (or 3 or 4 fingers wide). Make sure you hang on to both ends of balloon, otherwise it will untwist. Twist it around 2 or 3 times. Do not worry it will not break. Why didn’t it break? There is space at the end of the balloon for the extra air. That is why we only blow the balloon up half way.
3. While holding on to the twisted balloon, make another bubble the same size. This will be the one ear. Do not let go.
4. Make another balloon bubble the same size. This is the other ear. Look at the picture.
5. Twist balloon joints A & B together twist 2 or 4 time all the way around. The balloon will not break, and they will stay together. If yours looks like this, very good; if not, try it again -practice makes perfect!!
6. Now for the neck. Twist a 2 to 3” bubble or 3 or 4 fingers wide. This is the neck. Make sure you hang on to the balloon, both parts.
7. To make the legs, start by twisting a 2 to 3” bubble. Hang on to the neck as you twist the balloon, and do not let go of the leg.
8. Second leg, same as the first. Twist a 2 to 3” bubble. Twist those two parts together just like you did with the ears. Remember twist around each other 4 or 5 times. Twist the parts together to look like the drawing.
9. Have a lot of balloon left over? Hotdog! We make the body 1 hands long. Then twisting; make sure you hang on to the balloon. Make the back legs like you did in step 7
Dog Biscuit Neckerchief Slides
Piedmont Council
Materials: Small dog biscuit; Pompoms; Felt; Wiggle eyes; Seed beads; 1” long - 1/2” diameter PVC pipe
Slide 1
1. Cut two ears out of felt and glue on the biscuit.
2. Glue on wiggle eyes.
3. Place two 1/4” or 1/2” pompoms side by side just below the eyes.
4. Glue on a seed bead for the nose.
5. 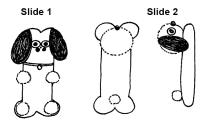
Glue on 4 small pompoms for the dog’s feet.
6. If desired, fashion a collar and tag using scrap felt.
Slide 2
1. Fashion dog’s head with wiggle eyes and felt ears.
2. Glue the head on the biscuit.
3. Glue on a pompom for a tail.
PAGE PETS
Piedmont Council

Materials: Used envelope; Colored paper; Marker; Scissors; Glue
1. Clip a bottom corner from an envelope, new or used.
2. Draw the head of your favorite pet on colored paper and cut it out.
3. Glue the head onto the envelope corner.
4. Add eyes, nose, mouth, ears and other features with a marker or cut from colored paper and glue on.
5. Place page pet on the corner of the page where you stopped reading.
INVISIBLE DOG LEASH
Materials: Wide mouth canning jar ring; Ribbon (1/4” or wider); Sturdy wire (16 gauge is stiff but is hard to work with. 19 gauge makes a less stiff leash, but is easier to use); Material to decorate the collar; Low temp glue gun 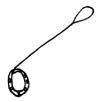
1. Cover the canning jar ring with ribbon to make a collar. Use hot glue to hold the ends of the ribbon to the ring.
2. Decorate the collar with rhinestones, glitter paints, etc.
3. Cut wire so it will extend from your hand to about 5” from the floor. Add 3” for twisting the ends under.
4. Fasten the wire to the collar by twisting it around the top and tucking the cut ends under so it can’t be seen.
5. Twist the other end of the wire into a loop (for your hand) and tuck the sharp edge inside. Gently shape the wire so it curves down a bit.
6. If desired, wrap ribbon around the wire.
7. When you walk your invisible dog, hold the wire in front of you as you walk, so the dog appears to be wearing the collar.
Bird Cookies
Santa Clara County Council
Make tasty cookie treats for your feathered friends.
Supplies:
1 cup softened unsalted butter
3 beaten eggs
3½ cups flour
1 tsp. baking soda
Pinch of salt
Mixed birdseed
Directions:
1. Stir flour, baking soda, and salt together in a large bowl.
2. Add butter and eggs. Mix until well blended.
3. Roll dough out on floured surface and cut different shapes with cookie cutters.
4. Make a hole in the top of each cookie with a drinking straw.
5. Press birdseed into each side of the cookies.
6. Bake in oven at 350 degrees for 10-12 minutes.
7. After Bird Cookies have cooled, tie a ribbon or string through the hole and hang on a tree branch.
Pencil Pup
Santa Clara County Council
Supplies: (4) pinch-style wooden clothespins, Wood Glue, Felt, Googly Eyes, Pom-pom, Markers, Pencil
Directions:
To form the front end of the dog pinch open a clothespin and apply glue to the inner surface of the opened end. Then clamp the glued end onto a second clothespin, just behind the metal spring.
For the dog's tail end, glue and clamp together the last two clothespins so that one holds the other wide open. When the glue is dry, fit the opened end of the back half onto the lower end of the front half. Apply glue to bond the two sections.
From the felt, cut out floppy ears and circular paws. Then glue ears and paws, the googly eyes, and the pom-pom nose onto the dog.
Add spots or other distinguishing details with colored markers. Finally, pinch open the dog's mouth and insert a pencil, balancing its weight equally on both sides.
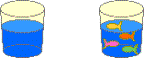
Cup of Fish
Santa Clara County Council
I know I ran a similar item last month but it fits with this theme better. CD
Supplies:
Package of blue Jell-o,
gummy fish (or fruit-flavored sharks),
clear plastic cups
Directions:
1. Make the blue Jell-o according to the directions on the box.
2. Pour into the clear plastic cups.
3. Let the cups cool about an hour in the refrigerator until partially set.
4. When the Jell-o is partially set, place a few gummy fish in each cup.
I would make some more Jell-o and pour it on top after putting the fish in the cups. CD
5. Place cup back in the refrigerator until the Jell-o is completely set.
6. Eat and enjoy.
Variations:
ü Frozen fish-popsicles (just freeze the Jell-o in popsicle molds - add the gummy fish when they are partially set - unmold very gently when entirely frozen). These are really messy to eat and are best eaten outside.
ü An entire punch bowl of fish Jell-o (made like the cup o' fish)!