ENGINEER
TECHNOLOGY
GROUP
Baltimore Area
Council
The engineer is
someone who may be doing just about anything from working on a new chemical
process, to planning how to get water to your house. Point out to the Webelos in
your Den that an engineer is a planner who is found in many fields: civil
engineers - plan towns, electrical engineers - plan power plants and large scale
electrical wiring. chemical engineers, mechanical engineers; any field that
needs to have its work done for utmost efficiency and reliability.
Circle Ten
Council
Scientists who build machines are
called engineers. They do tests and experiments that help them to invent new
machines and make old ones work better. Without engineers we wouldn’t have
tools, engines, trucks, trains, clocks or can openers. Humans are the only
animals that invent and make machines. We use them to build skyscrapers, lift
heavy loads, and move faster than the speed of sound. Humans have even made
machines that can travel to the moon.
Den Activities
Baltimore Area
Council
Arrange for boys to visit an engineer or surveyor in
a municipal or county office. Plan for the boys to look through a surveyor’s
transit and “read a rod” or visit a construction site and see the plans, which
are being followed.
Make a block and tackle. Be
sure to explain its purpose - to lift weights easily. A single block and tackle
has an ideal mechanical advantage of two, which means that if there was no
friction, a one pound force can pull two pounds. A double block with one pound
pulling force could lift four pounds. As additional blocks are added, the
mechanical advantage is increased, but each additional pulley also decreases the
distance the load is moved. Friction is a factor affecting the lifting power.
Have the boys find pictures of different bridges and
bring them to a Den meeting. The differences in many kinds of bridges will
become apparent as the boys study them and construct models. The simplest ones
are plank, beam, pier, deck, truss, and arch types. The more complex kinds are
the bascule (the old castle drawbridge type). vertical lift, cantilever, and
pontoon. Many swinging bridges are in use today.
Discuss property lines. Have an expert show the boys how property lines are determined,
and how to measure one.
Discuss different types of engineers. If one of the dads is
an engineer, ask him to describe briefly to the boys what his duties are.
Surveying
Land
Baltimore Area
Council
Survey land, it could be yours
or a staked out section in a schoolyard or park with fixed points. To mark the
points, you can use a nail pushed through a rag.
To do this, you
will need a compass and a 100-foot tape measure. Put the compass on top of a 2 x
4 approximately three feet long. Start at one corner of the area to be surveyed.
Take a reading of your compass and measure the distance to the next point. Do
this all around the area that you have chosen to be surveyed - marking down your
distance and degree.
360 degrees North
40’ Points A to B
90 degrees East
100’ Points B to C
180 degrees South
40’ Points C to D
270 degrees West
100’ Points D to A
A surveyor’s
transit works much the same way. It gives the surveyor degrees in elevation as
well as the degrees horizontally.
Steam Electric
Power Plants
Baltimore Area
Council
They create steam
by heating water in a nuclear reactor or in a combustion chamber, where coal,
oil or gas is burned. The steam turns a turbine that runs a generator. The
generator has a rotating electromagnet called a rotor and a stationary part
called a stator. A separate generator called an exciter powers the rotor,
creating a magnetic field that produces an electric charge in the stator. The
charge is transmitted as electricity. A transformer boosts the voltage. Exhaust
steam passes cool water pipes in a condenser and turns back to water for
re-heating. The water that has absorbed the steam’s heat in the condenser is
piped to a cooling tower to be cooled.
Things To Make
Baltimore Area
Council
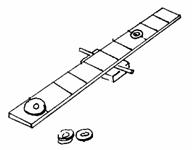
Balance
A balance is not
a weight scale, but is a device to measure an amount of one thing equally to
another (in weight), not to a scale.
Materials:
1” x 4” - 12”
long
1”x½” – 12” long
½” x 3” x 3”
plywood for base
Wire coat hanger
2 cup hooks
2½” long bolt
with washers and nut
(2) ½” x 3”
diameter plywood circles
6 lengths of 6”
chain
Instructions:
·
On the 1” x 1/2”, carefully measure and find the
centers for a hole in the middle, equal distance from both ends and from both
edges.
·
Drill it.
·
Put cup hooks in the board bottom - 1” from the
ends.
·
On the bottom, equal distance from both ends; drill
a hole big enough to put a piece of coat hanger through.
·
On the 1” x 4”, drill a hole 2” from the top and
equal distance from both sides on the 4” side of the board from top to center.
·
Attach the 1” x 4” to the 3” x 3” in the center of
the base.
·
Cut a straight section of coat hanger about 6 to 8
inches long and glue into the hole on the 1”x 1/2”.
·
Bolt the 1” x 1/2” to the 1” x 4” - You want enough
play so the 1” x 1/2” moves freely, but not sloppy.
·
On the 3” diameter circles, find 3 points equal
distance around the edge and tack a length of chain to each point, then attach
the three chains to the cup hooks.
·
If all works well, the coat hanger should lay on the
centerline of the 1” x 4”. If this doesn’t happen, weights (bent nails) can be
hooked over the lighter arm and moved back and forth until balance is gained.
Bridges
Baltimore Area
Council
The earliest
bridges were probably a log fallen across a stream. Someone probably learned
that several logs side by side made it wider and easier to cross. You could make
a longer bridge by putting logs or slabs of stone across stepping-stones over a
wider stream. These are the same principles that are used in many modern
bridges.
Make a plank
bridge out of a piece of poster board or a cereal box 10 inches long and 4
inches wide. Place it between two blocks or thick books. See how many toy cars
it will support. Now bend the sides up 1/2 inch from the sides like handrails.
See how many toy cars it will now support.
What you have
done is changed a plank bridge to a beam bridge. It acts like a much thicker
plank without the weight or expense of more material.
Beams are thick
at the center where more weight is supported and thinner near the ends where
there is less weight. The beams are usually made lighter by making them out of
lots of small triangles. The beams are started at the center and built out on
both sides equally to maintain balance like a seesaw.
Try this
experiment to see why triangles are used. Nail the ends of four scrap boards
together to form a frame. Use only one nail per corner. See how easily this four
sided structure collapses? This is how a bridge would act made from a shape
other than triangles. Now nail a board on a diagonal between two corners across
the frame to form two triangles. See how much stronger it is?
Arch bridges are
some of the longest lasting in the world. Some are over 1,500 years old! The
arch can be entirely over the roadway, entirely under the roadway, or in the
center. You can make a pretty good model of an arch bridge by using a hole saw,
like you would use to drill a hole for a door knob, and drilling holes in a
board. Cut this out with a cut through the center of the holes and you have the
two sides of an arch bridge. Place another board on top for the road the draw
and paint the stones on the side.
Bridge Activity
Baltimore Area
Council
Have boys build
two demonstration bridge side frames - one of rectangles and one of triangles.
Use stiff cardboard or thin wood and brass fasteners. Have them experiment to
see which type of bridge is stronger.
Ideas for
Engineer
Circle Ten
Council
Speakers – electrician, heavy
equipment operator, plumber, telephone lineman, sanitation worker, railroad
engineer, surveyor, city engineer, traffic planner, draftsman, architect.
Places to visit:
·
Visit the municipal offices of the city engineer or
surveyor. Look at a map of your town or city and try to find your house. Look
at some of the surveying equipment and learn some of the simple math
calculations.
·
Tour the city water works, sanitary facility or
recycling center. Ask about the current workload, and kinds of daily activities
that go on. How do they handle emergencies?
·
Visit an operational drawbridge, grain elevator,
ship or grain loading operation, or other large industrial operation involving
large cranes or other lifting equipment.
·
Visit a jeweler and look at various gems under the
microscope. How does the pattern affect the way a jewel is cut?
Den Activities:
·
Ask your local Boy Scout troop to give a
demonstration of some of the skills needed for the Pioneering Merit Badge. One
particular item of interest would be to see a rope monkey bridge being lashed
together.
·
Ask Webelos to look through books and magazines at
home and bring in pictures of bridges. Note the difference in construction.
Levers
Circle Ten
Council
A lever helps you to lift things
easily. A lever can be made by laying a plank over a wooden log or can with
both ends intact. Balance the plank so that there is a short end and a long
end. Place the short end under the object to be raised and push down on the
long end. Try raising some bricks. To experiment you can try to raise things
with the short end and you will find that it is more difficult or not possible
to raise the object. The longer end of the plank gives you the ability to
create more force and therefore raise weights easier.

Perhaps the simplest machine of all
for increasing force is the lever. A wheelbarrow is a king of the lever. Many
other types of complicated machines are really just collections of levers that
are put together to work in different ways.
Simple
Levers
Materials:
Length of
wood Glue
Small wooden
dowel Ruler
Stripes of colored
paper Pencil
Matchbox Weights (washers or coins)
How it works –
A simple lever is a straight rod that
rest on pivot or fulcrum. When you push one end of the rod down with an effort,
the other end goes up, lifting the load.
Try making this model seesaw and find
out for yourself how levers work.
Mark the length of wood with stripes
spaced about 1-inch apart.
Glue the dowel to the matchbox to make
a pivot.
Place the center of the length of wood
on the pivot so that the two ends balance.
Now try some experiments with the
weights.
Put a weight (the load) three marks
from the fulcrum.
Where must you place another weight
(the effort) to lift the load?
More load for less effort!
If the load is close to the fulcrum,
it’s easier to lift and you don’t need so much effort. You may have noticed
this if you’ve ever played on a seesaw – you can lift someone heavier than
yourself if they sit nearer to the middle than you do.
Try putting two weights (the load) two
marks away from the fulcrum of your seesaw. Where must you put a single weight
to lift the load?
Belt Drive
Merry-go-rounds, sewing machines,
record players, fishing reels, washing machines, and bicycles: these are just a
few of the many machines that turn, or rotate, as they work.
All the different rotating parts
inside a machine can be connected with a drive belt. As one part turns, it
drags the belt around with it, carrying its turning motion to the other parts of
the machine.
How it works – a drive belt
runs round a series of pulleys to carry the turning force from one place to
another. If the belt is going to work properly, there must be friction between
it and the pulleys, so that the belt does not slip. If the belt is too slack it
will not grip. If it is too tight, it might break or twist the pulleys out of
line.
Whirling
Acrobats
Circle Ten
Council
Materials:
Sandpaper Wooden board
Glue
Cardboard
Velcro –
self-adhesive Ribbon
Wooden
dowel Empty thread spools
Directions:
1.
Cut sandpaper into strips, and glue a strip
around each of the thread spools. The rough surface of the sandpaper is needed
to make some friction between the reels and the belt. This way, the belt will
not slip.
2.
Draw both the front and the back of each figure
on a piece of cardboard as shown, leaving a space between front and back to make
a base.
3.
Cut out the figures.
4.
Then fold and glue them so that they stand up.
5.
Glue a figure onto each spool.
6.
Cut the wooden dowel into a number of shorter
dowel pegs.
7.
Smooth the ends of the pegs with sandpaper.
8.
Drill holes into the baseboard. They should be
just big enough for the dowel pegs to fit snugly into them.
9.
Put the pegs into the holes,
10.
Put a thread spool onto each peg.
11.
Check that every reel can turn freely on its
peg.
12.
Push a short piece of dowel into the top of one
thread spool and glue the spool to the bottom peg. Put this spool on peg #5.
This is the drive belt handle. You will use it to turn the drive belt.
13.
Stretch a length of ribbon around the spools so
that it touches them all. Use a piece of Velcro to join the ends of the
ribbon. Then you can adjust it so that it is not too tight and not too slack,
and the figures will turn more smoothly.
Changing
Direction
Both of the figures will turn in the
same direction as the drive belt handle is turned when placed on any combination
of spools 1, 2, and 6. Both of the figures will turn in the opposite direction
of the drive belt handle when placed on spools 3 and 4. Notice what happens
when one figure is on spools 1,2, or 6 and the other is on spool 3 or 4.
Changing
Speed –
If all the thread spools have the same
diameter, they all rotate at the same speed. But if you use different-sized
spools, they turn at different speeds. To turn a big spool, the belt has to
move farther than it does to turn a smaller one, and so the big spool turns
around more slowly.
Gears
You’ll find gears inside nearly every
machine that turns. Clocks, watches and bicycles all use them. Just like belt
drive, the gears connect all of the rotating parts, but gears last longer than
belts and are more precise. If you’ve ever ridden a mountain bike, you’ll know
that gears are a good way of changing speed.
Cardboard
Gears:
Circle Ten
Council
This is a great section!! Having been a Machine
Design major for my BS and MS ME, I can get into gears!! CD
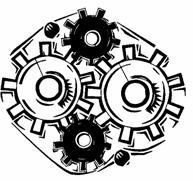
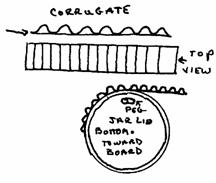
How it works – the best way to
find out how gears work is to make some of you own to experiment with. Each of
these homemade gears is made from a jar lid with a strip of corrugated
cardboard, stuck around the rim. The corrugations face put to make the gear
teeth.
Materials:
Strips of corrugated cardboard (1/2”
wide) with corrugations exposed
Jar lids and bottle tops of different
sizes
Pin board and push pins
Short dowel peg
Glue and paper
Directions:
1.
Bend a strip of cardboard around the rim of a
jar lid. Try to stretch it into place so that there is a whole number of teeth
evenly spaced around the lid. Cut the strip carefully to length and then glue
it in place.
2.
Make a small hole in the middle of the gear and
pin it to the board so that it spins freely.
3.
Make a selection of different-sized gears to add
to the board. Glue a dowel peg to one of the gears to make a crank handle.
4.
To make the gears work you must place them so
the teeth mesh. When you turn one gear its teeth will push on its neighbor’s
teeth and make them turn in the opposite direction.
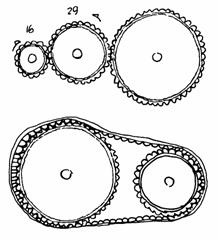
Gear Experiments
Connect a series of gears like the one
shown.
If you turn the big gear,
*
What happens to the two smaller ones?
*
Which way do they go around?
*
Which does a complete turn first?
Now try turning the small gear –
*
Do the bigger gears turn more quickly or more
slowly?
Count the number of teeth on each
gear.
*
If you turned a gear with 20 teeth around once, how
many times would it turn a gear with 10 teeth?
Drive Chains –
Circle Ten
Council
In some
machines, gears called sprockets are connected by a drive-chain. A bicycle
chain connects a sprocket on the pedals to another one on the back wheel. The
chain transfers the movement from the pedals to the wheels.
Make a
model chain from a long strip of corrugated cardboard with the ends taped
together. Loop it around two different sized gears and work out how far the
small gear moves then you turn the larger one.
Hollow
Tubes
Circle Ten
Council
To demonstrate the strength of hollow
tubes, try laying a brick on a Styrofoam cup lying on its side. Place another
cup on its rim and add bricks (2 to 3) until it crushed. Glue four cups
together rim to rim and bottom to bottom with white glue and allow glue to dry.
Place bricks (usually 4) on top until the structure crushes. Demonstration
shows why engineers use columns in structures and bridges.
Springs –
Springs store energy when compressed,
which is released when the spring is released. Catapults are a form of springs.
Catapult
Circle Ten
Council
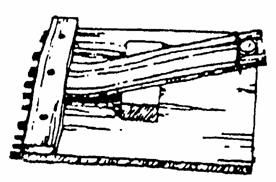
Materials:
Wood
scraps Ruler or yardstick
It can be any dimension. Use a ruler or
yardstick or any flexible wood for deadman arm. Leave spring bar loose so you
can test catapult with various leverages.
Block and Tackle
Circle Ten
Council
Materials:
2 Dowel rods (1” or
larger) Sash cord or clothesline
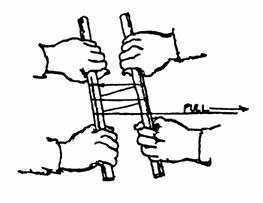
Tie the
cord to one dowel and make three wraps around both dowels. Have two big Webelos
Scouts try to pull the dowels apart while a smaller boy pulls the loose end of
the cord. He will be able to draw the larger boys together, no matter how hard
they pull. The block and tackle does not create more power; it merely trades
distance for force.
Block and Tackle Power (Part 2)
Baltimore Area
Council
To show how a
simple block and tackle increases pulling power, try this demonstration. You
need two dowels of broomstick diameter and a length of clothesline. Tie the line
to one of the sticks. Wrap it around both sticks two or three times. Have two of
your larger Webelos Scouts grasp the sticks. Have the smallest boy pull on the
line. He will be able to pull the two sticks together no matter how hard the
bigger boys try to hold back.