PACK
AND DEN ACTIVITIES
DEN TIME CAPSULE
Sam
Houston Area Council
Make a den time capsule. Include photos of den members and families, pack
newsletter, lists of favorite things and activities, souvenirs from field
trips, samples of den crafts, etc. Put it away in a safe place. Open at the
final den meeting of the Cub Scouting year or just before graduation to Boy
Scouts.
Alien Space Ships
Santa
Clara County Council
Here’s a craft you can make from all of your free or recycled computer CDs
to create space ships. Use plenty of "shiny" attachments, such as foil, old
hubcaps, CDs, tin cans, etc. This would make a great Scout camp project to
decorate for an alien or space theme.
Supplies: Old CDs (be sure to ask first), Aluminum foil,
Old hub caps, Tin cans (clean), Tacky Glue or Silver Duct Tape, Wire
(optional), Wire cutters (optional), String or fishing line, Scissors,
Markers
Directions:
- Use CDs to build the base of the space ship on
(shiny side out).
- Use glue or duct tape to adhere the pieces
together. Use aluminum foil if you want a shiny ship.
- Use any supplies that you find, just be sure to
have an adult present for safety.
- Decorate with markers if desired.
- Hang with string or
fishing line.
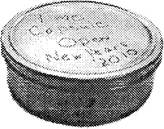
Cub Scout Time Capsule
Baltimore Area Council
Materials: "Trails End" popcorn tin,
water proof tape (electrical tape works well), duct tape, sandpaper, rag,
spray paint, paint pens and/or markers.
Instructions:
1.
Sand the side and lid of the popcorn tin. Work over newspaper to
minimize the mess.
2.
Discard the newspaper and dust off with a rag.
3.
Spread fresh newspaper and spray paint the tin. Allow to dry
fully; this may take several hours depending on the paint and conditions.
4.
Decorate the time capsule with the paint pens or markers.
5.
Have the boys put things into the capsule that they think are
important.
6.
Seal the time capsule with the electrical tape first and then put
a layer of duct tape over the electrical tape. Have each Cub Scout that
contributed put his name on the duct tape.
7.
Decide when you are going to open the time capsule. Perhaps the
week before your Den's bridging ceremony would be a good choice.
8.
Bury in the Den Leaders yard or store in a safe place.
Suggestions for contents:
1.
Photos of friends, family, den members, your room, your pet, or
yourself. It's a good idea to put these in a zip-lock baggie if you will be
burying he time capsule.
2.
Ticket stubs from your favorite movie or concert.
3.
Tape of your favorite song or your voice.
4.
A video of you and your Family, friends and Den Members.
5.
A letter to yourself. Or one from a friend to your future self.
6.
A list of your friends.
7.
A paragraph about what you think you will be like when the
capsule is opened or maybe what you want to be doing with your life in the
future.
Martian Tie Slide Materials:
Heart of
America Council
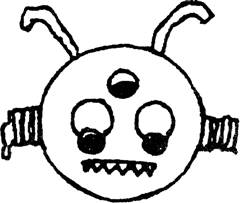
Materials:
1 - 1/2" Green Styrofoam ball
2 Green chenille stems
3 - small Wiggle eyes
1/2" piece of "Zip Strip" from waxed paper or aluminum
foil box :
1 - Plastic curtain ring
or PVC pipe piece
1.
Cut one chenille stem in halt and coil each half around pencil.
2.
Remove from pencil and glue one on each side of ball.
3.
Cut other chenille stem in half and cut one half in half. Push
two short pieces into top of ball and glue into place. Shape for antennae.
4.
Glue on three wiggle eyes and zip strip for mouth.
5.
Push curtain ring into back and glue into place.
Wind Catcher
Heart of
America Council
Materials:
Nail polish remover 2 - Liter bottle Craft knife
Stickers
Colored vinyl tape Markers
Fishing string Fishing swivel
- Using nail polish remover, clean off all glue from
2 - liter bottle.
- Draw windows on graph paper.
- Using a craft knife cut each window on the lines.
Tape pattern around the bottom of bottle a few inches above the bottom.
- Trace the 3 sides onto the bottle. Remove the
pattern
- Using the craft knife lightly score the bottle
where the fold of the window will be. Cut the rest of the window out
carefully.
6.
Draw four windows on the upper part of the bottle. Then cut in
the same manner by visually dividing the bottle into quarters.
7.
Decorate the bottle in any way you like either with pieces of
vinyl adhesive tape, markers or any other waterproof materials you can think
of. When decorated carefully fold the windows out along the score lines to
90 degree angles.
8.
Poke a small round hole in the top of the bottle cap, and secure
a fishing swivel hook through it. Tie fishing string to this and string up
anywhere.
ODDS AND ENDS ROBOT
Sam
Houston Area Council
ü
Remove lid from tuna can. Glue open side down to top of
oatmeal box.
ü
Cut a cardboard bathroom tissue roll into 3 equal parts.
Reserve two for arms. In third, punch a hold through the center. Glue this
piece to top of tuna can. Push a straw through holes and glue beads on ends
of straw.
ü
Glue other two sections of cardboard roll to sides of oatmeal
box for arms.
ü
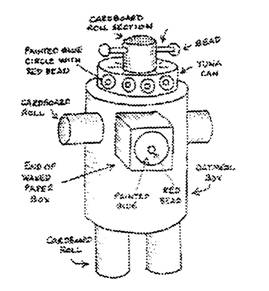
Use two more cardboard tissue rolls for legs. Glue to bottom of oatmeal box,
in position so that robot will stand.
ü
Cut off one end of a waxed paper or aluminum foil box. Glue
this to center of oatmeal carton.
ü
Spray paint robot silver. When dry, paint blue circles on tuna
can and robot's front. Then glue red beads in center of blue circles.
MOON BUGGY
Sam
Houston Area Council
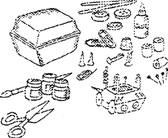
Provide each boy with an empty carton and an assortment of materials such as
pipe cleaners, golf tees, button, screws, wire, cardboard, paint, etc. Let
each boy custom-design his own Moon Buggy or Mars Rover.
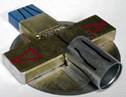
ROCKET SHIP
Sam
Houston Area Council
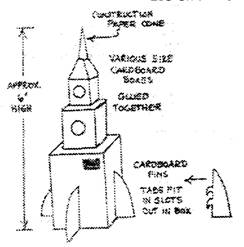
This is constructed from different size cardboard boxes glued together. It
can be made large enough for a boy to get inside, by making a door in the
back. After gluing boxes together, paint with gray or light blue latex
paint. Paint on trim with tempera. Design your own shape. It will vary
depending on the size and shape boxes you have available. The drawing is
simply an example to give you ideas.
ALIEN HEAD
Circle Ten Council
Materials: 1-2 yards green fabric, 1-1 1/2 feet
elastic, green thread, needle, plastic bags
Directions:
Cut out a large circle of green fabric. The larger you
want the head, the bigger the circle.
Then, hem the ends of the fabric, but leave enough
space to get the elastic through.
When you are done hemming, pull the elastic through the
space in the hem.
When the elastic is through, connect both ends together
with the thread.
Stuff your head with
plastic bags to make it stand up, or put it on your head (tuck your hair
under), and you're ready to go
ALIEN SPECIMENS
Circle Ten Council
Materials:
Clear glass or plastic jar with tight-fitting lid
Sculpey bake-hard craft clay;
little plastic (or glass) eyes of various sorts
Acrylic paints
food coloring
paper for labels
Cotton Balls
Glue
your computer.
Directions:
Paint the lid of your jar black, so it will look like a
real scientific specimen jar.
Using the Sculpey, model your creature, making sure it
will fit inside the jar.
Poke the eyes into it, then take them out.
When your creature is finished, bake in a 325-degree
oven until the thing turns uniform brown.
Let it cool fully.
Paint, and glue in the eyes.
Decide what you have just created.
Give it a name like, Twiggle Stimjiggy From Mars.
On your computer, create a scientific specimen label.
Print the label.
When the paint on your alien is dry, it's time to fill
the jar with water and insert your "specimen" into the "formaldehyde".
Tint the water with food coloring. I suggest green or
orange for a great effect.
Wind threads of cotton around your alien.
Glue your label to the jar.