PACK AND
DEN ACTIVITIES
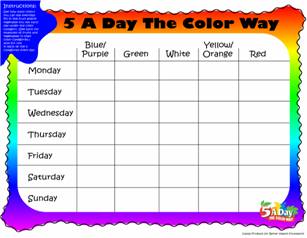
5 A Day
For a really great fun site
that I cannot begin to explain here go to
www.5aday.com . It provides a fun way for lids
to learn about Fruits and vegetables. There is a large Kids section on this
website, And a fun way to encourage them to eat their 5 to 9 servings a day.
They should have one from each color!! There are games and coloring books.
Funny characters and activities. Charts for them to fill out to log their
colors. There are recipes, too
Here’s the outline of their
plan –
Eating 5 or more servings of
colorful fruits and vegetables a day is part of an important plan for healthier
living. That’s because deeply hued fruits and vegetables provide the wide range
of vitamins, minerals, fiber, and phytochemicals your body needs to maintain
good health and energy levels, protect against the effects of aging, and reduce
the risk of cancer and heart disease. Diets rich in fruits and vegetables may
reduce the risk of some types of cancer and other chronic diseases.
It’s all about color –
blue/purple,
green,
white,
yellow/orange, and
red – and the power of colorful fruits and
vegetables to promote good health. So when you're grocery shopping, planning
your meals or dining out, think color.
And for variety, make it
5 A Day The Color Way:
BLUE/PURPLE
Boost the level of BLUE/PURPLE in your
low-fat diet to help maintain:
• A lower risk of some cancers*
• Urinary tract health
• Memory function
• Healthy aging
Beat the Effects of Aging
Blue/purple fruits and vegetables contain
varying amounts of health-promoting phytochemicals such as anthocyanins and
phenolics, currently being studied for their antioxidant and anti-aging
benefits. Get blue/purple every day with foods such as:
Blackberries
Blueberries Black currants
Dried plums
Elderberries Purple figs
Purple grapes
Plums Raisins
Purple asparagus Purple
cabbage Purple carrots
Eggplant Purple Belgian
endive Purple peppers
Potatoes (purple
fleshed) Black salsify
GREEN
Add GREEN to your low-fat diet to maintain:
• A lower risk of some cancers*
• Vision health
• Strong bones and teeth
Go Green. Go Healthy.
Green fruits and vegetables contain varying
amounts of potent phytochemicals such as lutein and indoles, which interest
researchers because of their potential antioxidant, health-promoting benefits.
Go green every day with fruits and vegetables like these:
Avocados Green
apples Green grapes
Honeydew
Kiwifruit Limes
Green pears
Artichokes Arugula
Asparagus
Broccoflower Broccoli
Broccoli rabe Brussels
sprouts Chinese cabbage
Green beans Green
cabbage Celery
Chayote squash
Cucumbers Endive
Leafy greens
Leeks Lettuce
Green onion
Okra Peas
Green pepper Snow
Peas Sugar snap peas
Spinach
Watercress Zucchini
WHITE
Working WHITE into your low-fat diet helps
maintain:
• Heart health
• Cholesterol levels that are already healthy
• A lower risk of some cancers*
White for
Wellness
White, tan, and brown fruits and vegetables
contain varying amounts of phytochemicals of interest to scientists. These
include allicin, found in the onion family. Get all the health benefits of white
by including foods such as:
Bananas Brown
pears Dates
White nectarines White
peaches Cauliflower
Garlic
Ginger Jerusalem artickoke
Jicama
Kohlrabi Mushrooms
Onions Parsnips
Potatoes (white fleshed)
Shallots
Turnips White Corn
YELLOW/ORANGE
Make YELLOW/ORANGE a part of your low-fat diet
to help maintain:
• Heart health
• Vision health
• A healthy immune system
• A lower risk of some cancers*
Powerful Antioxidants
Orange and yellow fruits and vegetables contain
varying amounts of antioxidants such as vitamin C as well as carotenoids and
bioflavonoids, two classes of phytochemicals that scientists are studying for
their health-promoting potential. Every day, include orange and yellow fruits
and vegetables like these:
Yellow apples
Apricots Cantaloupe
Cape Gooseberries Yellow
figs Grapefruit
Golden kiwifruit
Lemon Mangoes
Nectarines
Oranges Papayas
Peaches Yellow
pears Persimmons
Pineapples
Tangerines Yellow watermelon
Yellow beets Butternut
squash Carrots
Yellow peppers Yellow
potatoes Pumpkin
Rutabagas Yellow summer squash
Sweet potatoes
Yellow tomatoes Sweet corn Yellow
winter squash
RED
Be sure to include RED in your low-fat diet to
help maintain:
• Heart health
• Memory function
• A lower risk of some cancers*
• Urinary tract health
Red-hot and Healthy
The specific phytochemicals in the red group
being studied for their health-promoting properties include lycopene and
anthocyanins. Get your reds every day by eating fruits and vegetables such as:
Red apples Blood
oranges Cherries
Cranberries Red
grapes Pink/Red grapefruit
Red pears
Pomegranates Raspberries
Strawberries
Watermelon Beets
Red peppers
Radishes Radicchio
Red onions Red
potatoes Rhubarb
Tomatoes
What’s a
Serving?
www.5aday.com
The USDA Food Guide Pyramid recommends 5-9 servings of
fruits and vegetables every day. And getting 5 to 9 servings is easier than you
may think.
A serving size is:
One medium-size fruit
1/2 cup raw, cooked, frozen or
canned fruits (in 100% juice) or vegetables
3/4 cup (6 oz.) 100% fruit or
vegetable juice
1/2 cup cooked, canned or frozen
legumes (beans and peas)
1 cup raw, leafy vegetables
1/4 cup dried fruit
Wondering how many servings you really need each day?
Children (2-6 yrs.), women, and others who typically need
about 1,600 calories to reach or maintain a healthy weight:
Older children, teen girls, active women, and most men who
typically need about 2,200 calories to reach or maintain a healthy weight:
Teen boys and active men, who typically need about 2,800
calories to reach or maintain a healthy weight:
Now track this by downloading their color-tracking chart
and challenge the boys to have a serving of each color every day. Or do the
Scouting thing – Have the boys create grids with days of the week on one
axis and the five colors on the other then have them draw in what fruit or
vegetable they had each day from each color. Kathy who does pre-openings for my
Roundtables works at an elementary school that uses this and says the kids all
love this and do it. They get into the challenge of the five colors each day.
CD
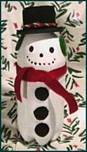
Soda Bottle Snowman
Santa Clara
County Council
This is an easy project for kids. Make a snowman out of old
plastic soda bottles.
Supplies:
2 Liter plastic soda bottle,
White and black acrylic paint,
Sponge brush,
Fine grain sand paper,
Red and black felt,
Pipe cleaners in Christmas colors,
Craft glue,
Plastic spray can lid (spray starch, or similar size),
Plastic tub lid (butter tub or similar size)
Directions:
1.
Sand the surface of the bottle, spray can lid and tub lid. This will
allow the acrylic paint to adhere to the surface.
2.
Paint the spray can lid and tub lid black. Paint the bottle white. Allow
to dry.
3.
Cover the top and sides of the spray can lid and the top of the tub lid
with black felt. Since you've painted them black, you don't need to be too
precise with the felt. Center, and glue the spray can lid to the tub lid. You
now have your snowman's hat. When the glue has dried, turn the hat over and cut
a small hole in the bottom with an Xacto knife. Make the hole a little smaller
than the circumference of the top of the hat.
4.
Fill the bottle about halfway with pebbles, sand or dirt. This will help
keep your snowman from falling over.
5.
Cut a strip of red felt about 2 feet long and 1" - 1 1/2" wide. (If your
felt came in 12" squares, just cut two strips and glue the ends together. Tie
this around the bottle, about 3-4" down from the top. Secure with a dab of glue.
6.
Make earmuffs using 3 pipe cleaners. Two of them will be coiled to make
the actual "muffs". The third will be the band attaching them. (Attach the pipe
cleaners by twisting the ends together.) Drape the earmuffs across the back/top
of the bottle. Secure with craft glue.
7.
Attach the hat to the bottle by running a bit of glue around the inside
of the hole and then place the hat over the top of the lid. Decorate the hat
with a pipe cleaner.
Draw a face using a black
marking pen or black paint. Draw buttons under the scarf, or glue on black felt
circles.
Chef’s Hat
Santa Clara
County Council
The boys are sure to enjoy wearing these hats as they
prepare holiday food.
Supplies:
White poster board,
White tissue paper,
Tape, Paper clips
Directions:
1.
Start with a band of white poster board 26” long and 3” high, and 3
sheets of 20” by 30” white tissue paper. Fold each sheet in half the long way.
2.
Gather and tape one of the short sides of each sheet along the hatband,
overlapping the sheets slightly.
3.
Curl the band tape side out, place it around the boy’s head, and
paperclip the ends. Gather the tissue at the top, taping it tightly together.
Cut off the extra tissue, remove the paper clips, and turn right side out.
Reattach the paper clips, puff up the tissue, and start cooking!
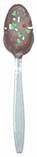
Chocolate Spoons
Santa Clara
County Council
This project is easy and fast. Add a special touch to a dinner party or cheer
someone up with a gift of this treat. Chocolate sure makes my day brighter!
Adult supervision is recommended.
Supplies:
Heavy
plastic spoons,
Milk
chocolate, White chocolate,
Chocolate
sprinkles, Colored sugar,
Wax paper,
Plastic wrap, Ribbon
Directions:
1.
In microwave, melt half of white chocolate in one bowl. Melt half of milk
chocolate in another bowl (of course you may melt chocolate on stove top).
2.
Dip half of the spoons in white chocolate and dip other half in milk
chocolate. Dip them as far as the base of the spoons bowl. Place on waxed paper
and let set completely.
3.
When chocolate is set dip the white spoons in milk chocolate, dip milk
chocolate spoons in white. Dip only half way up the bowl of the spoon to create
a layered effect. Place back on waxed paper to begin setting.
4.
Let chocolate set only partially (about 5 min.) Then gently dip spoons in
chocolate sprinkles or colored sugar.
5.
Wrap soon in plastic wrap and tie with ribbon. You can add a little tag
(i.e. "Stir me in your coffee").
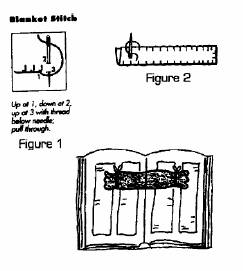
Cook Book
Page Holder
Baltimore Area Council
Materials:
Felt 5”x8
1/2”
Yarn in a
contrasting color
Tapestry
Needle
1/2 yard
of ribbon
Rice Beans
Fabric paints (optional)
Directions:
1.
Fold long edges of felt together.
2.
Use the blanket stitch for all sewing. Figure 1.
3.
Stitch along both long edges and one short edge using the yarn and
the blanket stitch. Figure 2.
4.
Cut ribbon into 9” lengths.
5.
About 2” from the sewn end tie a ribbon bow tightly using one piece
of ribbon.
6.
Fill with rice and beans to about 2” from the open end.
7.
Continue stitching the last short end and tie off the yarn.
8.
Tie a ribbon bow tightly around this end.
9.
Decorate with fabric paint if desired.

Edible
Pinewood Derby Car
Baltimore Area Council
Slip
your favorite vegetable dip inside one of these pinewood cars and drive your
hunger away.
Utensils: Fork, ruler, cutting board, sharp knife, drinking straw,
toothpicks, measuring cup, paper plates
Ingredients: Hoagie bun (one per car); cucumbers, carrots, pretzels, pitted
ripe black olives, pimento-stuffed green olives, broccoli, zucchini, cherry
tomatoes; red, green, and yellow sweet peppers, vegetable dip (any flavor), 1/4
cup per car.
ü
Use a fork to scoop out the center of the top of the bun, leaving about 2 inches
on the side and 1 inch on the ends.
ü
Cut four 1/4-inch-thick slices of cucumber for the wheels.
ü
Cut two thin carrot sticks, each about 4 inches long, for the
axles. (Save remaining carrots and cucumbers for dipping.)
ü
About 1 to 2 inches from each end of the bun, push the drinking
straw through the bun where the wheels will go to make holes for the axles. Next
poke the straw through the center of the cucumber slices. Throw away the straw.
ü
Slide the carrot sticks through the bun for axles. Attach the
cucumber slices to the axles for wheels.
ü
Stick a toothpick into two of the green stuffed olives.
ü
Cut a black olive into thick round slices. Push a slice onto each
toothpick behind the whole green olives. Push the end of each toothpick into the
front of the bun for headlights.
ü
Fill the bun with your favorite vegetable dip and vegetables.
ü
Use a pretzel for a windshield or steering wheel.
ü
Add two cherry tomatoes for driver and passenger.
Eat and
enjoy!
Children's Gingerbread House
Connecticut
Rivers Council
For more
Gingerbread Houses including one made with graham crackers – go to the Website
list. Wasn’t sure whether this should be here or Cub Grub. CD
Note, this gingerbread house takes 2 to 3 days to complete.
It would be a great one for the den can work on together.
Ingredients:
¾ cup butter,
7/8 cup packed light brown sugar,
1 teaspoon lemon zest,
1 ½ tablespoons lemon juice,
½ cup molasses,
2 eggs,
3 cups all-purpose flour,
2 teaspoon baking powder,
1 tablespoon ground ginger,
2 teaspoon ground allspice,
6 egg whites,
4 (16 ounce) packages confectioners' sugar, sifted
Directions:
First cut out in thin cardboard:
A side wall, 4 ½x8 inches;
An end wall, 4 ½x5 inches;
A triangular gable 4 1/2x3x3
inches;
And a roof rectangle 4 1/2x9
inches.
Tape the rectangular end wall piece to the triangular gable
piece: match the long 4 ½ inch side of the triangle to one of the 4 ½ inch sides
of the end wall.
In a large bowl, cream butter and sugar until light and
fluffy. Stir in lemon zest, lemon juice, and molasses.
Gradually beat in 2 eggs.
Sift the flour, baking powder and spices together, stir
into creamed mixture.
Wrap dough in parchment paper, and refrigerate for 1 hour.
Turn out dough onto a lightly floured surface.
Divide into 6 portions, 2 slightly larger than the others.
On a lightly floured surface, roll out the 4 smaller pieces
to approximately the size of the side wall and the end with gable templates; cut
out two of each.
Roll out remaining dough, and cut into two rectangular roof
pieces.
Transfer gingerbread onto greased baking trays.
In a preheated 375 degrees F (190 degrees C) oven, bake
gingerbread for 10 minutes, or until crisp.
When removing from the oven, leave the gingerbread on the
baking trays for a few minutes to set, then transfer to wire racks. Leave out
overnight to harden.
In a large bowl, lightly whisk 2 eggs whites.
Gradually beat in approximately 5 cups confectioners'
sugar, the icing should be smooth and stand in firm peaks.
Spread or pipe a 9-inch line of icing onto a cake board,
and press in one of the side walls so that it sticks firmly and stands upright.
If necessary, spread or pipe a little extra icing along either side to help
support it.
Take an end wall and ice both the side edges.
Spread or pipe a line of icing on the board at a right
angle to the first wall, and press the end wall into position.
Repeat this process with the other two walls until they are
all in position. Leave the walls to harden together for at least two hours
before putting on the roof.
Spread or pipe a thick layer of icing on top of all the
walls, and fix the roof pieces in position; the roof should overlap the walls to
make the eaves.
Pipe or spread a little icing along the crest of the roof
to hold the two pieces firmly together.
Leave overnight to set firmly.
When ready to decorate, make the remaining icing.
In a large bowl, lightly whisk 4 egg whites, and mix in
remaining confectioners' sugar as before. Use this to make snow on the roof, and
to stick various candies for decoration. Finish with a fine dusting of sifted
confectioners' sugar.
Learning
Activities
Louisiana
Department of Education
This is
only part of the list found at
http://www.doe.state.la.us/lde/nutrition/jazzy/23colors.html. I substituted
Scouting terms (e.g. Cub Scouts for students and Den Meetings for other places)
throughout the text. Be sure to check out – “Are Vegetables Noisy?” this sounds
like a perfect activity for Cubs. CD
Recognize fruits and vegetables.
Challenge your Cub Scouts to
name as many fruits and vegetables as they can in three minutes. Then help them
create a list of all the fruits and vegetables they know. Group according to
color.
Investigate colors of fruits and vegetables.
For FUN, Have your Cub Scouts
create a sheet to log their food for the next week. Have them designate a Red
Day, Yellow Day, Blue Day, Orange Day and Green Day. On these days, encourage
them to eat at least one food of that color. For example, on Red Day, choose
strawberries, cherries, a slice of watermelon, a tomato, radishes, beets, or
another red food. On Yellow Day, choose a banana, corn, or another yellow food.
Then write on the sheet what food they ate that day. Compare list at ext Den
Meeting.
Ask your Cub Scouts to come up
with reasons to eat more, and a greater variety, of fruits and vegetables.
Remind them that eating more fruits and vegetables in a greater variety will
provide the vitamins and minerals needed for growth. They can brainstorm the
benefits of having strong and healthy bodies and use their ideas to create
slogans, such as "Another fruit a day helps me play." They can post the slogans
at home as motivators. Then they can set goals to eat more fruits and
vegetables. A good idea for increasing fruit consumption is to have them decide
to eat a fruit instead of some other snack and to drink fruit juice instead of
soda. Challenge students to try a new fruit or vegetable every week.
Have a fruit and vegetable tasting party.
Arrange for the refreshments
for your den meetings this month to be fresh fruits and vegetables. You’re your
Cub Scouts taste the foods and keep a tally of the number and types of fruits
and vegetables they tried. Encourage them to try a fruit or vegetable they have
never tried before. Have them describe each food, using words to describe its
taste, its feel to the mouth, and its sound when chewed. Examples of descriptive
words include, cold, salty, chewy, sweet, juicy, crunchy, etc. Then ask students
to write a story about their experiences.
Are fresh vegetables noisy?
Fresh vegetables can be noisy
to eat! Have your Cub Scouts do a "sound test" comparison to find the loudest
and quietest vegetables. In the process, you’ll encourage your Cub Scouts to
sample vegetables in their most nutritious forms. Maybe do this with fruit,
too.
Gather four or five vegetables
that have different textures and can be served raw: carrots, celery, mushrooms,
spinach, lettuce, cabbage, cucumbers, cauliflower, and broccoli are all good
choices. Wash the vegetables and cut into sticks, slices, florets, or leaves.
(Review the different plant parts your Cub Scouts will be eating.)
Ask your Cub Scouts to wash
their hands. Set out the vegetables and sample them one at a time. Start with
carrots. Describe the color and feel of raw carrots. Remind everyone to listen
closely. Then invite your Cub Scouts to bite into the carrot sticks and chew.
Ask them to describe the sound of the carrot when it is chewed. Repeat the
process for each vegetable. Vote on which vegetable has the loudest crunch and
which has the quietest – or no crunch at all! Discuss how we need to eat
vegetables every day.
Introduce mystery bags.
This activity illustrates the
senses of taste, touch, and smell. Your Cub Scouts feel and smell the contents
of several Mystery bags to guess what food is inside. Make six or more Mystery
bags with a different fruit or vegetable in each one. Suggestions include kiwi,
red or green apple, red or green pepper, celery stalk with top left on, lemon
sliced in half. Include one or two foods that may be new to your Cub Scouts,
such as star fruit or acorn squash. If you have the resources, your Cub Scouts
will enjoy tasting samples of the "mystery foods" after they have made their
guesses. Talk about how the food feels, smells, and tastes as your Cub Scouts
eat. For sanitary reasons, be sure that the food used for tasting is fresh. Do
not eat the food that was used for feeling and smelling in the Mystery bags.
Directions for
Design
Louisiana
Department of Education
The colors, pictures and names of various fruits and
vegetables are used to symbolize the colors of a peacock.
Maybe you could design a turkey with feathers colored
the same way to keep it in the Holiday Theme. CD
Hard Candy Wreath
Santa Clara
County Council
This craft is a little time consuming but with patience it
looks great and is a fantastic gift for the holidays. This project can also be
used as a Valentine Day project or Easter craft depending on the type of candy
you use. Adult supervision is recommended.
Supplies:
1 coat
hanger
Approx 30
of assorted, wrapped hard candies, suckers, etc.
Approx 30 –
8” pieces of colorful curling ribbon
Wire
cutters, Pliers to bend the hanger
Masking
tape,
A dull pair
of scissors to curl the ribbon
Directions:
1.
Unbend the hanger and cut it in half (this will be enough for 2 kids).
2.
Bend the 1/2 hanger into a circle leaving about 4” at the top to make a
hook. Twist the end to make it look like a circle with a hook on it.
3.
Cut your curling ribbon into 8” pieces.
4.
Fold your ribbon in half. In the middle of that ribbon tie one piece of
candy. Tie it on the end of the candy where the paper twists.
5.
Now tie the candy with 2 knots tightly on to the hanger. Tie the candy
right next to the wire to help cover it up.
6.
Use the scissors to curl the ribbon on each end.
7.
Repeat the process for all your candy pieces.
It might take a few more or less
than 30 depending on the size of each candy. Suckers should be tied close to the
head. You may add a ribbon on the top to cover the hook if you want. You can
also tie on a pair of scissors so people can eat the candy when they visit.
DREIDEL PHOTO
MAGNET
Southern NJ
Council
1.
 Trace
dreidel patterns on two colors of craft foam (enlarge to desired size).
Trace
dreidel patterns on two colors of craft foam (enlarge to desired size).
2.
Cut out shapes. (Using pinking shears to cut one of the shapes)
3.
Cut circle from center of small shape
4.
Glue photo (approx. 2" x 2") on back of small dreidel foam shape so
picture shows through round opening.
5.
Center and glue small dreidel shape on large dreidel shape.
6.
Decorate as desired with bow, hole punched foam circles. Glitter, or
greeting written with marker.
7.
Press magnetic strip on back of dreidel.
SHOOTING STARS OR HANUKKAH STAR
Southern NJ
Council
1.
 Draw a five-point star or a six-point Star of David about 3 inches across on
cardboard for pattern (enlarge to desired size).
Draw a five-point star or a six-point Star of David about 3 inches across on
cardboard for pattern (enlarge to desired size).
2.
Then draw a slightly smaller star pattern.
3.
Use two different colors of bright colored felt, cut a star out of
each.
4.
Use 2 matching ribbons colors.
5.
Cut three 8-inch strands of ribbon from each color.
6.
Make sure all ends are even and then staple across the top several
times to hold them together.
7.
Lay the large star on the table and place the stapled ribbons
together in the center of the star.
8.
Put glue on the back of the smaller star and turn it over and center
it on the larger star, securing the ribbon strands.
9.
When the glue has dried, carefully poke a small hole in the top of
the star and thread a short piece of ribbon through it for a hanging loop.
10.
You may add glitter, sequins, beads, or write Shalom or Peace on star
with fabric paints.
KWANZAA Celebration
Southern NJ
Council
If you are having a Kwanzaa
celebration in your home, make a list of all the people you wish to invite. Look
through magazines for examples of African fabric and designs (Corel Gallery
Magic clipart has a large selection as well) You can follow these designs on
your invitations and other decorations. Look around the house for a special cup
that you can use for the unity cup. Start gathering dried vegetables and fruits
to make up the mazao. These fruits and vegetables represent the crops of
harvest, or the many good things in our lives. Make Kwanzaa decorations; the
colors of Kwanzaa are red, black and green.
Kwanzaa gifts are not meant to
cost a lot of money. Instead, the gifts are meant to celebrate the spirit of
kuumba, or creativity.

KWANZAA MAT
You will need:
Ruler, Scissors, Glue or clear tape
Black, red and green construction paper
1.
Measure and cut out a piece of black construction paper eight inches
wide and ten inches long. Cut seven lines in the paper, leaving a one-inch
border all the way around the mat. See illustration.
2.
Cut four red and four green strips of construction paper one inch
wide and eight inches long.
3.
Weave a red strip and then a green strip alternately, going over and
under the black mat frame. Keep the black border. Secure the ends of the strips
with glue or clear tape
4.
Place your mat on the table and decorate with corn and other harvest
foods.
OTHER KWANZAA
ACTIVITIES
1.
Take out the old photograph album and tell your children about their
ancestors.
2.
Show some movies about your country and her people.
3.
Take the children to the library and have an "Africa" scavenger hunt for
information about Africa.
4.
Create a family tree.
5.
Play the game OWARE.

PENGUIN PINS or TIE SLIDE
Southern NJ
Council
Need:
Craft sticks
Black, white and orange acrylic paint
3/8 " red felt
Tiny white pom poms
Tacky glue; glue gun
Sunflower seeds in shell
Paintbrush
1" long x 1/4" wide square of knit rib fabric
Pinback or chenille pipe cleaner
toothpick
Directions:
1.
Paint seeds orange and craft stick black.
2.
When dry, Paint white oval on stick, from top to 1 inch above bottom.
3.
Glue seed nose 1 inch below top of craft stick.
4.
Paint eyes 1/4" below top and buttons using a toothpick.
5.
Glue felt scarf around neck; fringe edges.
6.
For Hat
a.
Glue 1/4" at 1-inch edges of rib fabric together
b.
Gather and glue one end closed; turn.
c.
Fold under 1/8" at lower edge.
d.
Glue onto stick.
e.
Glue pompom on top.
7.
Hot glue pinback or chenille pipe cleaner to back of craft stick.
SNOW COVERED PINECONES
Southern NJ
Council
Place glue on ends of
individual cone leaves and sprinkle glitter on. Or you can use glitter fabric
paint glued directly to ends of cones leaves to give the effect of fallen snow.
PERSONALIZED ORNAMENTS
Southern NJ
Council
Encourage creativity by having kids paint plain glass or
plastic ball ornaments with fabric paint. The possibilities are endless!
Snowmen, Stars, Snowflakes...Many of the plastic balls can be easily filled with
curling ribbon to add color. A special holiday message can also be inscribed.
PASTA WREATH ORNAMENTS
Southern NJ
Council
Materials needed:
Tagboard or cardboard cut out into a wreath shape
Glue
Various shapes of uncooked pasta
Spray paint
Ribbon
Hot glue gun
Directions:
1.
Glue the various shapes of pasta all over the circular wreath pattern.
2.
Use a hole punch to make a hole at the top of the ornament.
3.
Once the pasta has dried thoroughly, spray the wreath with spray paint.
4.
Use a hot glue gun to attach a ribbon hanger to the wreath.
Beaded Snowflake
Santa Clara
County Council

This makes a pretty beaded snowflake, which you can use as an ornament.
Supplies:
3 Chenille
stems (6" in length),
8 Crystal
paddlewheel or sunburst beads (18 mm size),
20 Crystal
faceted beads (8 mm size),
18 Crystal
tri-beads (11 mm size),
Hot glue
gun or craft glue, Wire cutters (to cut chenille stems)
Directions:
1.
Cut chenille stems to equal 6" in length.
2.
Twist them in the center once or put a spot of hot glue to hold them
together, then spread out the arms gently, keeping it flat.
3.
String the beads on each arm in the following pattern: 1 faceted bead, 1
tri-bead, 1 faceted bead, 1 tri-bead, 1 paddle wheel, 1 tri-bead, 1 faceted bead
4.
Put a spot of glue under each last faceted bead. When dry clip off ends
of chenille stem.
5.
Glue (hot glue is best) one paddle wheel in center of each side then one
faceted in center of each paddle wheel that is in the middle.
6.
Make a hanger of fishing line or invisible thread.