PACK/DEN ACTIVITIES
Quill Pens (Bear Den
Meeting Activity)
Cub Scout Program Helps
Addendum
Use a
turkey feather and whittle the tip to a sharp point. Sandpaper will help make
the tip smooth. The point will need to be sharpened again after it is used.
Make sure the boys write with washable ink.
Lasso Practice
Santa Clara County Council
Using a hula-hoop and a child’s wooden rocking horse, have cowboys try to
“rope” the horse’s neck. You can also setup folding chairs around the room,
and have the boys try to rope the backs of the chairs.
Spin a Flat Loop
Santa Clara County Council
Before you try your first rope spin, there are a few
“don’ts” to remember: Don’t spin ropes inside the house, unless you have a
large play area where things aren’t likely to get bumped or broken. Don’t
wear loose clothes that might interfere with the spinning rope.
Don’t—actually, NEVER—put the lariat around anyone’s head or body, including
your own. And, finally, don’t be discouraged if the rope doesn’t spin a
perfect circle right away. Most kids can do a pretty good spin with less than
an hour’s practice.
Get a
piece of rope about 12 feet long and between ¼ and 3/8” in diameter. Use only
a braided rope, often called sash cord. Don’t use a common “laid rope,” with
spiral strands because it kinks and tangles too easily. A brand new rope will
probably be too stiff and should be worked until the stiffness is gone. Just
using the rope for awhile will usually soften it up.
At one
end of the rope, tie a slip knot known as a “honda.” Be sure to snip off the
tail or end of the honda knot to make it light enough for good spinning. Feed
the other end of the rope through the honda, and pull the slip knot tight.
Place a large flat washer over the free end of the rope, then tie the end of
the rope with a simple overhand knot.
To
adjust the rope for spinning, hold the lariat at the honda; the loop should
hang down. The length of the rope from the honda to the washer and knot is
called the “spoke.” When the loop is the proper size, the spoke should hang
down from the honda halfway to the bottom of the loop. Adjust the rope so
this is so. When you have the rope adjusted properly, be sure the skip knot
is pulled tight so that the loop size won’t change.
The
easiest spin to learn is the “flat loop.” Find a space where there is plenty
of room, and stand with your feet slightly apart and your body leaning
slightly forward at the waist. Hold the rope at the honda in your left hand
(assuming you are right-handed; a left-handed scout may need to switch
hands/directions). Place the knotted end of the spoke with the washer loosely
between the second and third fingers of your right hand so that the knot faces
the palm of your hand. Your right hand is called the “spoke hand.”
Bring
the loop over to your right hand and let it lie loosely across the fingers of
that hand. You’re now ready to throw out the rope and start spinning.
Throw out your right hand in
a counterclockwise direction away from your body. At the same time, release
the loop from both hands, while still loosely holding the spoke. Your right
hand should continue to make counterclockwise movements while the loop spins
parallel to the ground and the spoke slips and turns between your fingers.
This slipping is important if you wish to avoid “wind up” and rope kinking.
(Cowboys don’t use washers on their ropes, but this is a good way to learn.)
Keep trying to throw out the rope and get it spinning
before the loop touches the ground. If the rope seems too big or clumsy, you
can shorten it or try standing on something sturdy. Don’t try to make the
rope spin too fast—the secret of good rope spinning is to “get the rhythm.”
Of course, there are many other rope tricks you can learn, but the first step
is to learn this flat spin—and to be able to get it going in both directions.
Wanted Posters
Circle Ten Council
Make wanted posters . Their
easy just use Beige Paper and lightly singe the edges with a candle. Finally
paste a picture to the paper and write wanted at the top. At the bottom write
a description of all of the fun things they do in Scouting. "Wanted For Fun."
Then use these in the schools for your “Round Up” or other recruiting
drive!!
Log Cabin Key Holder
Circle Ten Council

Materials: 26
Popsicle sticks, glue, 6 small nails
Lay 10 sticks side by side. Glue 3 sticks on
top of the 10 sticks; one at the top, one in the middle and one at the
bottom. Glue 3 sticks one on top of each other for each side of the roof.
Cut the remaining sticks to make the roof. Glue the roof to the cabin.
Hammer the 6 small nails onto the cabin for hanging keys.
Tin Lantern
Santa Clara County Council
Materials:
Empty tin can (coffee can is
best, but any size will work)
Wire coat hanger, other wire
or heavy twine
Candle (at least 1” shorter
than the can)
Utensils:
Colored marker or crayon
Newspaper or towel
Nails
Hammer
Wire-cutting tool or scissors
Remove any labels from can and wash
thoroughly. Using a colored marker or crayon, draw a punch-hole pattern on
the can. Make a traditional design or invent your own.
Fill
the can with water and put in the freezer until the water is solid ice (one or
two days, depending on the size). The ice will keep the can from collapsing
when you make the holes. (In all my years of making Tin Can Lanterns, I
never heard this trick – Wow how easy to eliminate a problem!! Commissioner
Dave)
Remove
the can from the freezer and place on several layers of newspaper or a folded
towel. Using a hammer and nail, hammer holes in the tin can following the
pattern you have drawn. You can vary the size of the holes by using
different-sized nails. Make holes for the handle at opposite sides of the can
rim. When all the holes have been punched, invert the can to remove the ice.
Use
wire cutters or scissors to cut a length of wire or twine and attach across
the can for a handle. (If using twine, be sure to lay it over to one side
when the candle is lit.)
Drip
wax from the candle into the bottom of the lantern and stand the candle in it,
holding until set.
NOTE:
Use EXTREME CAUTION when candles are lit.
Have a water source nearby,
Cowboy Chaps
Slide
Heart of America Council
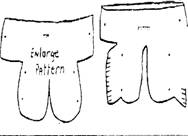
Material – small piece of suede, vinyl, leather or leatherette that
looks like what chaps were made of in the Old West
Trace both top and bottom of
pattern on material, cut out. Fasten top section to bottom by folding end
pieces (tabs) into the circle. Then secure with brad to form Ring. (indicated
by dot on pattern) Fasten top of chaps to bottom with Four brads where
indicated by dots. Fringe edges of chaps.
Or to make it easier -
I think I would cut out the top pattern with the tabs a little longer and glue
it to a piece of PVC pipe for the slide.
Burnt Match Necklace
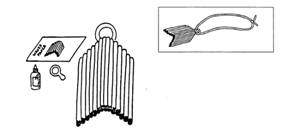 Heart
of America Council
Heart
of America Council
Materials:
Burnt
kitchen matches
Glue
Waxed
Paper
Ring
Cord or
Leather thong
-
Burn matches in advance. Light and blow out
immediately, so just tips are burnt. Wipe off black residue on tips.
-
Boys work on waxed paper when gluing matchers
together.
-
Arrange matches as shown and glue together
with white glue. Let dry thoroughly.
-
Glue ring on back, at top.
-
When glue is dry, add cord or leather thong
through ring and tie around neck.
Covered Wagon Model
Santa Clara
County Council
(Adapted from FamilyCrafts.com)
Here’s a model of a covered wagon that you can make from materials found
around the house.
Supplies:
·
1 empty pint size milk carton
·
Construction paper
·
4 bottle caps, or lids from milk jugs (Pogs)
·
Glue or tape
·
Markers or paint
Directions:
1.
Cut the milk carton in half as shown by the dotted
lines below. Keep the bottom half with the top point, and paint it brown
(adding a little glue to the paint will help your paint adhere to the milk
carton better). Set it aside to dry.
2.
Paint the 4 bottle or milk caps black or brown to
make the wheels for the wagon. You can also cut small circles from black or
brown construction paper and glue them to the outside of the caps. As a
substitute for the bottle or milk caps, try to find some big buttons, or
anything else that is small and round.
3.
Cut a piece of white construction paper about 8” x
5”. Glue or tape it over the opening you cut in the milk carton to make the
cover for your wagon.
4.
Glue the wheels into place. (This is the tricky
part, so be patient) If you are using the bottle or milk caps they will be
heavy and you will have to work to find a good position to lay your wagon
until the wheels dry. You will want most of each wheel attached to the wagon
body with very little hanging over the bottom edge. If you want, glue on the
wheels for one side at a time and let it dry lying on the side.
You can get a toy plastic horse for your covered
wagon. Attach the horse to your covered wagon with string.