January 2006 Cub Scout Roundtable Issue |
Volume 13, Issue 6
February 2007 Theme |
Theme: Aloha, Cub Scouts
Webelos:
Scholar & Engiineer
Tiger Cub Activities |
PACK AND DEN ACTIVITIES
Advancement Opportunities
Carol Little, CS RT Commissioner
American Elm District, Black Swamp Area Counicil
Tigers -Ach 1G, Elect. 1, 2
Wolf - Ach 4F, 11D, Elect. 4D, 12E, 22B
Bear - Ach 3E, 4A, 5A, 8A, 17A, 18D, 21F, Elect. 24
Ideas for Pack Activities:
Baltimore Area Council
- Complete arrangements for Blue and Gold (a luau would be an appropriate theme)
- Have an exhibit space in a public area where Den projects can be displayed
- Observe Scout Sunday or Sabbath (with your charter organization if appropriate)
- Presentation for Family Friends of Scouting
Ideas for Den Activities:
Baltimore Area Council
- Attend the Blue and Gold as a group with your family
- Make favors, place cards and centerpieces with a Hawaiian theme for the Blue and Gold Banquet
- Make thank you notes to leave when you pick up donations to Scouting for Food. (If you do this in February, ours is in November CD)
- Do a good turn for a fellow student
- Have a uniform inspection
- On February 10, Saturn will be at its closest approach to the earth. Saturn’s rings can be seen with binocular
Learn to Speak Hawaiian
Hawaiian Language Hints
San Gabriel Valley-Long Beach Area-Laguna Hills Councils
Five vowels a,e,i,o and u and seven consonants h,k,l,m,n,p, and w make up the entire Hawaiian alphabet. In the Hawaiian language a consonant is always followed by a vowel which also means all Hawaiian words end in a vowel.
Names and words are more easily pronounced when they are broken down into single syllable chunks. Take the name of Hawaii’s state fish, humuhumunukunukuapua’a, and pronounce it hu-mu-hu-mu-nu-ku-nu-ku-a-pu-a-a. Phonetically pronounced who-moo-who-moo-new-coo-new-coo-ah-poo-ah-ah.
Sometimes the letter W is pronounced the same as V as in the traditional pronunciation of Hawai'i which is phonetically pronounced huh-vi-ee rather than huh-why-ee.
Stressed vowels Unstressed vowels
a - ah, as in car: aloha a - a, as in about: ali`i
e - a, as in may: nene e - eh, as in met: kane
i - ee, as in bee: honi
o - oh, as in so: mahalo
u - oo, as in spoon: kapu
In the Hawaiian language a symbol directly over a vowel called a kahakô indicates that the vowel sound is to be elongated. A apostrophe like symbol called an `okina indicates a quick pause in the word, as in "ah-ah" for the word a`a. Note: These Hawaiian vocabulary words have not been written with the use of the correct kahakô markings due to the absence of a Hawaiian Font.
A hui hou kakou Until we meet again
Aloha kakahiaka Good morning
Aloha `auinala Good afternooon
Aloha ahiahi Good evening
Aloha `oe Farewell to you
A`ole pilikia No problem
Hau`oli la Hanau Happy Birthday
Hau`oli Makahiki Hou Happy New Year
Kipa hou mai Come visit again
Mahalo Thank you
Mahalo nui loa Thank you very much
Mau Loa Forever
`O wai kou inoa? What is your name?
Pomaika`i Good Luck
a`a sharp jagged lava rock
ae yes
ahe breeze
ahi fire
`aina land, earth
alanui street
`aka`aka laugh
aloha is a greeting used to say hello or good bye.
Aloha can also mean love.
anuanu cold
anuenue rainbow
a'ole no
'awe backpack
hahai follow
hala kahiki pineapple
hale house, building
hana work, bay
haole foreigner, Caucasian
hau`oli happy
ho`i mai come back
hoku star
honi kiss
honu turtle
ho`omo`a cook
hu'i hu'i cool
hula Hawaiian form of communication using dance
huli turn
ihu nose
inu drink
imu underground pit oven used in luau
Numbers, days and Months
St Louis Area Council
Count to 10 in Hawaiian
1. Akahi 6. Aono
2. Alua 7. Ahiku
3. Akolu 8. Awalu
4. Aha 9. Aiwa
5. Alima 10. Umi
The Days of the Week
Sunday - Lapule (lay-poo-lay )
Monday - Po’akahi (poh ah-kah-hee)
Tuesday - Po’alua (poh ah-loo-ah)
Wednesday - Po’akolu (poh ah-ko-loo)
Thursday - Po’aha (poh ah-ha)
Friday - Po’alima (poh ah-lee-mah)
Saturday - Po ‘aono (poh ah-o-no)
The Months of the Year
January - ‘Iaunuali (ee-ya-oo new-ahlee)
February - Pepeluali (pay-pay loo-ahlee )
March - Malaki (ma-la-key)
April - ‘Apelila (ah-pe-lee-la)
May - Mei (may-ee)
June - Iune (ee-oo-ney)
July - Iulai (ee-oo-la-ee)
August - ‘Aukake (ah-oo-ka-key)
September - Kepakemapa (key-pa-key-ma-pa)
October - 'Okakopa (oh-ka-ko-pa)
November - Nowemapa (No-vay-ma-pa)
December - Kekemapa (key-key-ma-pa)
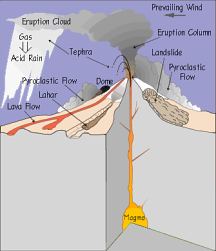
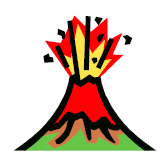
Build A Model Volcano
(parental supervision is advised)
Montanan Bureau of Mines and Geology
http://www.mbmg.mtech.edu/kids/make_a_volcano.htm
This is a very messy project—especially at the end when the volcano erupts. Wear old clothes and work on a pile of newspapers (or even better, outdoors).
In a real volcano, molten rock from deep within the Earth erupts through a volcano (the molten rock is called magma when it is within the Earth and is called lava when it comes out of a volcano). In this project, a mock volcano will erupt with a bubbly, fizzy liquid that is created by a simple chemical reaction.
This project shows what happens when an acid (vinegar) and a base (baking soda) interact. Chemically, the acid and base neutralize each other, producing carbon dioxide gas as a byproduct. The exact reaction is:
HC2H3O2 (vinegar = acetic acid) + NaHCO3 (baking soda = sodium bicarbonate) = CO2 (carbon dioxide gas) + NaC2H3O2(sodium acetate) + H2O (water)
Begin by gathering all your ingredients; you should have everything you need around the house.
What you'll need:
- Aluminum cookie sheet
- Cardboard box
- Lots of old newspaper
- Baking soda (about 3-4 tablespoons)
- Vinegar (about 1/2 cup)
- A few drops of liquid dishwashing detergent
- Small plastic bottle (like a small pop bottle)
Choose a spot to build your volcano that is okay to occupy for a couple of days because the volcano will need time to dry. You should also choose a spot that is easy to clean up—this project is messy! Your backyard would be an ideal location, if the weather is good.
Spread newspapers over your work area.
Use a large piece of cardboard as a platform for your volcano. A large tray or cookie sheet with sides all the way around will help contain your volcanic eruption. Cut the cardboard to fit inside the tray.
Try to find a small beverage bottle, so that you can use less clay to model your volcano. A 16-oz soda bottle will require about three batches of clay. This can get quite heavy if you want to move the volcano. Some people use papier mache' for part of the volcano to make it lighter. However, if you want to keep the volcano and use it again, modeling clay is best.
Cut the neck off the bottle at a slight angle. This creates a wider opening for the lava flow, and the angle makes the volcano opening look more realistic.
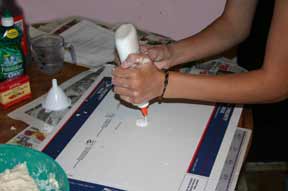 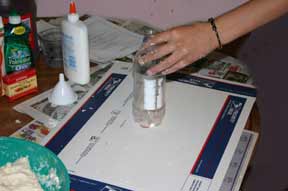
Glue the bottle to the center of the cardboard base. Let it dry for about an hour.
You may then add all of the ingredients for the first eruption except the baking soda to the bottle (vinegar, dish soap, and red dye).
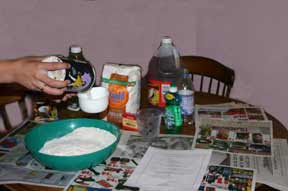 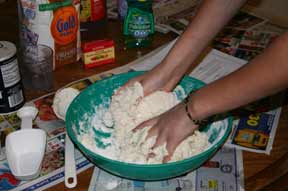
While you wait, mix your clay. Begin by mixing the flour and salt. Then add the water and mix with your hands until you have a clay-like consistency. It must be moist enough to hold together, but as dry as possible, so it doesn’t take too long to cure.
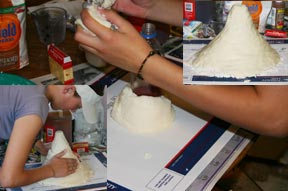 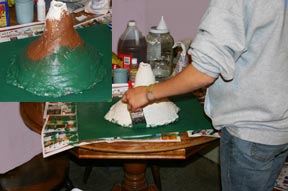
Start building your volcano from the bottom, molding the clay around the base and working toward the top. Remember, you need a wide bottom and a narrow top. When you run out of clay, let the volcano dry for awhile before mixing another batch. Sometimes if the volcano dries on the outside and the inside is still moist, the inside will expand, creating surface cracks and fissures. This is okay because that is what happens in real volcanoes. But if the interior is too moist, the weight will cause the whole thing to break away from the bottle. Volcanoes look like mountains, so lumps and bumps are good. You can also sculpt erosion gullies and lava channels after the volcano has dried for awhile.
 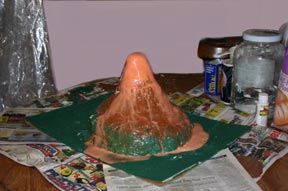
Let the volcano completely dry before you paint it. Use a base color like brown to paint the entire volcano and the base. Then paint green for trees, white for snow at the top, etc. Or you can use entirely different colors–whatever your imagination dictates. If you want texture, you can sprinkle fine sand on the wet paint. You can use small twigs and grass for trees, but remember, you are building a mountain, so individual trees would be difficult to see from your perspective.
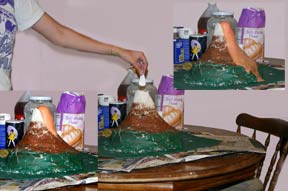
When the paint dries, you will be ready for the eruption. Place your baking soda in a small square of tissue. Gather the edges and twist them together. Drop the baking soda into the volcano, wait several seconds, and you will begin to see your eruption.
Your volcano should be very durable, so you can keep it and erupt it many times if you like. Just remember that the eruption is messy and plan accordingly.
A slightly different approach to a volcano -
Volcano
St Louis Area Council
What you need
- Old aluminum pie tin (or baking pan or paper plate)
- Lots of old newspaper
- Baking soda (about 3-4 tablespoons)
- Vinegar (about 1/2 cup)
- A few drops of liquid dishwashing detergent
- Small plastic bottle (like a small pop bottle)
- Modeling clay
- Funnel
- Measuring spoon and measuring cup
- Red food coloring
- Glitter (optional)
Instructions
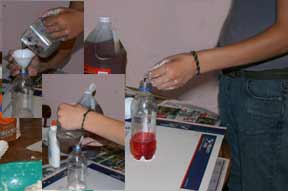
- Put the clean, empty bottle on the aluminum pie plate (or baking pan or paper plate).
- Using the modeling clay, make a volcano around the bottle. Leave the area around the top of the bottle open and don't get any clay inside the bottle.
- You can decorate the volcano with little twigs, lichens (that look like tiny trees), etc.
- Using the funnel (make sure it's dry), put 3 to 4 tablespoons of baking soda into the bottle. Then add a few drops of liquid dishwashing detergent and about a half cup of water. Optional: add a little bit of glitter (about half a teaspoon).
- Put a few drops of red food coloring into about one-half of a cup of vinegar.
- The Eruption: Using the funnel, pour the vinegar mixture into the bottle (then quickly remove the funnel).
- Your volcano will erupt immediately! When the vinegar reacts with the baking soda, carbon dioxide gas is formed and the bubbles push the "lava" out the "volcano."
- Be prepared for a mess!
Learn the Hula
San Gabriel Valley-Long Beach Area-Laguna Hills Councils
What goes perfect with music but dancing??. Here’s a link to buy a how to hula video. What a great pack activity. http://www.hawaiianmusicstore.com/videos/v68.html
Or you can read some history and use these easy instructions:
Hula Dance
Hula is the soul of Hawaii expressed in motion. No one knows its exact origins but Hawaiians agree that the first hula was performed by a god or goddess which makes the dance a sacred ritual.
Some believe the hula was originally only danced by men, but legend and historical sources tells us both men and women danced. Hawaiian hula is unique and totally different from other Polynesian dances. Although it began as a form of worship during religious ceremonies, it gradually evolved into a form of entertainment.
HULA:
Learn How To Hula Dance
Hula is the traditional dance of the Hawaiian Islands. It was once both a religious exercise in honor of the goddess Laka and also their form of entertainment. In traditional hula, poems and stories were interpreted by highly stylized movements of the dancers arms and hands. Although the angelic dances of old Hawaii have almost disintegrated and bear little resemblance to the modern forms of hula, the modern hula also tells a story. The out spread arms of the dancer represents the swaying of the palm trees gently blown by the wind. To be able to convey the story to the audience the dancer has to coordinate the facial expression and the eye with the graceful movements of the fingers, arms, wrists, hips, knees and feet. A step-by-step method is outlined below to an easy way of learning the hula dance.
STEP 1 – Fingers, Wrists, Hands and Arms
The right arm and hand is first extended to the right of the body leveled to shoulder height. Elbow slightly bent, palms down, fingers lightly touching each other. The left hand is placed on the hip with fingers pointing downward. Remember that there are 4 counts in this Hula dance. Practice all steps and movement to the rhythm of Hawaiian Hula music to obtain the correct tempo. When dancing, the feet must be bare, do not wear sandals or shoes…
On Count 1, dip right hand fingers downwards with wrist slightly raised then bring fingers up as wrist being lowered (like ocean waves.)
On Count 2, repeat movement of fingers and wrist but this time move the forearms and hand halfway to chest.
On Count 3, again repeat fingers and wrist movement with forearm and hand further move to the center of the chest without touching the body.
On Count 4, drop right hand and place on the hip with fingers pointing downward.
Repeat the process with you left hand, arm, fingers and wrist, dropping the left hand to the hip at the count of four. Practice the movement until it becomes easy and natural for you.
STEP 2 – Feet and Knees Stand in the natural position, completely relaxed, feet about four inches apart. Bend knees slightly, raising heels an inch or two off the floor with weight of the body on balls of the feet. Never dance flat footed.
On Count 1, take one step to the right approximately eight to nine inches with the right foot, then
On Count 2 bring left foot to the side of the right without dragging the foot.
On Count 3 again move the right foot eight to nine inches to the right, bringing the left foot to the side of the right
On Count 4. Do this on reverse by taking one step to the left
On Count 1 place the right foot to the side of the left
On Count 2. Take one more step to the left
On Count 3 and on Count 4 bring right foot to the side of the left.
Now, you are back to your original position. It is important to practice these steps until it comes to you naturally without much concentration.
STEP 3 – Hips To obtain the rhythm of the hips, sway them gently.
Count 1 to the right,
Count 2 to the left,
Count 3 to the right,
Count 4 to the left.
The swaying must be done gently and never in jerky manner and must follow the rhythm of the music. The correct movement of the hips will give charm and grace to the dancer. In order to acquire the skill of the true Hula Dancer one must practice these instructions diligently.
STEP 4 – Bringing it all together
After having mastered Steps 1 to 3, you combine these steps as a continuous movement. Remember to practice with the Hawaiian music like Tiny Bubbles or Pearly Shell, available at most record outlets. When dancing, smile and be happy! To give expression one must follow the motion with the eyes. Remember to keep the shoulders as still possible as the motion of the shoulders distract from the movement of the hands, hips and feet.
Kamani Nut Hanging Basket
Baltimore Area Council
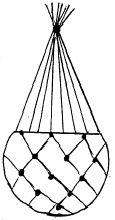
Supplies:
- Kamani Nut (Substitute a coconut shell)
- Crochet Thread
- Sand Paper
- Florist Clay or small piece of Styrofoam
- Dried flowers
Directions:
- Peel skin off kamani nut and clean with plastic knife and sand paper smooth.
- Use rough sand paper to make a hole in top of nut. As kamani nut is very fragile do not cut top off. Nut might crack.
- Cut 8 or 10 pieces of crochet threads about a 12 to 14" long.
- Grab all threads and make a knot in the center. Spread open threads.
- Tie shorter threads between as shown
- Place nut in center and gather threads up. Tie in know at top.
- Arrange dried flowers inside nut with florist clay.
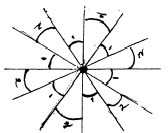
Temporary Hawaiian Warrior Tattoos
San Gabriel Valley-Long Beach Area-Laguna Hills Councils
Use black eyeliner pencils or costume make up sticks to create Hawaiian warrior tattoo designs around the upper arm or around the ankle. These tattoos are very basic using symbols, lines, and dashes. Here is a example but creativity is encouraged.
Toilet Paper Tiki's
San Gabriel Valley-Long Beach Area-Laguna Hills Councils
Supplies:
- Toilet paper roll
- Brown paint or paper for base color
- Assorted colors acrylic paint
Directions:
- Use paper mache for 3D facial features - lips, eyes and nose,
- Glue to tiki if necessary,
- Let dry and then paint as desired
Or
- Use Crayola model magic for the 3D facial features
- Glue to roll let dry,
- Then use the acrylic colored paints to paint the features
Or
Use squeeze acrylic paint for 3D facial features this will give them interesting textures but it will take some time to dry between applications otherwise there could be a big mess.
Plastic grass Skirt
San Gabriel Valley-Long Beach Area-Laguna Hills Councils
Use a plastic 54" x 108" green Table cloths cut to length. You should probably cut the clots in half (27") or thirds (18") especially for younger scouts. You could get 3 or more out of each tablecloth. Some stores run specials on table cloths for $.69 each. (Or try a Dollar Store) Keep your eyes open.
Cut strips 1/2" wide leaving a 3" at the top for a waist band.
Wrap around your Cub Scouts and tape in place. You can wrap more than one time around if you wish.
Or
You could make the same thing using newspaper but it would not be green. Don't cut the skirts too long otherwise yours scouts could trip on them. Great for that Hawaiian skit.
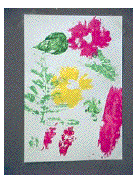
Tissue Flowers
Remember the flowers you made as child.
Kids still enjoy making them today!
I made these when I was a Cub Scout and my Mom still talks about it!! CD
Materials needed for one flower:
4 sheets of 6"X6" tissue paper (multi color),
1 pipe cleaner
- How to make a Tissue Flower:
Stack 4 pieces of tissue paper together.
- "Fan fold" the tissue paper using 1" folds.
- Fold back and forth until you have about a 1" X 6" piece.
- Cut both ends of your tissue strip to round the corners.
- Squeeze the tissue paper in the middle and
- Twist the pipe cleaner tightly to secure.
- Make a fan on both sides of the pipe cleaner.
- Gently pull up each of the four layers of tissue to make the flower petals.
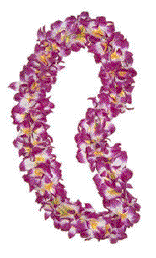
Lei Necklaces –
San Gabriel Valley-Long Beach Area-Laguna Hills Councils
Supplies:
Various colors of Crepe paper.
Directions:
- Cut your flower shapes.
- Roll each flower around a pencil then take it off this will help give it a 3 dimensional look.
- Using 3 strands of Embroidery floss and Embroidery needle. Tie your first knot at least 4 inches from the end.
- Then string a flower putting the needle through the center, place a knot before and after each flower.
- Try to space evenly.
- Continue to string flowers until lei is long enough to easily go over head and hang to lower chest.
- The lei can be as full as you like.
- Add green leaves if you like but pierce them at one end not at the middle.
- This is good for older Scouts
Read on for other directions that may suit your Scouts ages.
Or:
- If unable to find crepe paper you can use tissue paper but the body (shape) will be as good.
- You may want to make the fan fold flowers (directions above) and then string them.
- If you leave the pipe cleaners a little longer you can connect the pipe cleaners together to make your lei.
Or for younger Scouts:
You'll need:
Yarn, drinking straws and colored paper.
Directions:
- Before the party, cut 1" pieces from drinking straws and flowers from colored paper.
- Make a hole in the center of each flower using a hole punch.
- The children will bead their lei's alternating straws and flowers until it is the desired length.
- Put Tape on the end of the Yarn so that the flowers and straws don’t fall off during beading
Here’s another approach -
Paper Lei Making
St Louis Area Council
You will need:
- string 36"-40" in length
- paper
- scissors
- hole punch (if none just use scissors)
Fillers:
- colored straws cut up into 2 inch lengths,
- colored dry macaroni,
- beads, or
- curled colored pipe cleaners
Directions
- Create a basic "Daisy" style flower design. Either trace your master flower or copy the flower design onto colored paper. If your lei makers will have limited time cut out the flowers and make a hole in the center of each flower.
- Assembly - thread one flower, one "filler" of your choice, one flower, etc onto the string. Leave about 2 inches on each end to tie the lei.
Lau (leaf) Printin
St Louis Area Council
What you need:
Leaves and flowers.
Paint - tempra paint for paper, acrylic paint for cloth.
Drawing paper or cloth (t-shirts!)
Instructions
- Coat the leaves and flowers with paint, using a paintbrush.
- Press the leaves and flowers lightly on the paper or cloth, paint side down.
- Let it dry.
- There, that was easy!
Sand and Seashell Candle
St Louis Area Council
What you need:
Wax block or household paraffin
(approx. ¼ lb. for each candle)
I was always able to get discarded candles from stores as they changed displays and had to get rid of old stock, but then that was what Donna’s (not my wife but a Den Leader and Asst SM) did for a job. Thank you Donna for many, many candles. Maybe you can get a source of discarded candles, too. CD
- candle wick
- seashells
- sand
- empty can (coffee can works well)
- pot (large enough for the empty can)
Instructions
- Break up the wax and put pieces in the empty can.
- Fill a small pot one third full of water; put the can in the pot and the pot on the stove over low heat. Heat until the wax just melts.
- Moisten the sand and then dig out the candle shape. (You are making the candle upside down.)
- Press seashells on the wall with the sides you want to see on the finished product against the wall.
- When the mold is finished, embed one end of the wick in the sand, making sure enough wick is in the sand.
- Adult partners carefully pour the wax into the mold. Make sure the wick is straight.
- Let the wax cool completely and then carefully remove the candle.
- Brush off as much sand as possible. A very thin coating of sand should remain on the candle surface.
Materials found in Baloo's Bugle may be used by Scouters for Scouting activities provided that Baloo's Bugle and the original contributors are cited as the source of the material.
Materials found at the U. S. Scouting Service Project, Inc. Website ©1997-2006 may be reproduced and used locally by Scouting volunteers for training purposes consistent with the programs of the Boy Scouts of America (BSA) or other Scouting and Guiding Organizations. No material found here may be used or reproduced for electronic redistribution or for commercial or other non-Scouting purposes without the express permission of the U. S. Scouting Service Project, Inc. (USSSP) or other copyright holders. USSSP is not affiliated with BSA and does not speak on behalf of BSA. Opinions expressed on these web pages are those of the web authors.
|
|