WEBELOS
Turning Your Webelos Into Boy Scouts
Baltimore Area Council
- Start early with your program for the first year boys to get all of them to Arrow of Light (A.O.L.).
- Do not wait for September to start new Webelos den into active program.
- Get together during the summer months to do some special activities. The Aquanaut can be completed right away.
- Pull the den together during the summer by doing small and simple service projects for school, church, or community.
- While doing regular programs with boys add those requirements for 'joining Boy Scouts'. Get boys into the outdoors as soon as they start the Webelos Program.
- Do as many activity pins outside as possible. Plan around a patio, yard, Garage, Park, Pool, a business or any other place.
- Have special Visitors over for den meetings to talk about specific skill activities.
- Spend sufficient time with each activity pin. Not one week, but two to four weeks.
- Try to get all the boys in the den to the Webelos badge at the same time. Make it special for them at their recognition pack meeting.
- Attend the monthly Roundtable meetings and 'Cub Leader Pow-Wow' to get activity pin ideas and help.
- Once into the program start planning ahead, up to six months, those activities you want to do. Work your program into your schedule, the seasons, the weather, the Boy Scout Troop and sudden changes. Always have a back-up plan.
- If a leader feels uncomfortable about doing an activity with the boys, get help: do not pass up the opportunity to learn
- Give boys a sample of the skills, activities, requirements that the Boy Scouts do.
- Start early to get boys ready for camping. Have a backyard Day Camp or overnighter.
- Look for Troops in your area that the boys may go to and visit. Go Camping with them. Have skills demonstrations with them.
- Take boys on meaningful tours and trips (more special than their earlier Cub outings).
- Now is the time to take boys out for hikes - in neighborhood, park, construction site, open fields.
- Know what your boys want and give them all they can take. Every Activity Pin if they so desire.
- Realize that the second year for Webelos is a short one. Know when to graduate them ahead of time.
- Plan well ahead for the Arrow of Light and get an O.A. (Order of the Arrow) ceremony or other special ceremony scheduled. Contact Troops for help.
- Be sure to fulfill all the requirements for Arrow of Light and those to get the boys started into Boy Scouts.
- Get parents involved, even more than before, so they will help carry boys into Boy Scouts.
- Visit more than one Troop in your area - early. Have parents go along. Also to get a better understanding of the Boy Scout Program.
- Having a Boy Scout Handbook to work from, refer to, show boys, get ideas from and get them prepared with is a great training aid.
- Be aware that boys are lost from the Boy Scout Program during the first year if not properly prepared.
- It is very important that boys experience camping before they join the Boy Scouts to make it more comfortable for them.
- Remember that a parent must be with a boy on campouts as Webelos, but let the boys live the experience themselves.
- Having and using a trained 'Den Chief' will add to the program and help leaders, too. The Webelos will enjoy having an older boy there.
- Use as many assistant leaders and parents as possible to help with any and all hands-on skills activities. A good safety factor, too.
- Get outside experienced help to give boys the 'Whittling Chit' Requirements and Demonstrations.
- Boys should start working towards proper uniforming for the Boy Scouts. A proper insignia placement is important.
- Having a den doodle for the boys is a good tracking and incentive tool to get them all into Boy Scouts.
- Work with the Webelos at the beginning of their second year, a little at a time, so that they know the Boy Scout Joining Requirements.
- Have them start working towards the Boy Scout Tenderfoot physical fitness requirements. This is the hardest requirement to fulfill.
- Get boys started in making out duty rosters and menus for campouts soon. They will have to do these on their own as Boy Scouts.
- Get all of your boys to Webelos Summer Camp after their first year. This will be their best Outdoor experience as a Webelos den.
- Games, Skits, Songs, Stories, Competition with each other and a den flag are very important parts of the Webelos Program.
- Letting the boys pick a patrol name, with a patch, instead of a den number will bring the boys closer to the Boy Scout Program.
- The most important part of the Webelos Program is having well trained leaders to pass on all those new skills to the
Keys to Cub Scouts continuing in Boy Scouts
Baltimore Area Council
- Visit troop before moving up from cub scouts
- Having friends in the Boy Scout troop
- Going to summer camp the first summer as a boy scout
FITNESS
PHYSICAL SKILLS GROUP
Baltimore Area Council
Your body is a wonderful machine. It is much more complicated than the fanciest car or fastest computer. But your body needs the same kind of care that experts give to machines. What does that mean? It means that you must give your body the right fuels in a balanced diet. You must avoid putting harmful substances into it. Your body needs rest and exercise, just as a car needs maintenance. As you earn the Fitness activity badge, you will learn how to take care of the world's most wonderful machine - your own body.
Den Activities
- Invite the grade school gym teacher to your meeting. Get to know them on a personal basis. Why did they become a teacher? What kind of background do they have? What sports are they currently active in? What do they like about teaching kids?
- Invite a nurse, doctor or dentist to your den to answer questions about health. Have boys write the questions on cards so they are anonymous.
- Have your den write a skit depicting ways to say ‘NO’ to drugs & smoking.
- Have the den make a poster designed to encourage people to say "NO" to drugs & Smoking.
- Have a police officer involved with drug prevention attend a den meeting.
- Have the boys interview him and ask questions concerning drugs and alcohol.
- Have the boys find out what the policies are in their school about drugs and what would happen to students with drugs in their lockers, etc.
- Collect newspaper and magazine articles about accidents and crimes that are drug or alcohol related.
- Find out what some organizations are doing to stop use and availability of drugs, especially to, children.
- Check with the BSA council for a video, "Drugs: A Deadly Game."
Speakers –
- YMCA director
- heath class teacher
- personal trainer or coach,
- CPR instructor,
- marathon or race director,
- little league coach,
- gym instructor
Field Trips:
- Visit the local YMCA.
- Visit a local fitness club.
Test Your Heartbeat
Did you know that you can’t actually hear a heartbeat? The heartbeat itself is just a contraction of muscle and is perfectly quiet. What you can hear is the sound of heart valves snapping shut.
Here’s how to check your heartbeat:
1. Press the first two fingers of one hand over the radial artery in the wrist of your other hand. That’s the artery in the depression just below the base of your wrist. Move your fingers until you can feel the pulse of your blood.
2. Use a watch with a second hand, and count the number of beats in 10 seconds.
3. Multiply by 6. Now you know the number of beats per minute.
4. Run or exercise for 10 minutes or so. Take your pulse again, and see how much faster your heart is pumping.
Your resting heart rate can tell something about your overall health and fitness.
Physically fit people often have low resting heart rates.
Southern NJ Council
The material for this badge is organized somewhat differently.
Facts On Cigarette Smoking
- Cigarette smoking is addictive. It fulfills these three criteria:
- Smokers develop a tolerance to nicotine (they need to smoke more and more for an effect.)
- Smokers become dependent on it (they need it to feel comfortable.)
- Smokers suffer withdrawal symptoms (physical and psychological discomfort) when they try to stop smoking.
- There are hundreds of chemicals in cigarette smoke. Three of the most damaging ones are:
- Tars - damage delicate lung tissue and are considered the main cancer causing agent in cigarette smoke.
- Nicotine - a poison found only in tobacco leaves. One drop of pure nicotine can be fatal to humans. It is a powerful stimulant to the brain and central nervous system that “hits” the brain within four seconds. But then it has a depressant effect on the cardiovascular system. It narrows the blood vessels cutting down the flow of blood and oxygen throughout your body. The heart has to pump harder, thus increasing the chance of heart disease. It raises the blood pressure and narrows air passages in the lungs, depriving the body of some oxygen.
- Carbon Monoxide - replaces needed oxygen in your red blood cells. Even after one stops smoking, carbon monoxide stays in the bloodstream for days depriving the body of oxygen until the oxygen level in the blood returns to normal. Carbon monoxide is a product of cigarette smoking and also of gasoline engines.
- Some of the diseases caused by cigarette smoking are:
- Chronic Bronchitis - an inflammation of the bronchi which are the breathing tubes in the lungs.
- Laryngitis - an inflammation of the throat
- Emphysema - a degenerative lung disease that destroys breathing capacity.
- It is a contributing factor in cancer of the lungs, mouth and esophagus.
Activities That Will Help The Boys Understand The Harmful Effects Of Cigarette Smoking
- Define ‘pollution.” (“Pol-lu-tion: to make unclean, impure, or corrupt; desecrate; defile; contaminate; dirty.” Webster’s New World Dictionary of the American. Language)
- Discuss pollutants in the air in the outside environment. Use pictures from magazines or newspapers. Include: factory smoke, car exhausts, rocket launches, smoke from someone else’s burning cigarette and so on.
- Explain how all living things need air to breathe.
- Put a plant under an airtight container. What begins to happen?
- Put ants or other insects in an airtight jar. Give them everything else the need to survive. What happens? Why? (When the ants’ activity begins to decrease, open the jar and set them free.)
- Talk about the fact that smoking cigarettes is harmful to our health and how it “pollutes” the internal environment of our body (the lungs).
- Blow smoke from a cigarette through a tissue. What did you observe? Wouldn’t that also make your lungs “dirty?”
- Hold your breath and have someone check the time. Did you have to breathe very soon after you started holding your breath?
Demonstrate the effects of sick or injured lungs:
- Light a candle. Ask a boy to stand a reasonable distance from the candle. Instruct the boy to take a deep breath, and then blow out the candle.
- Relight the candle. Ask the boy to stand at the same distance from the candle. Instruct him to take a deep breath and blow out at least half of the breath before attempting to blow out the candle. With the breath that is left, ask the boy to blow out the candle. What happened?
Prescription Drugs
Ask the boys to define “drugs - (any substance, liquid, powder, or solid taken by mouth, inhaled, injected, or rubbed into the skin, that affects the way the body or the mind naturally works.)
Define “prescription drugs” - (medicines that, legally, can be purchased only on the order of a doctor or a dentist, a) for specific reasons, b) for a specific person, and c) prepared by a specially trained person called a pharmacist.)
Have the boys talk about the last time they went to the doctor or dentist and were given medicine. What was the problem? What medicine was given? Did it make them feel better?
Bring in empty, clean bottles that once contained prescription medicines. Choose something appropriate, e.g. an antibiotic from a recent illness, prescription vitamins or fluoride tablets
Note:
- the label,
- the name of the one particular person,
- the name of the medicine,
- the amount and the time to be given,
- the name of the doctor, the date
- the prescription number,
- the number of refills, if needed, and
- the pharmacy name, address and phone number.
Discuss some of the considerations the doctor must make before he can order your medication:
- age,
- weight,
- general health of the person, and
- severity of the condition.
A drug may affect different people in die different ways! Have the boys make reports on the discovery of drugs/medicines that have helped mankind. (Ex. measles vaccine, polio vaccine, penicillin, and so forth.)
Stress that medicine may be taken only under the supervision of a parent, physician, nurse, or specifically designated adult.
Have the boys list safety rules to be followed when taking medicine. Put these on a large poster to be displayed at the Pack Meeting.
Be sure they include the following rules:
- Take medicine as directed. -
- Finish the entire prescription.
- Discard any unused medicines.
- Never share your medicines with anyone else.
- Keep medicine in a safe place, out of the reach of children.
- Keep medicines in their original container.
- Do not take several medicines at the same time unless the doctor is aware of all of them.
- Mixing drugs and alcohol can be fatal.
- Never describe medicine as “candy.”
- Never give medicines in the dark.
- Never give medicine from an unlabeled container. When in doubt - throw it out.
Non-prescription drugs
Define the term “non-prescription drug” (Medicines that do not require a doctor’s order or the assistance of a pharmacist. They can be found on open shelves in a drug store or supermarket.)
Take the boys to the local supermarket and have the boys make a survey of the drugs they find there. Ask them to read the labels and list:
- The name of the product.
- The condition for which it is to be used.
- Is it a liquid, tablet, capsule, cream, or spray.
- Any warnings or cautions listed on the container.
Was there more than one product that could be used for the same condition?
Locate and list 3 substances which are socially acceptable, contain a drug and can be bought in supermarkets.
- Cigarettes (tobacco contains nicotine)
- Coffee, tea, cocoa, cola (all contain caffeine)
- Beer, wine, whiskey (all contain alcohol)
Have the boys report on two TV commercials dealing with non-prescription medication (aspirin, cold preparations, etc.) In the report answer the following questions:
- Does the medicine always seem to make the people better and happier?
- Can that be true always?
- Why would the manufacturer want people to believe that?
- Are they always completely honest?
- Compare ads for brands of aspirin.
- Can they all be the best?
Facts on alcohol
- Alcohol is a drug that affects the way the body naturally functions. It is a depressant that slows the body processes.
- It is the oldest and most abused drug in the world.
- There are predictable, though varying physical effects upon everyone who drinks alcohol. (This is why the law has set a specific blood alcohol level for defining drunkenness while driving.) The brain is the control center of the body.
- The brain is the organ most affected by the presence of alcohol.
- Alcohol is a drug that depresses the central nervous system, thus reducing the activity of the brain.
- Alcohol arrives in the brain almost as soon as it is consumed.
- The bloodstream carries alcohol to the brain.
- It keeps circulating through the brain until the liver has had time to change all of the alcohol into carbon dioxide and water for release from the body.
- It affects the higher functions of the brain judgment, learning, and behavioral control. It then affects vision, coordination, and speech.
Too much alcohol in the bloodstream kills by depressing the breathing center. This means that a person who drinks too much alcohol in one day can die. This is called “acute alcohol poisoning.”
Related Activities
- Have a dietitian come talk to the den.
- Visit a dentist office.
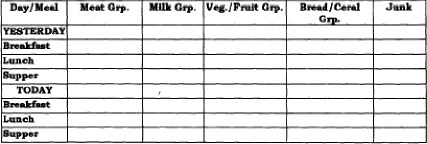
Gathering Activity:
As the Scouts arrive, ask them to complete the following table,
Filling in the names of the foods they ate that day.
Scout with most balanced chart wins (an ice cream sundae???)
Last column doesn’t count.
Physical Activities
Trees in the Wind: Gather the den around you in a circle, three feet or more between individuals. Scout stands looking at the back of the Scout next to him. They then run slowly around the circle, bending left, right, forward, and back as though swaying in the breeze. One the command, “reverse”, they turn around and run in the opposite direction.
Russian Hop: Scouts squatting, ready to move around the circle, feet together, hands folded around chest. Move around circle, leaping upward and forward off both feet. As hop is complete, Scout returns to squat position with arms folded across chest.
Tortoise and Hare: Scouts stand at attention, then they start jogging slowly in place. When you say “Hare”, the tempo doubles, knees lifting high, arms pumping vigorously. When you say “Tortoise”, the tempo slows to an easy jog. Vary the commands for some fun.
Inchworm: Scouts assume push-up position, body extended, face down, arms extended fully, hands on floor, fingers spread, pointed forward. Hold hands stationary and walk feet up as close to hands as possible. Then feet stationary, walk hands forward to starting position. Repeat the sequence.
Gorilla Walk: Scouts’ feet are spread apart, same width as their shoulders. Bend at the waist, grasp ankles, legs straight. Walk forward holding firmly to ankles. Keep legs straight. Conduct a race for speed.
Sawing Wood: Scouts pair off facing each other. Grasp hands at shoulder height, fingers interlaced. With a vigorous action, Scouts pump arms alternatively as though sawing wood.
READYMAN
COMMUNITY GROUP
Baltimore Area Council
The Boy Scout motto is “Be Prepared”. It means that the Scout is always ready in mind and body to do his duty and to face danger, if necessary, to help other people. He learns first aid. He learns how to swim safely and how to ride his bicycle without danger to himself or others. He also learns how to make his home safer and the safety rules for passengers in the car. In earning the Readyman Activity Badge, you will get a faster start on being prepared as a Scout. Many of the things you learn help you advance as a Boy Scout.
Den Activities
- Visit your local ambulance service or fire department rescue squad.
- Ask a member of the local Red Cross or emergency trauma team to visit your den and show you how to save lives by learning: Hurry cases, shock, other minor emergencies.
- Learn how to get help from the local authorities such as the police, fire department, ambulance, or hospital, contact the police department to find out how to report or summon help in these situations.
- Consult with the local fire marshal, emergency services team, or police department to find out how to plan an emergency escape route, or find where most home accidents are likely to occur.
- Invite a member of the local Red Cross or a qualified swimming instructor who is a Water safety Instructor to show your den how to have a safe and fun time at the beach or the local pool.
- Build a buddy tag board and use it on an outing that involves water sports.
- Attend a Boy Scout first-aid demo.
General Directions for Giving First Aid - American Red Cross
- Keep the injured person lying down.
- Do not give liquids to an unconscious person.
- Restart breathing with mouth-to-mouth artificial respiration.
- Control bleeding by pressing on the wound.
- Dilute swallowed poisons and call the poison Control Center.
- Keep broken bones from moving.
- Cover burns with thick layers of cloth.
- Keep heart-attack cases quiet and give cardiopulmonary resuscitation (CPR) if it is necessary and if you have been trained.
- Keep a fainting victim lying flat.
- For eye injuries, pad and bandage both eyes.
- ALWAYS CALL A DOCTOR.
Fire Prevention
Safety Comes First!
Kitchen Fire Extinguisher
Materials:
- Glass bottle
- Red and black construction paper
- Funnel (optional)
- Baking soda
- Black marker, scissors, glue
Directions:
- Wash and dry the bottle.
- Cover the outside with red paper; glue ends.
- Draw extinguisher shape on front of bottle.
- Write the words with black marker.
- Fill the jar with baking soda (the funnel helps, if you have one).
- Place next to kitchen stove.
- If there should ever be a stove fire, pour the baking soda on the flames to put them out.
Possible Kit (It’s possible that what you forgot is here.)
35 mm film canister Rubber bands
Masking tape thumb tacks
paper clips Band-Aids
piece of chalk straight pins
Book matches Fishing line and fishhook
2 safety pins 1 quarter and 1 dime
2 kitchen matches 2 stamps
1 pencil stub 1 piece of string
Directions:
- Wrap masking tape and rubber bands around the outside of the film canister and carefully put all other items into the canister.
- And it’s just possible that what you forgot is in there.
- You will survive a little longer.
Make Your Own First Aid Kit
What to Include:
For open wounds, cuts, skinned knees, and scratches
- 1 box 12 adhesive compresses
- 3 sizes sterile bandages
- 3 sterile gauze squares
- a small bottle antiseptic
For blisters
- - Adhesive compresses or gauze squares
- - narrow adhesive
For sprains
- - 1 triangular bandage
- - small scissors
For burns, sunburn
- - tube burn ointment - 5%
For splinters
- - small tweezers
- - needle
- - matches to sterilize
For fainting
- - small bottle aromatic spirits of ammonia
For bites or stings
- - small box bicarbonate of soda
For toothache
- - small bottle oil of cloves
For plant poisoning
Ideas for containers to use:
- - A cigar box, a tin cracker or candy box - paint and decorate. Put a list of what-to-do inside the lid.
- - Make a cloth case with a strap.
- - A cloth kit with pockets. Fold over the top, roll up, and tie.
Southern NJ Council
At your first meeting you will want the boys to explain what first aid is. FIRST AID is immediate help right after an injury. First aid isn’t playing doctor. It’s doing the things that must be done before expert help arrives. How will you act in an emergency? Would you know what to do? If you do, you’ll be cool and calm, because you know you can help. Your confidence will show and it will help the injured as you ease their pain and worry.
Activities:
- Ask a First Aid Merit Badge Counselor from a Scout Troop in your area to attend the meeting and explain the items in a first aid kit, or have him shoe what to do for “hurry cases.”
- Invite a Scout Troop to your meeting to show first aid for cuts and scratches, burns and scalds, and choking.
- Invite a police officer to speak on bicycle safety.
- Have a swim instructor go over the safe swim defense plan.
- Visit a fire station with an E.M.S. Unit.
- Visit a hospital E.R. or an Emergency Clinic.
- Put together a first aid kit for you Pack to take on outings.
- Stage a mock disaster involving injuries and have the boys treat the injuries. This could be done in conjunction with a Patrol from a nearby Troop. With the Scouts demonstrating more complicated skills and acting the part of the injured.
- Attend A First aid Rally in your area
- Visit the local Red Cross office and learn about how the teach First Aid
- Plan a fire escape plan for your home.
First Aid Actions
Severe Bleeding - Do not take any objects out that may have caused the bleeding and do not try to wash the wound. With one hand take a gauze pad and apply pressure with your hand. With the opposite hand wrap the wound. Continue to add pressure. If the wound continues to bleed apply pressure to an artery and seek medical attention. While doing all of the above elevate the wound above the heart to help reduce bleeding.
Stopped Breath - It is not necessary to determine if the victim has a pulse or not. In the event that the victim has a pulse, one would begin doing rescue breathing which is a process of blowing air into the lungs every 5 seconds in a effort to try to get them to breathe on their own. In the vent that the victim has no pulse one would begin CPR which is a process of blowing air into the lungs and pumping the heart at the same time. It is best that you do not give rescue breathing or CPR if you have not been trained. The best thing for you to do is seek medical attention as soon as possible. The brain can only go without oxygen for 4 - 6 minutes without damage.
Internal Poisoning - Poisons can be swallowed, inhaled, absorbed or injected into ones system. It is important that you call the Poison Control Center and get instructions on how to handle the emergency. Dial 911.
Heart Attack - Seek medical attention as soon as possible. It may be necessary to apply CPR.
Shock - Shock is a normal reaction to many emergencies and is the process of the body shutting down the normal flow of blood on a temporary basis. To treat, ask the victim to line down on their back and elevate their feet slightly. If they are conscious, get them to take some deep breaths and give them some water to sip. If they suffer from chills, offer them a blanket. If shock continues, seek medical attention.
Cuts and Scratches - Wash with clear water and bandage. Watch and treat for infection.
Burns and Scalds - Burns can be obtained by heat, chemicals, and electricity or radiation. Rinse all burns with dear water and wrap with dean and dry bandages. All burns except some first degree burns needs to have medical attention.
Choking - As long as a victim can speak, breath, or cough, encourage them to continue coughing. If the victim shows signs of troubled breathing, apply abdominal thrusts until the object is dislodged.
Things to Make
Buddy Board and Tags: One of the eight parts of the Safe Swim Defense is the use of the buddy system. In this everyone pairs off BUDDY TAGS with another person of his own swimming ability. Buddies check in and out of the swim area together.
The swim supervisor issues everyone a buddy tag so that he knows at all times that certain Scouts are paired with certain others. No one swims without a buddy tag displayed in the proper spot.

Simple badge tags make good buddy tags. So do wooden tongue depressors stuck into the ground or sand beach near the swim area. Both may be marked in pencil or waterproof marker with the swimmers name and his classification: non-swimmer, beginner, or swimmer.
Display the buddy tags by hanging them on inverted cup hooks screwed into a rectangle of plywood. Buddies hang their tags on the same hook. Have Scouts make a buddy board. Cut the wood, drill holes as show, and mark off the areas of equal dimensions. Shellac or varnish the whole works. Your Scouts may also make buddy tags for your pack.
Car Breakdown Marker

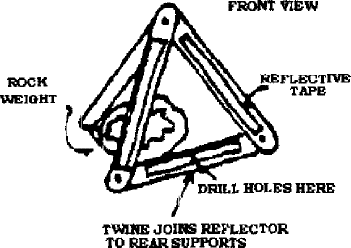
Equipment Needed:
- 5 Wooden paddles cut from 1/4” thick plywood/ wooden crate or similar
- ROCK WEIGHT
- 3 large brass paper fasteners or 1/4” x 1” threaded stock,
- long bolts with wing nuts,
- Self-adhesive reflective tape, and
- Some strong twine.
Cut paddles as shown. Cover one side of 3 paddles with reflective tape. Drill 1/4 or 3/8 inch holes as shown. In actual use, bolt or fasten the paddles together into a triangle shape as Illustrated. Fasten rear supports by tying with twine. Place the warning marker about 100’ behind the disabled car parked on the shoulder of the road. Reflective tape faces oncoming traffic. Weigh down the bottom rear support with a large rock or something similar.
GAMES
Pressure Pad Relay:
Equipment - Each boy using his own neckerchief.
One boy lies about 30 feet in front of the team with arterial bleeding” of the left wrist.
There is one judge for each victim.
On signal, the first boy from each team runs up and applies a pressure pad over the simulated would.
When correct, the judge yells “off’, the boy removes the pad and runs back to the team, tags off the next boy who repeats the operation.
Bandage Demonstration:
Equipment - As needed. One member of a den is the patient; the rest are first-aiders.
On “go” Number 1 runs to the patient and ties a head bandage and runs back;
Number 2 ties cross chest;
Number 3, thigh;
Number 4, ankle bandage;
Number 5, sling for arm; then
Numbers 6 and 7 go up and be chair carry transport for the patient back to the starting point. NO TIME ELEMENT (Note: In case of a small den, one or more boys may go up twice, until the project is completed).
What’s Wrong With Me?
Write down several different accidents or afflictions. (example: A broken legs A nose bleed, Choking, Shock, etc...) Place these in a hat and have the boys draw them out one at a time. The boy that drew will have to act out that particular problem. The first boy to identify the problem must show how to treat it, he now gets to pick and act out an accident.
Fire:
Seat Webelos Scouts in a circle with one in the center.
The one in the center calls out one of the following and points to one of the seated players: “Earth”, “Air”, “Water”, or “Fire”. (If there are more than four players, the names may be repeated.)
As he points, he begins counting slowly to 10.
The player to whom he points must answer as follows:
“Earth” must name four animals,
“Air” must name four birds or flying insects,
“Water” must name four fish or sea creatures.
If “Fire” is called, he remains silent.
If the player succeeds before the count of 10, another seated player gets a turn, and the Webelos in the center remains there.
If the player fails, he becomes the new leader and the old leader takes his place in the circle.
Douse That Fire: Each team has a pail with a candle stub in a holder on the bottom. Fill the bucket to two inches below the candle wick and light the candle. Divide the den into two teams and give each team a cp and a jar of water. On signal, the first player on each team fills his cup, runs to the bucket, and empties the water into it. He then runs back with his cup and the next player repeats the action. Continue until one team has doused its fire by filling the bucket to candlewick level. A team is disqualified if a player pours water on the candle flame.
Fire Hazard Hunt: Prepare for this game by creating some fire hazards in and around your meeting place -- matches left carelessly within reach of children; outside door blocked by a chair, oily rags in a pile in the garage; grease spilled near stove burner, newspaper piled near furnace; fireplace screen away from fireplace; frayed electric cord, etc. Ask boys to find and list on paper as many hazards as they can find. At the end of the game, check findings and explain the hazards. Urge Webelos to check their own home.
Fireman. Save My Child: Divide den into two teams. One member of each team (the “child”) sits on an old throw rug or heavy cloth about 2’ x 3’ about 15 feet from his team. Each of the other players has a four foot length of rope. On signal, the boys tie their ropes together with square knots to form a rescue rope. When all ropes are tied, a player throws the rescue to the child and the team pulls him to safety. The den that ties all knots correctly and first pulls its child to safety is the winner.
The Search For Bigfoot Game: This is a series of tests for each den leading to the discovery of Bigfoot. It can be adapted to either indoors or outdoors, but if you have a choice, make it outdoors. The object of the hunt is to complete the tests and find Bigfoot in the shortest time.
Station #1: Climbing the Mountain - Build a string trail, with the string leading high and low between tree trunks, branches, etc. The den is blindfolded and each member follows the trail by sliding one hand along the string. (If indoors, run the string from chair to table to side of the room and back again.)
Station #2: One member of the den is lost and presumably injured in the mountains. That Cub Scout is sent some distance away and left lying on the ground. The other den members must find him, apply some simple-first aid, and bring him back to the stretcher made from two poles and a blanket.
Station #3: Finding Shelter - One the way up the mountain, a fierce storm stops the den. The boy must build a shelter with a blanket and a few poles that all den members can get under.
Station #4: After the storm, the den finds Bigfoot’s footprints near the camp. (The footprints are huge cardboard cutouts of an ape’s print and lead toward a wooded area or, toward another room.)
Station #5: As the den follows the footprints, the boys see Bigfoot (a leader in a fur coat and mask) scurrying off into the woods (or other room). Start dens at four or five minute intervals. Time each start. The winning den is the one which tags Bigfoot in the shortest time.