

WEBELOS COOKING
This is the second part of a fabulous cooking section sent to me by Gary and Drucie Yerkes.
Good Cooking
Drucie and Gary Yerkes
MAKING A BOX OVEN
(Simple Model)
I have heard of many ways to make a box oven. This one is a simple, easy method which gives you a good basic oven for starters. As you become more confident with your box oven skills, you can then build your own, custom oven.
First, select a good sturdy box. A good starting box is about the size of a printing paper box or lid to a banana box. Heavy moving boxes about the same size work great. Do not start with a large box. If your box has holes in it, I like to plug with pieces of cardboard cut from another box. Tape the cardboard cutout in place with duct tape. DO NOT USE PLASTIC PACKING TAPE. Plastic tapes will melt. Plugging holes will help prevent you from putting your finger through the aluminum foil once the box is wrapped.
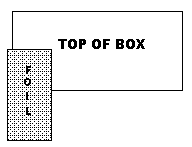
Using a heavy duty role of foil (I like the wide stuff)start covering the box, shinny side out. I usually start from the middle of the top of the box with foil about ˝ inch over the edge and work width wise first (see Figure 1) and hold foil down with tape. Work down the side and into box. Make sure that your foil lays flat and you do not puncture the foil. Mold the foil into the side and corner seams as you go. Continue wrapping until you have reached the edge of the foil. Overlap foil edge by about ˝ inch and tape.
(NOTE: Some people only foil the inside of the box. This will work but covering the entire box makes it less likely to get burnt by hot ashes or coals.).
Start your next piece of foil by overlapping the first piece by 2 inches or more based on the size foil being used. Repeat until the width of the box is completely covered.. Repeat this step running the foil the length of the box, making sure every exposed piece of cardboard is covered. If there is any cardboard exposed on the inside of the oven, it will burn. Do not use any tape on the inside of the box. Tape can be used to hold foil in place on the outside only.
Your box oven is now ready. You may want to add handles or a rack to your next box oven. But that’s for another day.
 BOX OVEN OPERATION
So, you want to work a box oven and you don’t know how. Well, sit back and read on cause by the time I’m done, you’ll be cooking up a storm.
Once you have your box oven made, you will also need the following items.
1. four empty soda cans
2. stainless steel cookie sheet (you can use Teflon or non stick but it
could get scratched because of outdoor handling).
3. charcoal (get a good brand as it burns better)
4. brick or foil wrapped block of wood about the same size
5. tongs to lift and place coals
6. hot pad mittens to lift box
7. ingredients and utensils to make whatever it is you are making
Now that you have all your stuff, let’s get cooking.
Step 1 Determine how many coals are going to be needed. The average rule of thumb is that each coal will give off about 20 degrees F of heat each. Having taken higher math in college, this tells me that if I need to bake at 350 degrees F, I need to divide 350 by 20. The answer, 17˝ is the number of coals that will be needed (be brave, use 18 coals, cutting a coal in ˝ gets messy). On really hot days and cooking in the sunlight, you may want to use one or two less, on cold days, use one or two more. It also makes sense that the larger the box, the more coals are needed. I bought one of those sit in the oven temperature gages and put it in the oven as checked the temp. this gave me a good idea on number of coals needed.
Step 2 Get coals going. Remember, BSA regulations say that NO liquid starters may be used. I like to use a charcoal chimney. Count out the number of coals needed and add a few extra. Coals need to be completely white for proper cooking. This will take about 20 minutes to happen using a charcoal chimney. While coals are starting, fill the four empty soda cans ľ full with water, sand or pebbles. These will be used as legs for your cookie sheet.
Step 3 Before the coals are ready, you should prepare whatever it is you are going to bake. So get busy.
Step 4 In the fire ring, place the four filled soda cans so that they fully support the cookie sheet at the four corners. If you want, you can add two cans on each side in the middle for more support. (NOTE: If you are baking in a casserole dish, place the casserole dish on the cans. Coals can be spread out. Coals do not have to be under the dish for the oven to bake properly).
Step 5 Once coals are ready, place coals, using tongs, in the middle of the cans. Spread the coals out so they are just touching each other.
Step 6 Place cookie sheet with whatever on top of cans. Place box oven over cookie sheet. Place brick (or foil covered block) under the front lip of the box oven. This allows air to get it for the coals.
Congratulations, you are now baking in your box oven. Wasn’t that easy? Here are some helpful hints.
Hint 1 When you lift the box to check to see how things are cooking, use your glove mittens. The box will be hot.
Hint 2 Don’t lift your box too often. This allows the heat to escape.
Hint 3 If your are going to be cooking over an extended period of time, you may need to add coals. Coals are usually good for about 1 hour of cooking. If your dish will take longer or you are doing several dishes, you should start another set of coals prior to running out so they will be ready about 45 minutes into your cook cycle. Add new coals as required. (NOTE: This is a trial and error process so the more you cook with your box oven, the better you will get at judging.)
Hint 4 If it is windy, be careful when installing and removing your box oven. Ashes may fly when hit by high winds which can be a fire hazard. The ashes may also get on your food. Try to set up your cooking area in a non windy place of try to set up a wind block so the wind does not hit the coals.
Hint 5 When selecting a cookie sheet to use, make sure that there is at least 2" between each side of the cookie sheet and the box. This will allow for proper air flow.
Materials found in Baloo's Bugle may be used by Scouters for Scouting activities provided that USSSP, Baloo's Bugle and the original contributors are cited as the source of the material.
|